Main LogoLight Logo
  • Reviews
  • Top 10
  • How To
  • Tech News
  • OS
    • Windows
    • MAC
    • iOS
    • Android
  • Categories
    • Driver Updater
    • Cyber Security
    • Games
    • Fitness
    • Entertainment
    • Tips & Tricks
Top 10 Windows
by Monil

12 Best Free Photo Slideshow Software For Windows in 2024

December 18, 2023
1

Do you feel bored looking at the same pictures over and over? Want to create an impressive cinematic photo slideshow with amazing background music and transition effects?

Well, in order to turn your coolest photos into an amazing slideshow, all you need is a photo slideshow software for Windows.

Slideshow software is an easy to use tool that can help you create amazing video slideshows using your favorite photographs, theme, and soundtrack.

Needless to say, there are hundreds of photo slideshow makers available in the market, but choosing the perfect one is an extremely difficult task. So if you don’t know how to shortlist the best one for your Windows PC, no need to worry, we’ve got your covered.

To make your task a little bit easier, we have narrowed down the list of best free photo slideshow software to top nine. Here they are!

Table of Contents hide
Best Photo Slideshow Software For Windows 2024:
1. Wondershare Filmora
2. Slideshow Maker
3. PhotoStage Slideshow Software
4. Movavi Slideshow Maker
5. CyberLink MediaShow
6. MAGIX Photostory Easy
7. Freemake Video Converter
8. Renderforest
9. Kizoa
10. Free Bolide Slideshow Creator
11. Microsoft Powerpoint
12. ThunderSoft Free Slideshow Maker
Bring Your Photos into Life with Slideshow Software

Best Photo Slideshow Software For Windows 2024:

Whether you want to create a professional presentation for business, a photo collection of family events, or just a simple slideshow with music and cool artistic effects, you can count on these best professional slideshow software any day of the month.

Now, let’s jump right into the list:
1. Wondershare Filmora

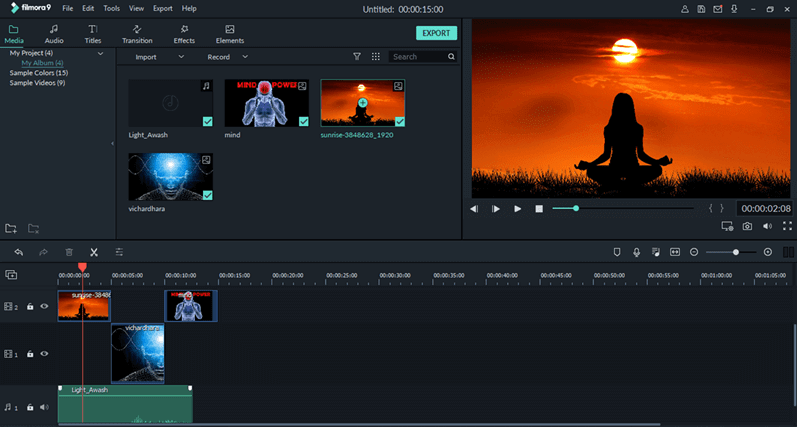
Wondershare Filmora9 - Photo Slideshow Software For Windows

Filmora9 developed by Wondershare holds first place in our list of best slideshow software for Windows. Now, you may be wondering how video editing software has managed to make its way into this list. Well, most people are not aware that Filmora9 holds strong capabilities to create slideshows using your photos.

Notable Offerings: 

  • Improves the quality of your sound with using keyframing
  • It support full 4K resolution
  • It has endless effects like green screen, slow motion, aesthetic, etc.

System Requirements:

Supported OS: Windows 10, 8.1, & 7 | Processor: Intel i5 or higher with 2Ghz+ CPU | RAM: 4 GB of RAM (8 GB recommended for videos with 4K resolutions) | GPU: NVIDIA GeForce GTX 700 series or Intel HD 5000 or Radeon R5 M230 graphic card | Hard Disk: 10GB of free space

Pros

  • Multiple features
  • Easy to use UI
  • Built-in libraries
  • Multiple filters and options’
  • Supports different formats

Cons

  • Complicated for some
  • Lack of advanced features in free version

2. Slideshow Maker
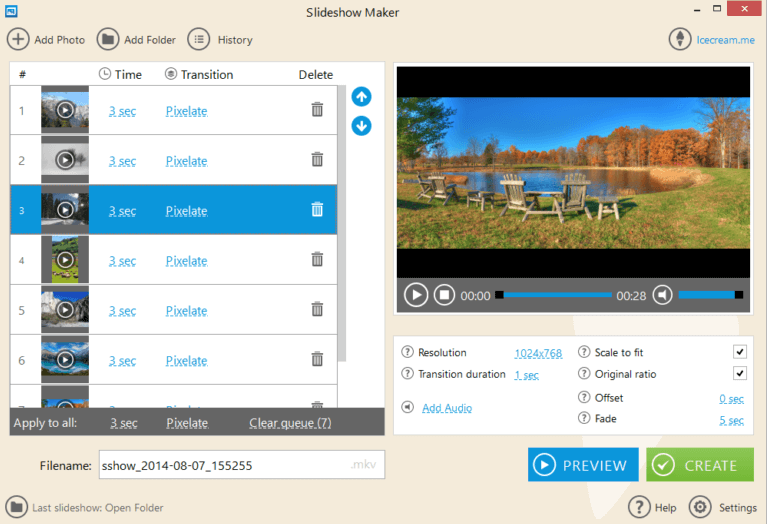
Slideshow Maker - Best Free Photo Slideshow Software

Slideshow Maker from Icecream Apps is a prominent slideshow software available for Windows. The beautiful design and easy to use, intuitive interface make this photo slideshow maker a great option for anyone looking to create video slideshows using photos.

Notable Offerings

  • Create professional looking presentations for your business
  • Wide array of  transition effects to choose from including mosaic, pixelate, & flip over
  • Displays preview of slideshow before creating
  • Make high-quality slideshows with 4K resolution (3840×2160 pixels)
  • Slideshow burner option to let you burn slideshow to DVD

System Requirements: 

Supported OS: Windows 10, 8.1, 8, 7, Vista, & XP | CPU: Intel 1.66 GHz or AMD processors | RAM: 4 GB RAM for faster performance (512MB minimum) | Hard Disk: 5GB free hard disk space

Pros

  • Attractive design
  • Freeware available
  • Preview available
  • Snappy tool
  • Lightweight

Cons

  • Lack of advanced features
  • Complex for some users

Read More: 13 Best Free Slideshow Maker Apps For Android & iOS


3. PhotoStage Slideshow Software
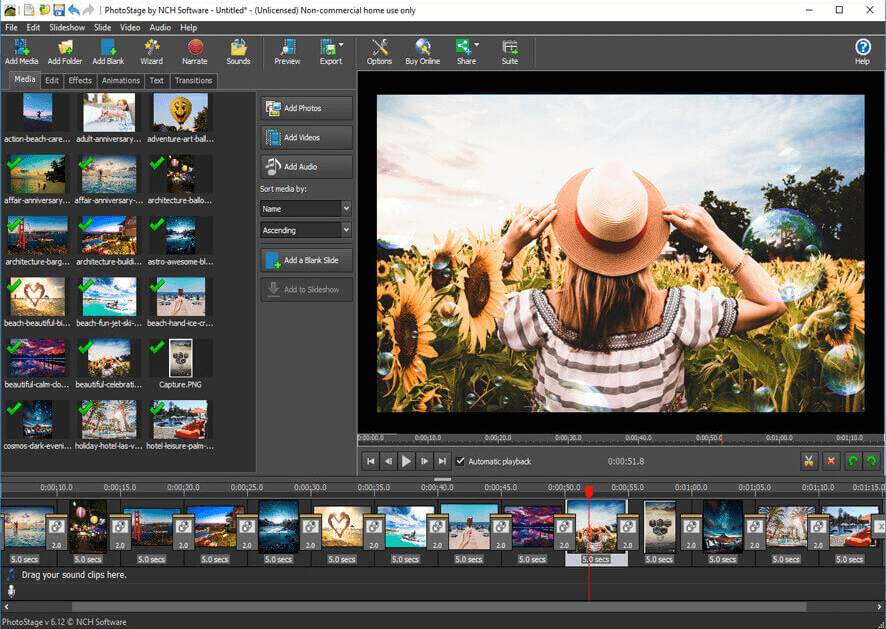
PhotoStage Slideshow Software

Creating photo slideshows and multimedia presentations has never been this easier; thanks to the awesome PhotoStage Slideshow Software. The program comes with a plethora of photo editing tools and stunning after effects that help you bring your pictures into life. Also, the interface of this program is so intuitive and easy to use that even a beginner will have no trouble using it.

It is undoubtedly one of the best free photo slideshow software for Windows available in the current marketplace.

Notable Offerings: 

  • Comprises various effects like zoom, fade, Ken Burns, etc.
  • Create multimedia presentations with captions, background music and narration
  • Upload slideshows online, burn to DVD or save to other portable devices
  • Supports popular video formats such as .MP4, .3GP, .GIF, and more

System Requirements:

Supported OS: Windows 10, 8.1, 8, 7, Vista, & XP (only 64 bit version) | RAM: 512MB | Hard Disk: 100MB (minimum) | Processor: Intel Celeron 2.10 GHz

Pros

  • Quick execution
  • Easy to use
  • Multiple output options
  • Plethora of features

Cons

  • Outdated UI
  • Lacks some basics filters

4. Movavi Slideshow Maker
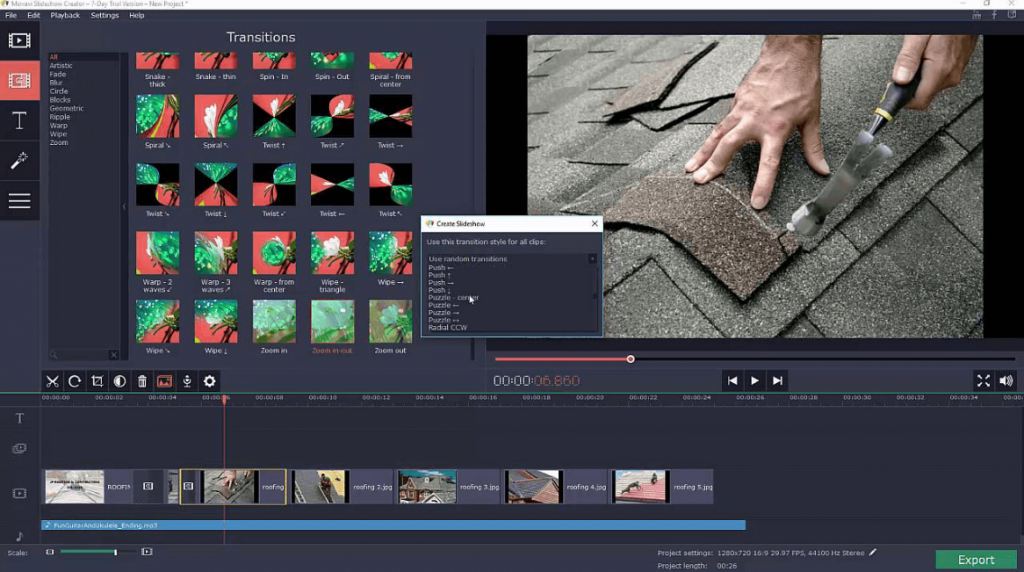
Movavi Slideshow Maker Software For Windows

One of the most remarkable tools for creating personalized slideshows with amazing music and effects is Movavi Slideshow Maker. It is a powerful yet easy to use program that lets you make your video and photo slideshows even more enticing with a wide array of customization and editing tools such as themed soundtracks, background noise removal, narration, visual effects, and more.

Notable Offerings: 

  • Amazing ‘Montage Wizard’ option to help you automatically create slideshows
  • It has built-in effects, music tracks, title styles, transitions, and more
  • Share your creative slideshows with your loved ones on YouTube
  • The program supports all popular video, audio, and image formats

System Requirements:

Supported OS: Windows 10, 8, and 7 | CPU Processor: Intel dual-core processor 1.5 GHz | GPU: Intel HD 2000, NVIDIA GeForce 8, Radeon R600 (Graphic cards should have up-to-date drivers for better gaming performance.) | Display Resolution: 1280 × 768 pixels | RAM: 2GB | Hard Disk: 750MB of free hard drive space.

Pros

  • Supports different formats
  • Multiple attractive transitions
  • Snappy performance
  • Plethora of features

Cons

  • Complicated at times
  • Complex UI

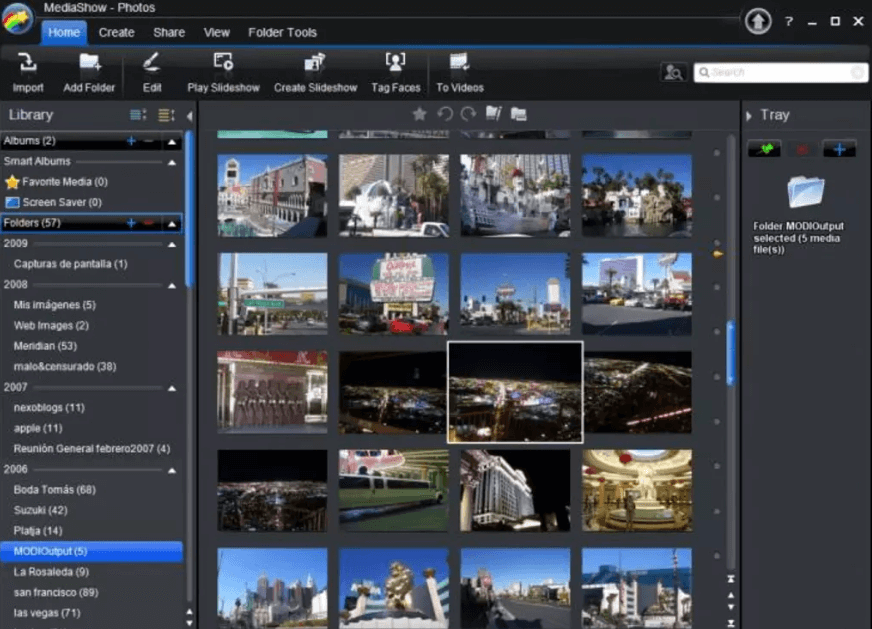
5. CyberLink MediaShow

CyberLink MediaShow - Photo Slideshow Software For Windows 2020

Anyone who wants to manage a huge collection of photos and videos virtually and enrich them with stylistic elements to look more appealing and lively should download this excellent photo slideshow tool of CyberLink.

Being one of the best slideshow software, MediaShow offers numerous photo management tools to help you create professional-looking slideshows within a few minutes.

Notable Offerings: 

  • Simple, fast, and easy to manage slideshow maker
  • Allows users to organize all photos date wise in a calendar
  • Quickly find your photo from large collection of albums using its smart instant view
  • Includes effective FaceMe option to help you tag your friends
  • Redefine your 2D or 3D photos and videos with numerous transitions and effects

System Requirements:

Supported OS: Windows 10, 8.1, 8, 7, Vista, and XP | Display Resolution: 1024 x 600 pixels | RAM: Minimum 1GB of RAM (2GB required for HD videos) | CPU: Intel Pentium 3.0 GHz | Hard Disk: 1GB to 60GB of free hard drive space | GPU: Intel 945GM Express or NVIDIA Geforce 6600 or ATI X1600 or higher

Pros

  • Creates 3D images
  • Multiple input and output formats
  • Easy to use
  • Multiple advanced features

Cons

  • Can not process RAW images

6. MAGIX Photostory Easy
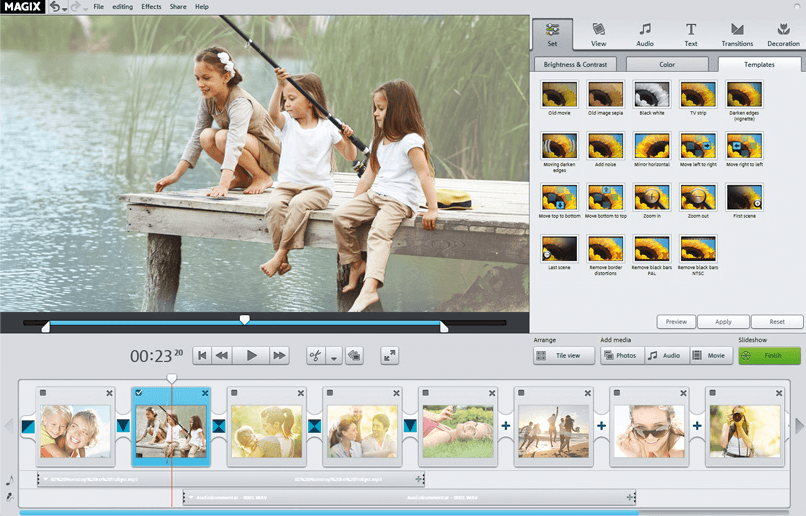
MAGIX Photostory Easy - Best Professional Slideshow Software

You can’t talk about the best free photo slideshow software for Windows without including MAGIX Photostory Easy. The program is easy to use and configure and offers lots of beautiful templates to create anniversary, vacation, birthday, and graduation slideshows with amazing background music and effects.

Notable Offerings: 

  • It comes with an unique import wizard option that lets you select your best shots directly from your smartphone
  • It has a lot of attractive animations, decorative items, and cool effects
  • It automatically removes red eyes and optimizes your photos in just a few clicks
  • It lets you upload your slideshows online (Facebook, YouTube, and Flicker) for free

System Requirements: 

Supported OS: Windows 10, 8, and 7 | RAM: 2GB | CPU Processor: 2 GHz | GPU: Onboard graphics card with up-to-date drivers and a display resolution of 1024 x 768 pixels | Hard Disk: 1GB of free hard drive space.

Pros

  • Multiple unique filters.
  • HD results
  • Playback options

Cons

  • Selects limited pictures
  • Lack of advanced features

7. Freemake Video Converter
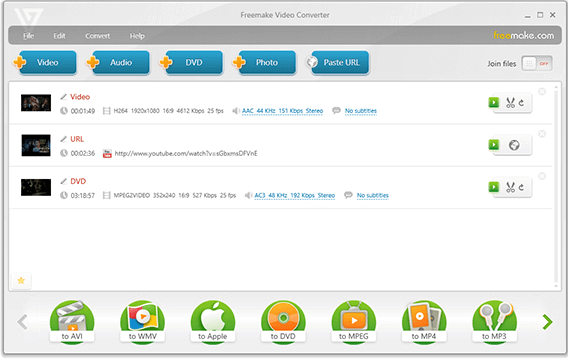
Freemake Video Converter Software For Windows

Freemake Video Converter developed by Ellora Assets has been in the business for more than a decade and still ranks among the best professional slideshow software of all time.

Though it might come next in the list of photo slideshow tools, it’s still a great option to convert video clips and make photo slideshows for free.

Notable Offerings: 

  • Fast and easy to use interface
  • It lets you burn slideshows and movies or video clip to DVD or Blu-ray
  • Supports HD, full HD, and 4K
  • It supports all popular audio, video, and image formats

System Requirements: 

Supported OS: Windows 10, 8.1, 8, 7, and Vista | CPU Processor: Intel 1 GHz or any other compatible processor | Microsoft NET Framework: 4.5 | RAM: 256MB or above | Hard Disk: 50MB of free hard drive space

Pros

  • Completely free to use
  • Supports different formats
  • Direct sharing features

Cons

  • No templates
  • No option to add text to slides

Read More: 14 Best Video Converter Software For Windows


8. Renderforest

Renderforest

Renderforest requires no space on the device to create slideshow. The software is available online and the user can make slideshows from any browser. It offers great features which can be used to create YouTube intro, explainer animation and many more. The features which only the best slideshow softwares offer.

Notable Offerings:

  1. Users have the freedom to choose templates of their own choice and can also customize the design.
  2. User friendly interface makes it easy for the user to create slideshows.
  3. Whether it’s animation, tutorial videos or slideshows, the app can create all with just a click.
  4. You can choose commercial videos/ music or can also import your own video/ music for editing in the software.

System Requirements:

As the software is available online and the user can create amazing projects from the browser. There are no specific system requirements to use the software. All you need is just a device with internet connection and a browser.

Pros

  • Multiple features
  • Easy to use
  • Straight UI

Cons

    • Variation in the paid version
    • Complicated for some users

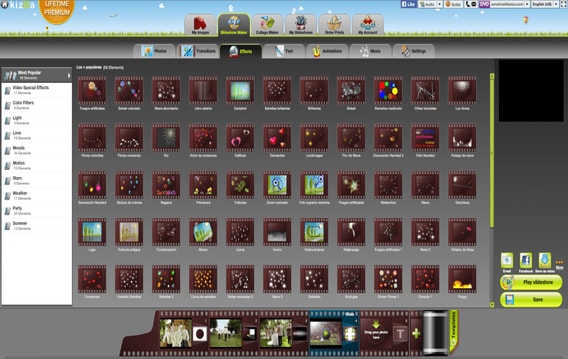
9. Kizoa

Kizoa

Kizoa Our app, Your Story, is a great app to create slideshows or videos for any project irrespective of school project or work. The app can easily make slideshows just the way you want it. The app also offers a feature which makes photo editing easy, so that the user does not have to rely on any other software to edit photos. It’s all in one offering makes it the best free slideshow software.

Notable Offerings: 

  1. By using the app users can add transition, text, effect, music and animation to the slideshow.
  2. By default the app automatically selects the transition to ease the work of the user.
  3. The project created in Kizoa can directly be exported to YouTube.
  4. The app can create a photo slideshow into a video without any hussle.

System Requirements:

Supported OS: Windows 10,8.1,8,7 & XP | RAM: 512 MB | Hard Disk: 100 MB free (Minimum)

Pros

  • Online tool
  • Free to use
  • Provides creating tips
  • Multiple templates

Cons

  • Requires account creation

10. Free Bolide Slideshow Creator
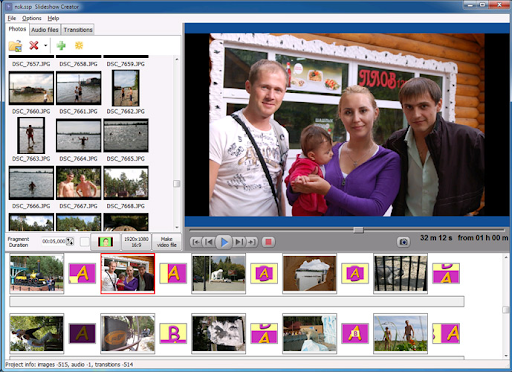
Free Bolide Slideshow Creator

Free Bolide Slideshow Creator is the another name on this list of the best free photo slideshow software for Windows. One of the best features of this software is that it does not contain any ads and hence offers a smooth performance. The tool supports a lot of different image formats. Apart from this, below are some exceptional features of Free Bolide Slideshow Creator.

Notable Offerings:

  1. The interface of the app is multilingual and supports all major languages.
  2. No output created using Free Bolide Slideshow Creator contains any watermark.
  3. The tool is quite reliable and allows you to create slideshows securely and quickly.
  4. With the help of the tool, you can directly share your outputs on different platforms like Facebook.

System Requirements:

Supported OS: Windows 11,10,8.1,8,7 & XP | RAM: 512 MB | Hard Disk: 100 MB free (Minimum)

Pros

  • Offline standalone tool
  • Completely Free for all
  • Multiple filters and options
  • Customization options

Cons

  • Lacks advanced features

11. Microsoft Powerpoint
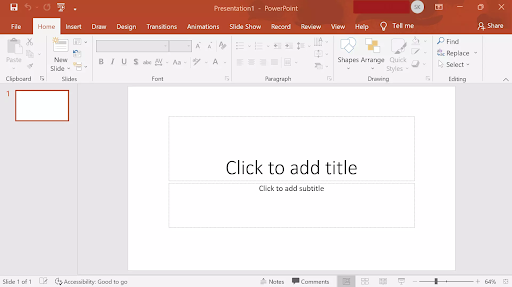
Microsoft Powerpoint


Microsoft Powerpoint is the next name on this list of the best free photo slideshow software for Windows. The tool is quite amazing and very well-known for developing presentations. With the help of this tool, you can easily create and present slideshows as well.

Notable Offerings:

  • The tool allows you to create presentations or PPTs.
  • Microsoft PowerPoint offers multiple features for amazing outputs.
  • You can use this software on any Windows device quite easily.
  • The tool allows you to add transitions and make the document more presentable.

System Requirements:

Supported OS: Windows 11,10,8.1,8,7,XP, or Lower | RAM: 512 MB | Hard Disk: 100 MB free (Minimum)

Pros

  • Works offline
  • Multiple futures
  • Smart UI

Cons

  • Better alternatives available

12. ThunderSoft Free Slideshow Maker
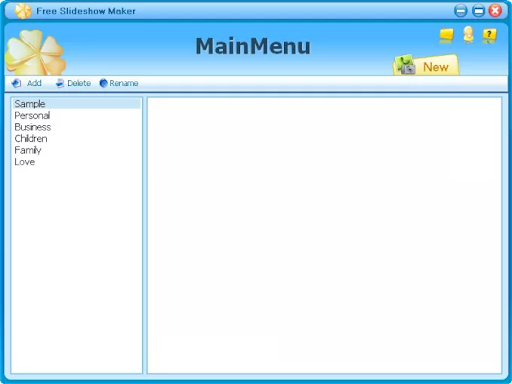
ThunderSoft Free Slideshow Maker

ThunderSoft Free Slideshow Maker is the another name that takes on this list of the best free photo slideshow software for Windows. This easy-to-use tool may boast an older interface but does not mean that it is short in performance. The tool allows you to use multiple filters and animations to make the slideshow attractive.

Notable Offerings:

  • Allows transition of images and slides as required.
  • Creates thumbnail for easy stimulation and smoother experience.
  • Takes that help of HTML5 for better results.

System Requirements:

Supported OS: Windows 11,10,8.1,8,7,XP,Vista | RAM: 256 MB | Hard Disk: 200 MB free (Minimum)

Pros

  • Fully offline
  • No ads
  • Smart filters

Cons

  • Better paid alternatives available

Bring Your Photos into Life with Slideshow Software

The simplest solution to create professional-looking slideshows with your favorite photos, music, and artistic effects is to use the best photo slideshow software.

So, now that you know how to make a slideshow of photos, download any of these aforementioned photo slideshow tools today and make your beautiful memories last forever.

Author

Monil

Monil is a professional writer whose forte is absorbing a lot of data and help large technical organizations convey their message clearly across multiple products. An engineer by qualification, his affinity for design enables him to write to inspire, energize, and influence various audiences to uncover their true potential. When not writing, Monil is likely to be found listening to music, traveling, or simply excavating into his favourite cuisines.

View all posts

Related Posts
How to Fix Windows Cannot Access The Specified Device

How to Fix Windows Cannot Access The Specified Device

May 22, 2024
0

This article explains the most suitable solutions to the path, file, or device access error on Windows.

Windows cannot access the specified device, path, or file errors typically appear when you try to open any internal document or EXE application. It may hamper your productivity and adversely affect the performance of your computer. However, you can put all your worries aside, as we are here to help.

Having struggled with this issue ourselves, we have researched thoroughly to find the best possible solutions. Before trying these fixes, it is important to know why the problem may have occurred to troubleshoot better. Hence, the next section of this article brings to light the factors that may have contributed to the error before sharing the fixes.

Why Windows Cannot Access The Specified Device, Path, or File

The following may be the reasons Windows 11/10/7 cannot access the specified path, file, or device.

  • The program you are trying to access requires administrative rights
  • Your antivirus software has blocked access to these applications or files
  • The file location is not accessible or it does not exist
  • Windows may have blocked access to these files
  • The files may have been deleted or moved to some other location
  • The file’s shortcut may be corrupted
  • The system files may be damaged or corrupted

After glancing through the causes of the error, let us begin the troubleshooting by applying the fixes given in the following section.

Windows 10 Cannot Access The Specified Device, Path, or File: The Best Fixes

Here is how you can fix the device, path, or file access problems on Windows.

Fix 1: Grant administrative rights to the program

Some programs require administrative permissions to access certain files and perform specific actions. Hence, you may take these steps to grant these permissions to the program you are trying to open to fix the Windows cannot access the specified device, path, or file problem.

  • The first step is to right-click on the application you wish to open.
  • A context menu will appear on your screen. You can now choose Run as administrator from the available options to open the application with administrative permissions.

Also Read: How to Fix System Cannot Find The File Specified in Windows 10, 11


 Fix 2: Disable your antivirus temporarily

Many third-party antivirus software are known to cause issues, such as Windows cannot access the specified device, path, or file. Hence, disabling the antivirus temporarily can solve your problem. Here is the step-by-step procedure to do this.

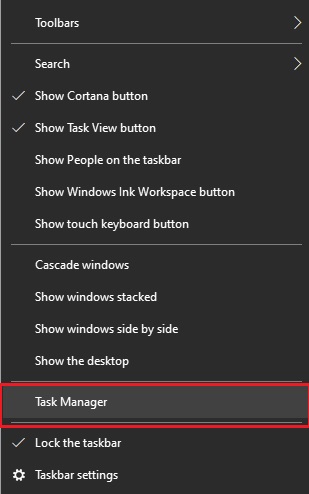
  • Firstly, you are required to access the Task Manager on your computer. You can access it by right-clicking on the taskbar and then selecting it from the menu that appears.Task Manager
  • After opening the Task Manager, navigate to the Startup tab and select your antivirus software.
  • Click on the Disable button to deactivate the antivirus software.
  • Lastly, exit the Task Manager and reboot your computer to complete the process.

Fix 3: Check the file or folder permissions

Improper file or folder permissions may be another reason you may get access errors. Hence, you can correct the permissions by following the below steps to solve the problem.

  • Firstly, select the desired file and then right-click on it to get a context menu.
  • Secondly, select Properties from the options that appear on your screen.
  • You can now click on the Security tab and choose the Edit option under the group or user name.
  • In the last step, check the SYSTEM permissions under the Allow section of the popup window.

Also Read: Fixed: A Device Which Does Not Exist Was Specified Windows


Fix 4: Remake the file shortcut

The problem may be with the program shortcut if you experience that Windows cannot access the specified path when running the shortcut. Hence, recreating the software shortcut can fix the problem. Here are the detailed steps to do this.

  • Firstly, click a blank desktop space and select New from the context menu.
  • Secondly, select the Shortcut option from the New menu.
  • Next, you can click on the Browse button and then select the file you wish to edit or open.
  • Type a name for this shortcut and click Finish to complete the process.

Fix 5: Perform file path verification

The file path may be inaccessible, leading to the “Windows cannot access specified device, path, or file” error. Hence, you can verify the file path and ensure it points to a valid location to fix the issue. Here is how to do this.

  • In the first step, you are required to right-click on the problematic file or folder and choose Properties from the context menu.
  • Next, navigate to the General tab in the Properties window to view the location information.
  • You can now check the file location.
  • In this step, use your mouse to select the area and then right-click on the selected text.
  • Next, choose Copy from the context menu that appears on your screen.
  • You can now open the File Explorer from the taskbar.
  • Next, use the Ctrl+P hotkey to click on the header and insert the file location you copied previously.
  • You can now press Enter to access the file location.
  • Lastly, ensure it is where the desired file is present.

Fix 6: Try unblocking the file or folder

Windows may perceive your file or folder as harmful and prevent its access. The file/folder properties contain a “This file came from another computer and might be blocked to help protect this computer” note if Windows has blocked the file or folder. Hence, you can take these steps to unblock it.

  • Firstly, right-click on the blocked file/folder and choose Properties from the available options.
  • You can now navigate to the General tab and choose the Unblock option.
  • Lastly, click OK to unblock the desired file or folder.

Fix 7: Run an SFC scan to check the system files

Corrupted or damaged system files can be another reason for the error you are trying to resolve. Hence, you can perform an SFC scan to check and fix the system files by following the below steps.

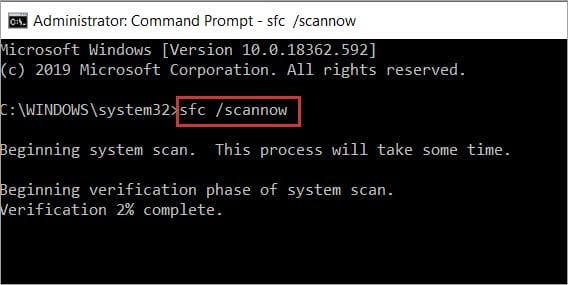
  • The first is opening Command Prompt as an administrator. You can open it by searching for cmd using the Windows search utility and then choosing to run the Command Prompt as an administrator.
  • After opening the Elevated Command Prompt, input sfc /scannow in the command line and press Enter. Command Prompt Open and Then Enter SFC-Scannow Command and Again Hit Enter
  • Next, wait for the scan and repair process to complete.
  • Lastly, reboot your computer to complete the process.

Also Read: Best Uninstaller Software For Windows 10, 11


Wrapping Up

You can solve the problem by applying the above solutions if Windows 7/Windows 10/Windows 11 cannot access the specified device, path, or file. One of these fixes will surely work to drive the issue away from your computer. However, you can leave a reply using the comments section below if you have any questions or concerns about this article.

How to Update and Reinstall Keyboard Drivers on Windows 10

How to Update and Reinstall Keyboard Drivers on Windows 10

April 28, 2023
5

Does your Keyboard not working perfectly? Then, it is happening so due to the outdated Keyboard driver. So, try out the below-mentioned methods to update Keyboard driver. 

Undoubtedly, Keyboard is the utmost crucial part of our system. But, do you ever wonder what if, when it lags in doing the work that it is supposed to do. Of course, you’ll be depressed to no end. Isn’t so? And, even it is an irony too that you can’t use your system without the Mouse and Keyboard. So, now think about how you can keep your Keyboard always on board. Well, if you are new to this, then we explain to you how you can do so. Drivers are the heart of the device that establishes an effective connection between the device and the operating system of your Windows. 

Hence, by updating the Keyboard drivers you can keep your Keyboard stable for long ages. But, many individuals have reported that after updating the drivers still the issue isn’t fixed. If you are one of them, then we advise you to first uninstall the drivers and then reinstall it again.

To do so within the least time and effort, you can use a powerful updater tool, such as Win Riser by the maker of Bit Driver Updater. This program performs automatic driver updates in a single mouse click, thereby eliminating the need to manually search for the correct drivers yourself. Win Riser includes many more features to keep your PC performance smooth.

Windows Download Button

Our aim behind this write-up is to explain to you how to update keyboard driver on Windows 10. But, before reinstalling the Keyboard drivers try simple hacks in order to fix the issue. Below, we’ve shared them. Without more baffling, let’s jump to the next section!

Simple Tips To Fix the Issues Before Reinstalling the Keyboard Driver

Sometimes, simple solutions can also fix the biggest issues. So, here are a few easy tips that you can use before reinstalling the keyboard driver, in order to fix the keyboard issues.

Tip 1: Inspect the Keyboard for Damages 

Currently, we are working from home, right so we have gone into our comfort zone. Isn’t it the same as you do? And, many users have the habit of taking coffee or some snacks while working. But, what if, when unknowingly it spills on your Keyboard. Obviously, your Keyboard gets damaged and stops working. That is what we want to explain to you that ensures your Keyboard may not be damaged. If it is then repair the damages as soon as possible. If, after repairing it still doesn’t work as it used to, then replace it with another or new one. 


Tip 2: Make Sure Keyboard is Connected Correctly 

The next tip is that you must have to pay proper attention and which is to make sure that Keyboard may be adequately connected to your system. If it is not connected accurately, then it lags to load the drivers. Plus, check the USB ports too, if there is any fault in them, and change it instantly. Those who are using the wireless keyboards, change the batteries frequently to ensure the accurate working of the Keyboard. 


Tip 3: Run Windows Troubleshooter 

Windows comes up with the in-built apparatus i.e., Windows Troubleshooter that detects the issues and fixed them too. Moreover, it boosts the performance level of your system too by resolving the issues that hamper the effectiveness. In order to fix the issues, you can run the Windows Troubleshooter. We’ve listed down the steps below for the very same!

Step 1:- Type Troubleshooting in the search bar of your Windows.

Step 2:- Then, click on the best match from search results.

Step 3:- After this, from the left-pane side click on the View All option. 

Step 4:- Now, a list will show up on the screen then, locate Hardware and Devices from the list and click on it.

Next, to finish the troubleshooting process follow the on-screen results.  

Read More: Fix Laptop Keyboard Not Working on Windows 10


Tip 4: Look to Driver Software

Want to use the advanced Keyboard features? Then, you need to have the proprietary Keyboard driver introduced to your system. If they are not present then you can download and install it from the official website of the Keyboard manufacturer. 

So, these all are the simple tricks by which you can easily fix the Keyboard issues. If after trying above all the tricks, still the issue is not solved. Then, you need to update Keyboard drivers. Below is everything that you should know about the same. 


How to Download & Install Keyboard Driver on Windows 10

This section of our write-up explains to you how you can download Keyboard driver, when it is not present on your PC. From the official website of the manufacturer, you can do so. Steps to download & install the Keyboard driver via the official website of the manufacturer. 

Step 1:- Visit the official support page of the Keyboard manufacturer. 

Step 2:- Then, switch to the Support & Download tab.

Step 3:- Next, search for the compatible driver according to your Keyboard model. 

Step 4:- After this, download the driver file and unzip it.

Step 5:- Now to move forward, follow the on-screen steps. 

That’s it! you need to do to download & install Keyboard drivers from the official website of the manufacturer. 

Read More: Fix Mouse Double Clicks Issues On Windows 10


How to Uninstall & Reinstall Keyboard Driver on Windows 10 

Maybe, after updating the Keyboard driver still, you have to face the Keyboard related issues. Well, it might be possible because of the wrong installation Keyboard driver. In this situation, you need to reinstall the keyboard drivers. Don’t know how to do it, no worries, we’ve shared the steps to reinstall Keyboard drivers on windows 10. 

Step 1:- Press the Win and R key at a time from your Keyboard. 

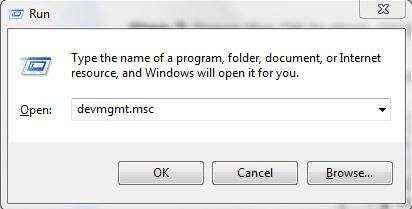
Step 2:- This will open up the Run Dialog box, then type devmgmt.msc and hit the enter key.

Type devmgmt.msc in Run Dialog Box

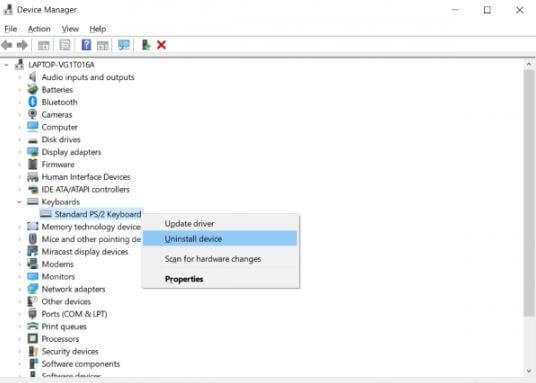
Step 3:- Now, you will land at your destination i.e., Device Manager. Locate Keyboards and expand the category.

Step 4:- Thereafter, click right on the Standard PS/2 Keyboard and choose Uninstall from the drop-down menu list. 

Click Right On Standard PS-2 Keyboard and Choose Uninstall From Drop-Down Menu

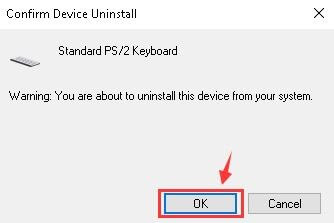
Step 5:- Then, a confirmation box asks you to make your final choice hence, click on Ok. 

Confirmation Box Asks You To Make Your Final Choice Hence Click On Ok

And, here you go, you’ve uninstalled the Keyboard driver successfully. After this, to reinstall Keyboard driver on Windows 10 do not forget to restart the PC. After doing so, still, your issues haven’t solved then you have to update your Keyboard drivers. 

Read More: Update Network Adapter Driver on Windows 10, 8, 7


How to Update Keyboard Driver on Windows 10

You may have two ways to update Keyboard drivers on Windows 10 either it is through the Windows Update or via the driver updater tool. We understand that updating drivers is nothing but a daunting task, especially for newbies. Isn’t it? But, here we are going to explain to you how you can do so quite easily. Below, we’ve shared the steps to both of the ways. Let’s read them! 

Way 1: Check for Windows Update 

Windows operating system provides you the facility to update drivers by running Windows Updates. So, below are the steps that you are required to follow! 

Step 1:- Go to the Start icon and click on it.

Step 2:- Now, select Settings from the available options and click on it.

Step 3:- This will trigger the Windows Settings. Now, locate Windows Update & Security and click on it.

Step 4:- Thereafter, select Windows Update from the left side and then click on Check for Updates option. 

If there are new updates available then Windows will download it automatically. However, sometimes Windows Update lags in updating the drivers. That is the only reason, we advise you to use the driver updater tool which we’ve referenced below. Scroll down, and read!


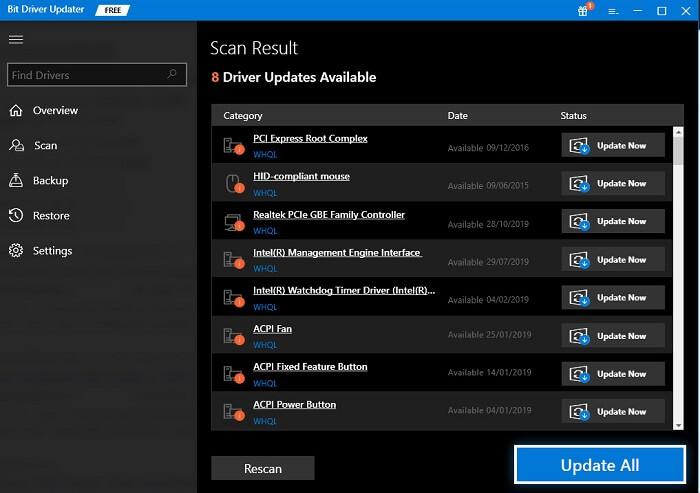
Way 2: Use Bit Driver Updater to Update Keyboard Drivers

Bit Driver Updater is an ideal driver updater tool that automatically updates the new drivers. Plus, it enhances the overall performance of the system. And, surprisingly, it allows you to update all the drivers in one click. Sounds quite-cool! String with the below steps to know how it works!

Step 1:- Launch Bit Driver Updater on your system.

Step 2:- Now, automatic scanning will start on its own. If it doesn’t start then you need to click on the Scan option on the left side.

Step 3:- After this, review the list of drivers wisely.

Step 4:- Lastly, hit the Update Now option and if you want to update all the drivers at once then click on the Update All option.
Bit Driver Updater
That’s all what you need to do to update Keyboard drivers via Bit Driver Updater. It is the most facile method to update drivers. So, download Bit Driver Updater from the given download tab below!


Windows Download Button


Bonus Tip: Roll Back Driver to its Previous Version

If updating or reinstalling driver software didn’t solve your keyboard problems, you can try restoring the previous driver version by using the rollback option that’s available within the Device Manager tool in Microsoft Windows. Here’re the detailed instructions on how to roll back the keyboard driver to its previous version in Windows 10:

  • Right-click on the Start button and click on Device Manager to launch the tool.
  • Expand the Keyboards category in Device Manager.
  • Right-click on the keyboard driver and select the ‘Properties’ option from the pop-up menu.
  • Go to the ‘Driver’ tab and click on the ‘Roll Back Driver’ button.
  • Click the OK/Yes button on the confirmation window.

Frequently Asked Questions: Keyboard Drivers on Windows

For all your queries related to the keyboard driver, we have brought together the most frequently asked questions below and answered them for your reference.

Q.1 What is a keyboard driver?

Just like the name suggests, a keyboard driver is a set of files or data that allows the keyboard to run on your system with ease. The driver defines how a device, in this case, the keyboard, will respond to your commands as a user.

Q.2 If I uninstall the keyboard driver, what will happen?

If you uninstall the keyboard driver, you may not be able to use the keyboard anymore. When you try to use the keyboard after uninstalling the driver, the system may also fail or crash.

Q.3 What is the method to fix the Windows 10 keyboard driver?

The best method to fix the keyboard driver on Windows 10/11 is to take the help of Bit Driver Updater. This is a free tool that allows you to download and install any driver, including the keyboard one, even if the driver is corrupted, faulty, damaged, outdated, or missing.

Q.4 Is a keyboard driver available?

Yes, for every keyboard, there is a specific keyboard driver available to help you. This driver will allow you to run the specific keyboard with ease.

Q.5 How can I download the keyboard driver on Windows 10 PC?

There are multiple methods to download the keyboard driver including the official manufacturer’s website, the Device Manager as well as the Bit Driver Updater. You can take the help of any of these methods to download the driver. Refer to the descriptions of the tools provided above for a detailed explanation.


Update and Reinstall Keyboard Drivers on Windows 10 [Done]

That’s all for now, expecting that now you could be able to bring back the effective performance of your Keyboard. As of now, you are familiar with the tips and hacks that you needed to know for the very same. 

If you are satisfied with our post then do subscribe to our Newsletter for more such latest tech updates. And, do share your views on this through the comment box below. We will be so happy to hear you out. We know it’s hard to say bye-bye, but don’t worry we’ll back shortly with yet another engaging but helpful article. Till then, stay tuned with us. And, Type Wisely!

1 Comment
    Smiddy says: Reply
    September 11th 2023, 7:28 am

    I conceive you have noted some very interesting details , appreciate it for the post.

Leave a Reply Cancel reply

Your email address will not be published. Required fields are marked *

Sidebar Image bit G ad1

Latest Posts

  • tpm msc access the trusted platform module (1)
    tpm.msc Command: How to Access the Trusted Platform Module (TPM) in Windows 
    by Niharika / September 12, 2026
  • sign in to hotmail in windows (1)
    How to Sign in to Hotmail in Windows 
    by Gunjita Sompura / September 11, 2026
  • How to Update Windows Security Signatures Manually 
    How to Update Windows Security Signatures Manually 
    by Niharika / September 10, 2026
  • How to Connect to Your PC Remotely on Windows 11  (1)
    How to Connect to Your PC Remotely on Windows 11 
    by Niharika / September 9, 2026
  • Best y2mate Alternatives for Download YouTube Videos
    10 Best y2mate Alternatives for Downloading YouTube Videos
    by Harshita / September 9, 2026

Categories

  • Cyber Security
  • Driver Updater
  • Entertainment
  • Fitness
  • Games
  • How To
  • laptop
  • OS
  • Reviews
  • Tech News
  • Tips & Tricks
  • Top 10
Sidebar Image bit G ad1
Best Free Text Comparison Tools 9 Best Free Text Comparison Tools in 2024 (Online & Offline)by Niharika / December 18, 2023
11 Best Free PDF Drive Alternative to Use in 2024by Devesh / December 18, 2023Best Free PDF Drive Alternative
TechPout Footer Logo

We at TechPout promise to put forth stories that help people to learn and simplify their digital life. Our purpose is to share the true essence of technology with our tech-loving community.

Useful Links

  • About Us
  • Contact us
  • Privacy Policy

Popular Posts

  • Best PC Optimizer Software
  • Best Mac Cleaner Apps
  • Best Driver Updater
  • Duplicate Photo Finder and Cleaner Software
  • Best Free Movie Download Sites
  • Best IPTV Players

Follow us

Copyright © 2026 www.techpout.com. All rights reserved
DMCA.com Protection Status