
To use Windows built in VPN, there are multiple ways you can do it on your own. But not every method is useful for everyone. Windows clearly does not use or include a VPN client, but it is not the VPN service either. But the question still arises, ‘How to set up VPN on Windows?’
And to answer that windows have a built in VPN client but not VPN service, so this is what we need to understand thoroughly. And the VPN service is mainly what we need for everything, and the provider is what runs everything and the main server.
How to Use Windows Built in VPN
To use the Windows built in VPN and for the complete you need to add some credentials, and it might work using these two methods. And before following up any of these methods to use VPN for PC, all the credentials you are going to use keep them ready and with you.
So, it will make the process easier and most importantly quick because the server is not going to provide you with any of them. But it does not support modern protocols like OpenVPN or Wire Guard and do not also rely on external VPN.
There are multiple limitations as well like you need to subscribe to some kind of third-party VPN provider and it also provides you with the tools for configuration
And here are the two methods for you to use a Windows VPN by your own:
Method 1: Windows Built-in VPN Client
This is one of the methods to use a Windows VPN client present in Windows, which is free to use as well.
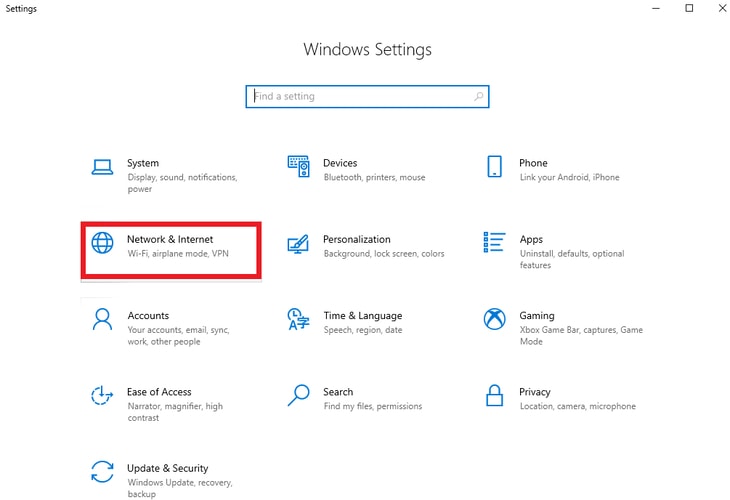
Step 1: First, you need to open the Windows settings and for that press Win + I.
Step 2: Now you need to access the VPN settings, navigate to ‘Network & Internet’ and go to the VPN tab from the lefthand menu present on the screen.
Step 3: Next, you must add a VPN connection after the configuration process starts.
Step 4: Then you need to fill out all the VPN details present on your screen.
- In the VPN provider, go to the Windows which is there already (Built-in).
- Enter the name of the VPN you are using.
- It will provide you with the Server Name or Address by whatever name of the VPN you have given to the VPN provider.
Step 5: And then you need to configure all the Windows VPN settings and select the automatic protocol in the VPN type dropdown. And if it is required, then you need to enter the type of sign-in info. You might need to enter a username, password, and certificate.
Step 6: After you finish, you need to save all the credentials you have just entered. Click on the ‘Save’ button to finalize the VPN setup.
Now you can connect whenever you want via settings or using the Taskbar.
Also know: The VPN Connection Failed Due to Unsuccessful Domain Name Resolution: Fixed
Method 2: Install the VPN on Windows
This is another method to use a Windows VPN client present in Windows, which is free to use as well.
Step 1: First of all, select any kind of VPN provider for your system.
Step 2: Install the VPN client software from any of the provider’s websites you selected before.
Step 3: Next, you need to install the VPN client and locate the recently downloaded file and start installation.
Step 4: Follow all the on-screen instructions that appear on your screen after the previous step.
Step 5: Then open the VPN client and fill up all the needed signing up details. And then connect the device to a server.
Step 6: Then with the server that is available on the screen select one and connect with your secure VPN connection.
However, Windows has a built-in VPN client but not a VPN encryption service. These two are interchangeable, but both are different halves of the working of a VPN. There is confusion between these two, and you cannot connect until you set up a profile.
You need to simply just setup a username and password to login or sign up to unlock the benefits. You even do not need to install any extra software if you have a VPN client because it is already present in the Windows operating system.
The user needs to set up the profile as per your needs and customize the profile to suit your needs. The built-in VPN does not even need any kind of additional system resources.
Frequently Asked Questions (FAQs)
Q1. How to use Windows built in VPN?
Ans. To use Windows built in VPN, you need to fill up all the credentials like username, password, and then you need to sign up or log in.
Q2. Is the Windows built in VPN free to use anyone?
Ans. The Windows built in VPN and Windows VPN client is free, and it is already a part of the Windows you are using. But the VPN services are not free of cost at all. The Windows built in VPN is free, but to create a connection, you need to have a supply server.
Q3. How can a user use a Windows built in VPN with any kind of VPN provider?
Ans. The users can only use the Windows built in VPN with the providers that support the protocol of Windows and publish the connections with all the details you need.
When the question arises, ‘How to set up VPN on Windows?’ then there are multiple ways to use a Windows built in VPN that follows all the Windows protocols manually. And this connection is more capable, free, and already installed. But there are rarely maximum privacy and less convenience that is making a VPN worth using daily.