If you are also facing the error stating “The VPN Connection Failed Due to Unsuccessful Domain Name Resolution”, then take the help of the solutions provided in this article and fix the issue easily.
VPNs are essential for organizations because they allow employees to access corporate resources from a distant location. If the virtual private network (VPN) connection fails, then workers will be unable to access these essential resources, which would result in delays and decreased productivity.
When it comes to data security, virtual private networks (VPNs) provide encrypted connections, which keeps data secure. Users who are unable to connect over a virtual private network (VPN) may choose to connect using unprotected connections, putting critical data at risk.
Additionally, the security advantages of a virtual private network (VPN) might be further compromised by damaged VPN profiles or conflicts with software developed by third parties. In order to protect data and ensure that corporate activities continue to run smoothly, it is vital to address this mistake issue. You are unable to successfully create a virtual private network (VPN) connection using Cisco because of DNS difficulties. This explanation is self-explanatory.
In most cases, if you have difficulties with the virtual private network (VPN) that your organization uses, such as an unsuccessful installation of AnyConnect, you should get in touch with your system administrator and ask for help. On the other hand, given that this problem is often brought on by incorrect configurations on the client’s end, you might attempt to resolve it by using the following options.
How to Fix The VPN Connection Failed Due to Unsuccessful Domain Issue
In the coming sections of this guide, we will throw some light on the tried and tested methods to fix the VPN Connection Failed Due to Unsuccessful Domain Name Resolution issue right away. You should try the solutions chronologically until the issue is fixed and the VPN connects perfectly.
Fix 1: Switch or Disable the Proxy
Let’s have a look at the first method to fix The VPN Connection Failed Due to Unsuccessful Domain Name Resolution error. To rapidly deactivate a local proxy server that you have previously established, pick the Proxy tab from the Settings menu. This will allow you to fix the issue with ease and run the VPN. Follow the steps below:
- To open the Run box, press the Windows key and the R key simultaneously.
- Put “ms-settings:network-proxy” into the following menu and then click the Enter key immediately thereafter.

- To enter the Proxy tab in the Settings app,
- From there, select the Manual Proxy Setup option.
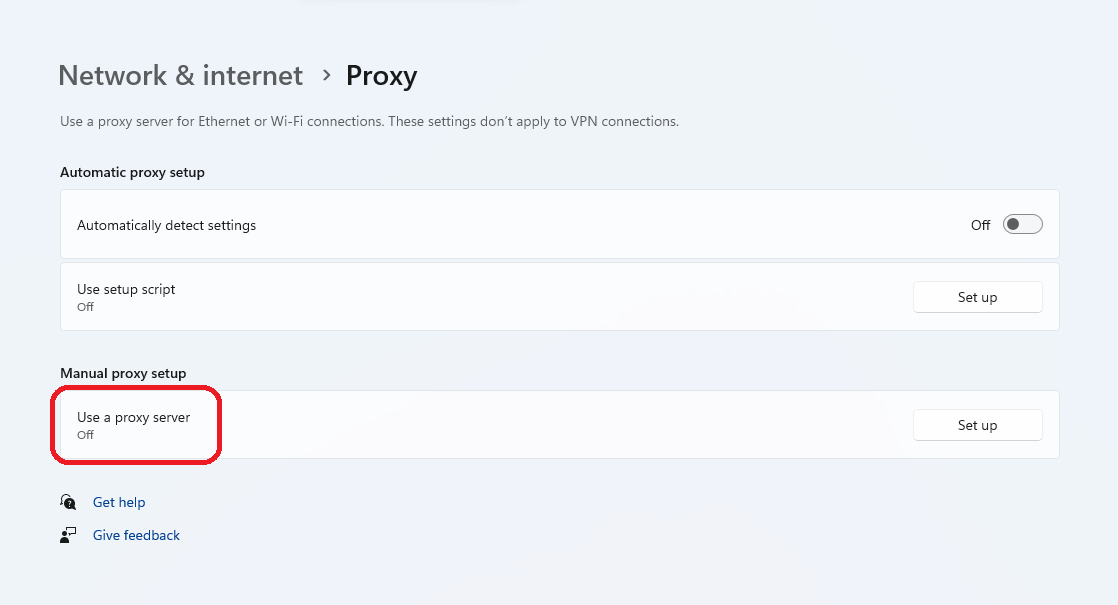
- Remove the checkmark from the box that is located on the right side of the screen and reads “Use a proxy server.”

- In order to determine whether or not the issue has been resolved, you should restart your computer after shutting off the proxy server and then attempt to connect remotely using Cisco AnyConnect once again.
If turning off the proxy does not work to fix the VPN Connection Failed Due to Unsuccessful Domain Resolution may be disabling the Antivirus will. Let’s move on.
Also Read: What is VPN Encryption and How VPN Encryption Works?
Fix 2: Disable the Firewall or Antivirus Software
Another viable method to fix The VPN Connection Failed Due to Unsuccessful Domain Name Resolution error is to disable the firewall or antivirus software that you are using. Such a tool is built for the protection and safety of your device. However, the tool can sometimes interrupt the working of the VPN tool and then result in such errors. You can visit the settings of the Firewall or antivirus software and disable the app from there.
Now, if the issue is still not fixed, you can take the help of the next solution and disable the VPN tool or switch the network to another region.
Fix 3: Switch or Disable the VPN Client
Let’s understand further how to fix The VPN Connection Failed Due to Unsuccessful Domain Name Resolution error. How to stop a virtual private network (VPN) service on a Windows PC is determined by whether the VPN service was installed by Windows itself or by external software.
If you are using a standalone application, you will need to go to the VPN interface in order to disconnect from a virtual private network (VPN). If, on the other hand, you customized your virtual private network (VPN) by using the built-in capability, you may deactivate it by following the steps below:
- To open the Run box, press the Windows key and the R key simultaneously.
- When you have finished entering “ms-settings:network-vpn,” hit the Enter key.

- To access your VPN connection, choose the VPN from the list on the right.
- You may prevent it from causing disruptions to connections to the outside world by selecting the Remove option from the new context menu.
Now, use the VPN as required and use it on any tool. It’s possible that The VPN Connection Failed Due to Unsuccessful Domain Resolution persists. This can happen because some other problem is causing the problem. Let’s understand how you can fix this issue in such a case.
Fix 4: Switch the VPN Network to Another Region
Another thing that you can do to prevent the following mistake is to connect to a new location using a different set of VPN HEs. This is something that you may do if you have brought yourself this far without finding a solution that is feasible. The problem will be resolved by using this approach in the event that the anyconnect.xml file gets corrupted and the way described above does not work for you.
Taking this step will result in the downloading of a new file, which will enable you to connect to the original HEs. If you are an administrator of AnyConnect and you have the ability to connect with a different group of HEs, you should do so in order to produce a new file.
Next, establish a connection with the first HEs and check to see whether the issue has been resolved. In the event that you continue to see the message “VPN connection failed due to unsuccessful domain name resolution” or if you do not possess the essential permissions to finish the operation, you should attempt the following approach instead.
Also Read: Reasons Why You Should Avoid Using a Free VPN
Fix 5: Try Repairing the anyconnect.xml File
This is an extreme solution to The VPN Connection Failed Due to Unsuccessful Domain Name Resolution error. This error can appear when the AnyConnectXML profile(s) damages. In order to fix anyconnect.xml, follow these steps:
- To enter the Run dialog box, press the Windows key and the R key simultaneously.
- The Run tool will appear after you have typed “appwiz.cpl” into the text field and then pressed the Shift, Ctrl, and Enter keys simultaneously.

- To allow administrative access, click the Yes button.
- To discover the AnyConnect installation, once you are within the applications and Features menu. Now, you should scroll down this list of apps until you find it.
- Using the context menu that just appeared, select the AnyConnect tool, & then select the Uninstall option from the selection that appears.
- When you reach the page that displays the uninstallation, you should follow the instructions that appear on the screen to finish the uninstallation. After that, you should restart your computer to delete any leftover files that were left behind.
- During the subsequent startup, visit the official website and download the most recent executable by going to Downloads and then Download Options.
- Make sure that you install a version that is compatible with the operating system from the following URL.
- Opening the EXE file with administrative privileges and following the steps shown on the screen until the tool is reinstalled is what you should do after the download is finished.
- Try to establish a remote connection to a computer by using the software that was just recently installed.
Fix 6: Modify the DNS Settings
Here’s yet another solution to fix the VPN Connection Failed Due to Unsuccessful Domain Name Resolution if the above ones didn’t work. A bespoke public DNS, such as Cloudflare, Google Public DNS, or Open DNS, is more likely to cause this error than other types of public DNS. Known to cause incompatibility issues with the vast majority of public DNS names, the built-in VPN component that Cisco AnyConnect employs is quite specialized and has a reputation for being exceedingly specific.
For the purpose of ensuring that the following issue is not being caused by a DNS-based conflict. If you would want detailed information on how to do this, please refer to the following instructions:
- In order to start a Run dialog box, press the Win key and the R key simultaneously.
- To launch the Network Connections window, type “ncpa.cpl” and then hit the Shift, Ctrl, and Enter keys simultaneously.

- To allow administrative access, click the Yes button.
- Once you are within the Network Connections menu, right-click on the network that is now active, and then choose Properties from the context menu that has just been displayed.
- Click on the Networking tab which is located inside the Properties menu of your current network. After that, scroll down until you reach the section that says “This connection uses the following items:” and then pick Internet Protocol Version 4 (TCP/IPv4). Finally, click on Properties.
- Using the Internet Protocol Version 4 (TCP/IPv4) Properties screen, go to the General tab. Ensure that the toggle for Obtain DNS server address automatically is turned on, and then click the Ok button to save the changes.

- Turn on your computer and restart it so that the adjustments may take effect.
Fix 7: Utilize a Different Virtual Private Network Tool
If you are facing The VPN Connection Failed Due to Unsuccessful Domain Name Resolution you can try some other VPN tool. If you have DNS-related problems on a frequent basis, we recommend that you switch to a different virtual private network (VPN). Keep an eye out for the best free VPN for Windows 11 that is both safe and up-to-date.
Because of this, we strongly suggest that you give one of the top free VPN tools of all time a go since it is well-known that these solutions provide excellent DNS security. Aside from providing you with highly secure DNS setups, these tools also enable you to create your own individualized DNS setup, arrange port forwarding, and do other tasks.
Also Read: How to Boost Slow VPN Speed
Fix 8: Reinstall the operating system on your computer.
You should only use this solution to fix The VPN Connection Failed Due to Unsuccessful Domain Name Resolution if you have a backup to the files present on the system. In the event that you are unable to resolve the issue in the domain name resolution, you may restore the Windows 10 OS after you back up the entire data.
When this occurs, all of the settings will be reset to their initial condition. The use of a third-party utility is another option for doing one clean installation.
The VPN Connection Failed Due to Unsuccessful Domain Name Resolution: Fixed
We hope that The VPN connection failed due to an unsuccessful domain name resolution. In order to eliminate the unknown factors that are causing the problem, you may try reinstalling your OS, updating your DNS settings, switching the VPN/region, or others as described before. To update the DNS, you can utilize the Control Panel to activate the option to obtain the DNS server address automatically. Please let us know in the comment section if you have any further helpful solutions to this problem that you would want to share with us. Also, subscribe to the newsletter to get daily updates. Follow us on Facebook, Instagram, Twitter, and other social media platforms.
![How to Download Playlist from YouTube Using IDM [Step by Step]](https://wpcontent.techpout.com/techpout/wp-content/uploads/2021/03/26160407/How-to-Download-Playlist-from-Youtube-Using-IDM-Step-by-Step.jpg)