Main LogoLight Logo
  • Reviews
  • Top 10
  • How To
  • Tech News
  • OS
    • Windows
    • MAC
    • iOS
    • Android
  • Categories
    • Driver Updater
    • Cyber Security
    • Games
    • Fitness
    • Entertainment
    • Tips & Tricks
How To
by Snigdha

8 Best Ways to Fix YouTube Black Screen Problem

May 27, 2020
1

YouTube seems to be the best place to get all the latest videos and music, but if you have come across the YouTube black screen error, then you definitely won’t be able to enjoy YouTube videos.

It usually occurs when you click on a video for watching and then the video player pops open with a black screen. Your video doesn’t play and there is no picture on YouTube. Sometimes the image doesn’t appear for a short whereas sometimes it stays like that for the entire video.

It can be frustrating but don’t worry as we are here to help you deal with this problem in smarter ways. 

Our blog will guide you through fixing the YouTube video black screen error. We have rounded up many solutions so you can try them and figure out which one would work the best for you.

Table of Contents hide
How to Fix YouTube Black Screen Problem? Try These Fixes:
Fix 1: Refresh Your Web Page
Fix 2: Verify the Internet Connection Status
A.) Check Your Internet Connectivity and Internet Usage
B.) Try a VPN Service
Fix 3: Sign Out of The Google Account You are Using to Watch YouTube
Fix 4: Clear Browsing Cache and Cookies
Fix 5: Disable the Browser Extensions
Navigate to the extension settings as per the below path and disable the ad blockers.
Fix 6: Update the Web Browser Application
Fix 7: Try Another Browser
Fix 8: Update the Graphics Card Drivers Automatically
Conclusion

How to Fix YouTube Black Screen Problem? Try These Fixes:

If your YouTube videos are appearing black, then here’s what you can do to watch your videos again.

Fix 1: Refresh Your Web Page

The simplest solution to try out once you are facing the YouTube black screen issue is to refresh your web page. You can press F5 or the reload icon on your web browser to refresh the web page. This will refresh the YouTube video as well and your video might start playing readily.

Refresh Your Web Page to Fix YouTube Black Screen Problem

You can also restart your browser by closing the application and then open the web browser again. Post this try accessing YouTube and see if the videos are playing appropriately or not.

Fix 2: Verify the Internet Connection Status

You may experience black screen YouTube videos if the network connection is not functioning correctly. There could be many scenarios that may be causing this issue and therefore you can try a number of solutions to get rid of the YouTube black screen error.

A.) Check Your Internet Connectivity and Internet Usage

First of all check your internet connection and troubleshoot issues related to outdated network drivers with the help of a driver updater tool. Also, check your WiFi router or modem for loose connections. You can restart your router and see if that fixes the problem of internet connection and also the black screen of YouTube.

Additionally, you may also disable the network connection of the programs or devices that may be interfering with your network connectivity and slowing down your network speed.

Read More: Best Ways to Speed up Your Internet Speed

B.) Try a VPN Service

If your local internet connection is giving you some kind of trouble and you are unable to view any image or video on YouTube, then you can try connecting to a VPN service which can resolve the issue for you.

We recommend using ExpressVPN and NordVPN as they are the most popular and trusted VPN providers available in the industry.

You can also manually connect to a VPN server and set up the VPN connection but if you are not proficient in it then, you can install a tool as per the above recommendations and stream your YouTube videos seamlessly and enjoy them. 

ExpressVPN is a simple tool that comes with a lot of data encryption and protection techniques. It also streams your videos at a greater speed without interruptions.

After installing the application on your computer, you can connect to a server of your choice and then access YouTube to watch your videos peacefully.

Fix 3: Sign Out of The Google Account You are Using to Watch YouTube

Sign Out of The Google Account You are Using to Watch YouTube

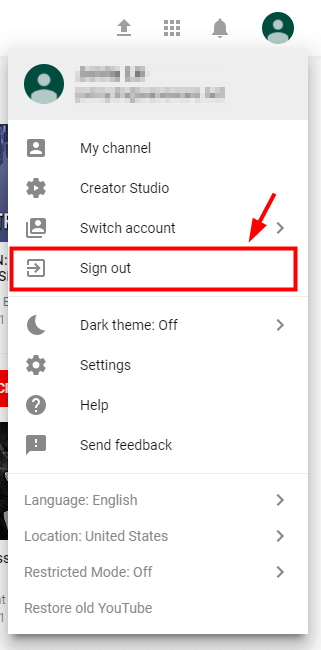
YouTube is generally accessible with our Google account. If you are experiencing YouTube video black screen, then you can sign out of the Google account and sign in again to fix the issue.

Alternatively, you can also try to login with another Google account to see if that is also able to help in solving the YouTube video playing issue.

Fix 4: Clear Browsing Cache and Cookies

When you have a black screen while you are attempting to play a very important You-tube video, it’s not only irritating but it is also a moment of worry. If you think, what could have created such a black screen for you? You would probably stumble upon facts like clearing cache and historical data. It could be that you have piled up a lot of cache; your browser has thus gone slow.

Thus, all you may simply have to do is clear the cache and browsing data history.

It could also be some kind of changes in the browser settings that could make your YouTube black screen.

So one of the exercises you need to perform in this process would be clearing out all the browsing histories, caches and all other places where junk is stored including clearing your passwords.

Clear Browsing Cache and Cookies to Fix YouTube Black Screen Problem

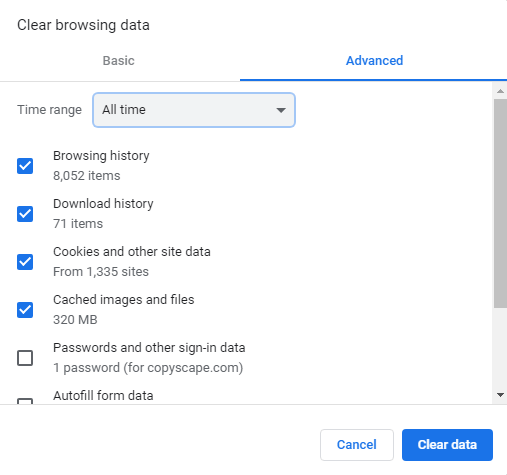
Follow the steps to clear your browsing history:

  • Ctrl, Shift and Delete keys all at the same time that will give way to the pop up window screen.
  • Now in that pop up screen select all that you think could be the cause.
  •  While doing so, set the time span for browser clearance as “All time.”
  • Now click on the option “Clear Data.” This one command will clear all your browsing and download history, form and search history, cookies and cache, activity logins, Offline Website data, Site Preferences all together, all at once.
  •  This should reboot your You-tube, and make it functional once again.

Now check if your You-tube Videos are up and running. Unless, there are more complexities, this single act should be sufficient to make your You-tube up and running.

Fix 5: Disable the Browser Extensions

So far if you haven’t experienced any luck in getting rid of the black screen of the YouTube video player, then you may try to disable the various browser extensions. At times, browser extensions can interfere with the YouTube player especially if you are using an ad blocker extension.

Disabling the browser extension momentarily can solve the problem. You can refer the below steps to know how to disable the browser extensions on your web browser.
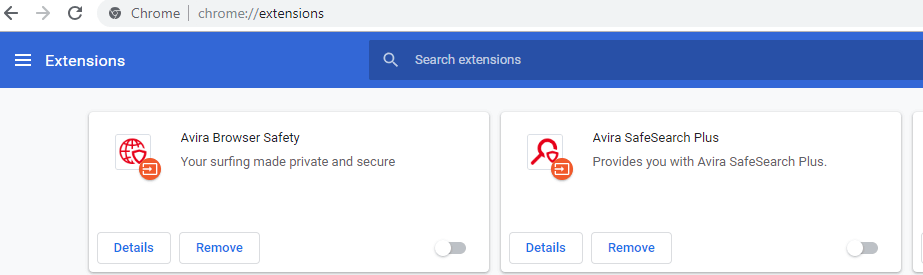
Navigate to the extension settings as per the below path and disable the ad blockers.

For Google Chrome –

  • Input the following in the address bar of the browser and hit the Enter key: “chrome://extensions”
  • Uncheck the box adjacent to “Enabled” status to disable it.
Disable the Browser Extensions to Fix YouTube Black Screen Problem

For Firefox –

  • Click on the menu button and then click on Add-ons.
  • You will see a Disable button next to the ad blocker. You can click it to disable it temporarily.

Ultimately, open the YouTube video and see if you are having a smooth video viewing experience or not. If you still have not had any luck then jump to the next solution.

Read More: Best Free Adware Removal Tools For Windows

Fix 6: Update the Web Browser Application

You can easily update the web browser to solve the black screen problem of YouTube videos. If the web browser is outdated or there is some configuration issue apart from some specific features of the browser that might be interfering with the YouTube player.

Under this circumstance, you can update the browser by uninstalling it and then downloading its most updated version on your computer. Once the installation completes, then you can check to see if the YouTube video black screen issue is resolved. If not, then try the next fix.

Fix 7: Try Another Browser

Last but not the least, if all the above fixes failed, then you can change your browser and see if the YouTube black screen error gets resolved or not. 

It could be that your browser is not compatible with the YouTube platform, therefore, you are experiencing this issue. It could be the plugins, extensions, or simply the web configuration that’s causing the YouTube video black screen error.

You can install a new browser and open YouTube to see if you are able to play the videos well now.

Fix 8: Update the Graphics Card Drivers Automatically

Ultimately, if you are still seeing YouTube black screen error then try updating the graphics driver to get rid of the problem for once and all.

To do this, you can install the best driver updater software in your system. These software can automatically scan and detect outdated graphics drivers or faulty graphics drivers and download the updated versions of the graphics driver for you. You can easily install them in a single click and then try to access YouTube to see if now you are able to play videos normally.

Another alternative method is to update the graphics driver manually. For this you can go to Manufacturer’s website and search for the accurate version of the graphics driver.

You can download the self executable file and then follow the on-screen steps to complete the installation procedure.

If the installation does not successfully happen on its own then you can also complete the installation process via the Device Manager.

Conclusion

Hopefully, with the above methods you have now been able to resolve your YouTube black screen trouble. The solutions that we have provided above are extremely feasible and easy to implement. 

In general it is a good practice to update the browser and clear cookies and cache data on a regular basis to maintain optimum performance of the browser. 

Besides, checking the internet connection, trying a VPN service can also help you to watch YouTube videos smoothly.

You can also sign in from a new Google account or try a new web browser to watch YouTube without facing the black screen error.

So, I am wrapping up this article with this. If you have any other tips and tricks, then you may let us know in the comments section below. 

Author

Snigdha

Snigdha is a technical content writer with expertise in the field of science & technology. Though she has a very diverse academic and professional profile yet she finds writing to be a creative form that she was unable to explore so far. When not writing, she can be found indulging in other forms of creativity like painting or travelling.

View all posts

Related Posts
How to Fix Cast to Device Not Working on Windows 10, 11

How to Fix Cast to Device Not Working on Windows 10,11

January 16, 2024
0

Have you found the Cast to Device functionality is not working on your computer? If yes, you can go through this post to know the quickest and easiest ways to solve this problem.

Casting allows you access to the computer’s desktop on the big screen of your TV for a fun-filled get-together, movie night, or professional presentation. However, it can be annoying if the cast to a device feature is not working on your PC.

Hence, this article describes the best possible fixes to this irritating issue. However, before attempting to troubleshoot, it is a good idea to understand the underlying causes of the problem to solve it quickly and efficiently. Thus, let us take a look at the same before looking at the solutions.

Why Is Cast to Device Not Working

Here are various reasons Miracast may not work on your Windows 10/11 device.

  • Outdated network adapter driver
  • Streaming permissions are not set correctly
  • Network sharing is disabled on your computer
  • Outdated graphics driver
  • Hardware problems
  • Interference from Windows Defender Firewall
  • Random system bugs

Above, we listed some factors that may be responsible for the mirror cast not working on the Windows 10/11 issue. Let us now learn the most suitable ways to fix it.

Fixes for Cast to Device Not Working (Quick and Easy)

You can apply the following tried and tested solutions if the cast to device feature is not functioning on your PC.

Fix 1:  Ensure your computer supports screencast

Before trying any complex solutions, you should check whether your PC has the screencast feature. Here are the steps to do it if the cast to device feature is not working on your computer.

  • To begin with, access the Settings panel using the Windows+I keyboard shortcut.
  • Secondly, select System from the menu on your screen.Choose System Setting
  • Now, choose Display from the options present in the System settings window.
  • You can now navigate to the Scale & layout option.Display Scale and Layout
  • Choose Multiple displays from the Scale & layout options.
  • Now, check whether or not the option to Connect to a wireless display is available. If the option is available your computer supports screencast, otherwise it does not support it.

However, there is no need to panic if screencasting is unavailable on your computer. You can use a physical cable to connect your computer’s screen to the big screen.

Also Read: Miracast on Windows 10,11 PC: Download, Install, Update & Setup


Fix 2: Ensure network sharing is enabled

Network sharing must be enabled on your computer for the screencast option to work. Hence, here is how to make sure the network sharing is enabled if you are experiencing problems with the cast to device feature.

  • To begin with, input Network in the Windows search box.
  • Secondly, choose Network status from the options you have on your screen.Network Status
  • Now, scroll down to the Network and Sharing Center and click on it.Network and Sharing Center
  • Choose the option to Change advanced sharing settings from the left panel of the Network and Sharing Center window.Change advanced sharing settings
  • Ensure the options to Turn on network discovery and Turn on file and printer sharing are checked.o Turn on network discovery and Turn on file and printer sharing
  • Click on the Save Changes button.
  • Lastly, try using the cast to device features to check whether or not it is working. If the feature still does not work, you can try the other solutions shared in this article.

Fix 3: Try resetting the stream permissions

Streaming permissions determine whether or not other devices can access your media. These permissions are reset automatically after an update. However, improper permissions reset can be a reason the cast to device does not work on your PC. Hence, you can follow the below steps to reset the permissions via the Windows Media Player to solve the problem.

  • To begin with, access Windows search using the Windows+S keyboard shortcut.
  • Secondly, input Windows Media Player in the on-screen box and select the first search result.Search Windows Media Player
  • Now, select Stream from the top menu.
  • Choose the option to Allow Internet access to home media from the Stream menu.
  • Give the necessary permissions to Allow Internet access to home media.
  • Now, select the option to Turn on media streaming. Turn on media streaming on Windows Media Player
  • After enabling the media streaming, open it.
  • Change the default PC name and the advanced sharing settings.
  • Lastly, reboot your PC after completing the above steps.

Also Read: How to Set up VPN on Chromecast


Fix 4: Try troubleshooting the hardware and devices

Many users solved the problem by running the hardware and devices troubleshooter. Though this fix may not work for everyone, there is no harm in trying it. Hence, you can follow the below directions to run the troubleshooter.

  • To begin with, search for the Control Panel and open it.Control panel
  • After opening the Control Panel, change the Control Panel’s view to Large icons.Click on Large icons
  • Now, select Troubleshooting from the menu on your screen.
  • Now, choose the View all option from the left panel of the Troubleshooting window.
  • Select Hardware and devices from the available options and click Next to proceed further.Hardware and Devices on the right pane
  • Lastly, wait until the troubleshooting process is complete and reboot your PC afterward.

Fix 5: Update outdated drivers (Recommended)

Broken or outdated drivers are among the top causes of many problems you experience on your computer. For example, an outdated or old network driver obstructs network sharing, and out-of-date graphics drivers cause display issues, leading to the cast to device not working issue. Hence, updating outdated drivers is a good idea.

You can update drives in various manual and automatic ways. However, the best approach is to perform driver updates automatically via a dedicated driver updater, such as Win Riser.

The Win Riser software updates all troublesome drivers with one click. Moreover, it offers many impeccable features to take your computer’s performance to the next level.

For example, it boasts driver backup and restore, junk removal, malware detection, ignore option for the drivers you do not plan to update, and PC scan scheduling. You can download and install this wonderful software directly from the following link.
Download-Button

After installing Win Riser (the installation completes in one to two seconds), you can follow the below simple directions to update drivers.

  • To begin with, allow the automatic computer scan to conclude (it completes in two to three seconds).
  • Now, go through the results to know which drivers are causing problems on your computer.
  • Select Fix Issues Now to automatically get all drivers updated to their most recent version.Win Riser Update the All Outdated Driver Click On Fixes Now

Also Read: How to Set Up Google Chromecast on Your TV


Fix 6: Perform Windows update

Microsoft has already recognized many users are experiencing issues with the cast to device feature. Hence, it has released updates to debug the problem. If you are still struggling with this problem, chances are you have not updated Windows. Hence, here are the steps you can take to update Windows.

  • To begin with, bring up the Settings window using the Windows+I keyboard shortcut.
  • Secondly, select Update & Security from the options available on the screen.Click on Updates and Security
  • Make sure you have Windows Update selected in the left panel of the Update & Security Settings window.
  • Now you can select the option to Check for updates to your computer.Check for Updates Button
  • Download and install the latest Windows update.
  • Lastly, restart your PC to complete the update process.

Fix 7: Change Windows Defender Firewall cast to device settings

Cast to device may not be working on your computer due to interference from Windows Defender Firewall. Hence, you can follow these steps to change the Defender settings to solve the problem.

  • To begin with, call up the Run utility using the Windows+R keyboard shortcut.
  • Now, input Control in the on-screen box and click OK to open the Control Panel.
  • After accessing the Control Panel, locate and click on Windows Defender Firewall. Windows Defender Firewall
  • Now, choose to Allow an app or feature through Windows Defender Firewall from the left panel of the on-screen window.Click On Allow App Or Feature Through Windows Defender Firewall
  • Find the Cast to Device functionality in the allowed apps and features.
  • If both private and public boxes are not checked for the cast to device functionality select the Change settings option to check both boxes.

Also Read: Best Web Browsers for Your Roku device


Cast to Device Not Working Problem Solved

The above guide listed various solutions you can try if the cast to device feature on the computer does not work. You can try the above fixes sequentially to arrive at the solution that solves the problem or directly apply the recommended fix (updating drivers) to get rid of the issue instantly.

However, if you have better recommendations to fix the issue or have any questions, feel free to drop them in the comments section.

Intel Rapid Storage Technology Driver Download Windows 10,11 [Intel RST Driver]

Intel Rapid Storage Technology Driver Download Windows 10,11 [Intel RST Driver]

December 26, 2022
0

Intel RST i.e Rapid Storage Technology is a RAID solution based on firmware built upon a varied range of Intel Chipsets. To support its configuration and enable features you must download the compatible drivers. The article below depicts simple steps for the Intel Rapid Storage Technology driver download and update.

Read the manual, partly manual, and automatic methods in the guide below and apply the steps that are suitable for your Windows device.

How to Download and Update Intel Rapid Storage Technology Driver Windows?

No need to implement all of the methods listed below, just choose the relevant one and use it to install the latest Intel Rapid Storage Technology driver on Windows 11 or 10 devices.

Method 1: Manual Intel Rapid Storage Technology Driver Download

If you are technically skilled and capable to download the Intel Rapid storage technology driver for Windows manually from the website. For this method, you must be aware of your Windows version. Once you gather the required specifications for the Intel Rapid storage technology driver apply the following steps.

Step 1: Open the official website of Intel in your web browser.

Step 2: In the Support tab click on Download Center.Support tab click on Download Center

Step 3: In the search bar type Intel Rapid Storage Technology driver and press the enter key on your keyboard.

Step 4: From the list of available drivers click on the Download button next to your Windows version.

Step 5: Install the downloaded Intel Rapid Storage Driver Windows 11, 10, or an older version with the help of instructions on your screen.

Restart your computer to apply the updates. But if you found this method complicated, use the underlying partly manual or automatic methods for Intel RST driver updates.

Also Read: Download and Update Intel Watchdog Timer Driver on Windows 


Method 2: Intel Rapid Storage Technology Driver Update with Device Manager

In your Windows devices, you get a pre-installed utility i.e Device Manager that acts as a directory for your system drivers. So if you don’t have time and patience to install Intel Rapid Storage Technology driver Windows 11 or other versions then you can use this method.

Here is how to update the Intel Rapid Storage Technology driver on Windows 10, 11, 8, or 7 devices.

Step 1: Press Windows and R keys together. In the Run dialog box that pops up type devmgmt.msc and click on OK to open Device Manager.Input devmgmt.msc in the Displayed Box

Step 2: Identify the Storage Controllers category in the Device Manager window and double-click on it to expand.

Step 3: Right-click on the Intel Rapid Storage Technology driver and select the Update Driver Software option.Update driver software

Step 4: In the next window Select the first option i.e for automatic search and download for driver update.Search Automatically for Updated Driver Software

Step 5: Wait till the installation of the Intel Rapid Storage Technology update completes. Restart your PC to bring the driver updates into effect.

Now another option to simplify the Intel Rapid Storage Technology driver download is by automating the process through driver updater software. The next method is a fully automatic one.

Also Read: Intel Management Engine Interface Driver Download on Windows


Method 3: Use Bit Driver Updater for Intel Rapid Storage Technology Driver Update

The above methods make a feasible choice only for users who are skilled and have the patience to find and download drivers. However, if you don’t have the skills and time this method can be your favorite.

There are several automatic driver updater options available online. One of the best tools for this purpose is the Bit Driver updater. You can scan your PC in no time and download compatible Intel Rapid Storage Technology drivers. Not just this the Pro update of the tool allows users to download all the pending driver updates with just one click.

Moreover, all your driver-specific data is backed up and can be restored whenever required. All the driver updates are compatible and WHQL-certified. These drivers are 100% verified and safe to use.

If you switch to the Pro upgrade you can connect with trained professionals around the clock for assistance. Additionally, a complete money-back guarantee is offered for up to 60 days in case the tool fails to acknowledge the user’s expectations.

How to Update Intel Rapid Storage Technology Drivers With Bit Driver Updater?

Apply the simple steps listed below to download the software and use it to automatically update the Intel Rapid Storage Technology driver for Windows 11, 10, or older version devices.

Step 1: Click on the Download icon below. Double-click on the downloaded package file and follow the steps on your screen to install the Bit Driver Updater software on your Windows PC.

Windows Download Button

Step 2: Run the software and click on the Scan Drivers option to get the list of drivers with pending updates.Scan outdated driver of your windows pc

Step 3: Identify the Intel RST driver from the list and click on the Update Now option next to it. Additionally, use the Update All option to download all the pending driver updates.

Note: The Update All features are available only for pro version users of the software.Update all outdated driver of your windows pc

Step 4: Install the downloaded Intel Rapid storage technology driver for Windows 10 by applying the on-screen instructions.

Restart your PC to bring the driver updates into effect.

Bit Driver Updater makes it easier for users to download driver updates with a single click. Moreover, to unlock the complete potential of the software use the Pro version.

Also Read: Download and Update Intel Chipset Drivers for Windows


Download and update Intel Rapid Storage Technology Driver Windows 10,11: DONE

Hopefully, the above methods helped you. Now you can easily download the latest updates released for the Intel Rapid storage technology driver. All the aforementioned are safe but in our opinion using Bit Driver Updater is the safest option. Install the driver updater software to automate the Intel RST driver and other driver updates on your Windows devices.

If you still have any confusion or questions don’t hesitate to ask them in the comments below. Also, for more helpful tech guides and write-ups hit the subscribe option for our blog. And to stay in touch and never miss any tech news or updates follow us on Facebook, Twitter, Instagram, and Pinterest.

1 Comment
    Susana William says: Reply
    May 28th 2020, 3:59 pm

    Thanks for the solutions, I found this error many times in my mobile when using YouTube. Here I get the complete solutions to resolve this YouTube black screen error. So thank you.

Leave a Reply Cancel reply

Your email address will not be published. Required fields are marked *

Sidebar Image bit G ad1

Latest Posts

  • Best-Free-Online-Portfolio-Websites-in-2026
    Best Free Online Portfolio Websites in 2026
    by adminuser / March 16, 2026
  • Anytime Astro: Best Website For Online Astrology Consultation
    Anytime Astro: Connect Now For Online Astrology Consultation
    by Somya Shrimal / March 13, 2026
  • Best-Ways-to-Combine-Images-Into-PDF-Files
    Best Ways to Combine Images Into PDF Files
    by Niharika / March 12, 2026
  • Best FREE VPS Hosting Providers
    7 Best FREE VPS Hosting Providers in 2026
    by Devesh / March 12, 2026
  • Best-McAfee-alternative-software-to-use-for-Virus-Protection
    Best McAfee Alternative Software to use for Virus Protection
    by adminuser / February 11, 2026

Categories

  • Cyber Security
  • Driver Updater
  • Entertainment
  • Fitness
  • Games
  • How To
  • laptop
  • OS
  • Reviews
  • Tech News
  • Tips & Tricks
  • Top 10
Sidebar Image bit G ad1
Fix: USB OTG Issues in Android Devices Fix: USB OTG Issues in Android Devicesby Prachi Dani / May 26, 2020
Technology Leads the Way in Educating Mortgage-Holdersby Remy Thomas / May 27, 2020Technology Leads the Way in Educating Mortgage-Holders
TechPout Footer Logo

We at TechPout promise to put forth stories that help people to learn and simplify their digital life. Our purpose is to share the true essence of technology with our tech-loving community.

Useful Links

  • About Us
  • Contact us
  • Privacy Policy

Popular Posts

  • Best PC Optimizer Software
  • Best Mac Cleaner Apps
  • Best Driver Updater
  • Duplicate Photo Finder and Cleaner Software
  • Best Free Movie Download Sites
  • Best IPTV Players

Follow us

Copyright © 2026 www.techpout.com. All rights reserved
DMCA.com Protection Status