Here you will find the simplest and quickest ways to download, install and update Intel Chipset drivers for Windows 10, 8, 7 PC.
Chipset helps in connecting the CPU with the PC and the peripherals connected to it. Intel chipset is a collection of electronic components in the CPU (Central Processing Unit) of a PC.
Intel chipset driver is a very important piece of software component that is responsible for the accurate flow of data from the CPU to all other connected devices. So, when the corresponding drivers goes missing or out of date you may encounter numerous problems. Therefore, to ensure proper functioning, you should keep your chipset drivers always up-to-date and in good working order.
In this write-up, we are going to discuss the three different strategies to perform the Intel chipset INF update program on Windows PC.
Automatically Download, Install and Update Intel Chipset Drivers Through Driver Updater Software – Experts Recommendation
The Intel Chipset driver files on a Windows operating system PC can be updated in several different ways. But the way which is most recommended by experts is updating the drivers through driver updater software. Among all the different driver updater software available over the internet, the Bit Driver Updater is the most effective and helpful software for this purpose. The detailed process to use Bit Driver Updater software is explained in the article below. Till then download the software via the link here.

Easy Methods to Download, Install and Update Intel Chipset Drivers for Windows 10, 8, 7
There are various ways to get the latest Intel Chipset drivers installed on Windows PC. Below you can find the most useful and convenient ways of performing the same task. Without further hustle, let’s read them!
Method 1: Manually Download Intel Chipset Drivers through Official Website
Intel keeps on releasing the latest driver updates for themselves. So, you can use the official Intel support to perform the same. Below is how to download Intel chipset drivers using this method.
Step 1: To begin the process, you need to first visit the official website of Intel.
Step 2: After that, head to the Support tab and choose the Download Center.

Step 3: Then, choose your product, that’s Chipsets.

Step 4: Next, select the specification for your Intel® Chipset device software and make a click on the download button shown next to it.

Wait for the process to finish. Once done, then run the downloaded driver file and follow the on-screen instructions to manually install the drivers.
Also Read: Intel Iris Xe Graphics Driver Download For Windows 10, 8, 7
Method 2: Use Device Manager to Update Intel Chipset Drivers
The second way of downloading and updating the Intel chipset drivers for Windows PC is using Device Manager. It is a Windows default program that manages all the PC drivers and connected hardware. Here are the steps on how to update Intel chipset drivers in Device Manager:
Step 1: To launch Device Manager, you will first need to open the Run Dialog box. To do so, altogether press Windows logo + R keyboard keys.
Step 2: Next, type devmgmt.msc in the Run box and hit the Enter from your Keyboard.

Step 3: This will invoke the Device Manager, wherein you need to look for the System Devices option and double click on it to expand the category.
Step 4: Then, right-click on the Intel Chipset driver and choose Update Driver Software… from the context menu list.

Step 5: From the subsequent prompt, choose the option that says Search Automatically for Updated Driver Software.

Now, with Windows in-built functionality, Device Manager will start searching for the most suitable drivers and later on, install them too automatically. Once the process is completed, users are expected to reboot your PC to validate the recently made changes.
Above discussed methods can be error-prone and time-consuming in order to download Intel Chipset driver utility, particularly for the newbies. Hence, we recommend you to use the below-discussed method to perform the same task.
Also Read: Intel High Definition (HD) Audio Driver Issue on Windows 10 [FIXED]
Method 3: Automatically Install and Update Intel Chipset Drivers via Bit Driver Updater
There are a plethora of driver updater tools available in the market to make this task of downloading and updating the device drivers easier. However, all of them are not safe to use, but out of all, Bit Driver Updater is worth trying.
It is one of the most powerful tools for performing driver updates, easily & quickly. Millions of users across the globe have shown their support and are still counting on it. Not only for updating the drivers, but it is a perfect solution for enhancing the performance of your complete PC. Here is a step-by-step tutorial to download and update Intel chipset drivers via Bit Driver Updater:
Step 1: Make a click on the download button below to get the setup file of Bit Driver Updater.

Step 2: Run the setup file and follow the on-screen instructions to complete the software installation process.
Step 3: Thereafter, launch the driver updater on your system and wait for it to complete the scanning process on your machine.
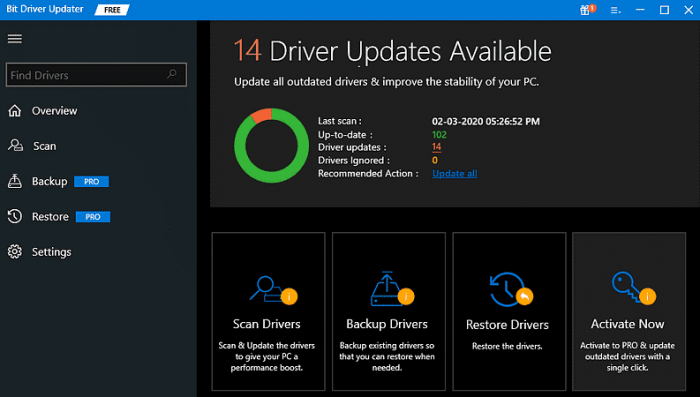
Note: Usually, Bit Driver Updater automatically recognizes the Windows OS version and accordingly starts searching for the compatible driver updates. But, in some rare cases, it doesn’t start on its own. If that is the case, then you will need to run scanning manually by making a click on the Scan button from the left menu pane as shown below.
Step 4: Now, you can either update device drivers one by one or just with a click of the mouse. In order to update device drivers in one click, you will need to make a click on the Update All button.

See, within a few steps, you can update all outdated Windows drivers on your PC. The driver updater has a few in-built tools that include auto backup & restore wizard, scan scheduler, and a system optimizer. It also provides 24/7 technical live support and a 60-days money-back guarantee. However, it is worth noting that these features are only available in the premium version of Bit Driver Updater.
Also Read: Fix ITBM (Intel Turbo Boost Download) Driver Not Available
Intel Chipset Driver Download and Update: DONE
Thus, one can easily download and update Intel chipset drivers on Windows 10, 8, 7 PC. Through this guide, we have brought up the best methods of finding the most suitable Intel chipset drivers.
Was this installation guide helpful? Do tell us in the comments below. Also, let us know if you have any further questions or suggestions regarding the same.
Lastly, before you go, do subscribe to our Newsletter for more informative write-ups. You can also stay in touch with us through Facebook, Twitter, Instagram, and Pinterest.