Miracast on Windows 10,11 PC: Download, Install, Update & Setup Guide 2024
If you want to download and install Miracast on Windows 10/11 then check out this thorough and simple guide listing and explaining some methods to do the same.
The ability to use the TV as a laptop or desktop screen is like a blessing in disguise. This is something that Miracast can easily help you with. Using the technology, you can easily project your Windows laptop or desktop screen on your TV with a single click. However, to use Miracast on Windows 10/11, you need to enable the same on your system. In this tutorial, we will explain the methods to help you download Miracast on Windows and then use the same as required.
Recommended: Download and Update the Miracast Drivers for Ease
Generally, it has been seen that common problems related to connectivity and mirroring are faced by users while setting up Miracast. This happens because the supportive drivers for Miracast are not available on your system. Hence, before proceeding, you should download and install all the required drivers right away. For the same task, you can take the help of the Win Riser a Driver Update tool to automatic update all kinds of drivers with a single click. Download this tool now.
However, before moving on to the method to enable and use Miracast, let’s know more about the feature.
What is Miracast?
Miracast is an HDMI over WiFi feature that uses a WiFi connection to display the data on a screen rather than the HDMI cable. Using this technology, you can easily share the video from or to a TV or any other screen with Windows 10/11 device. Using the certification standard of Miracast, mirroring the screen becomes quite easy and possible.
Generally, in the new devices, Miracast is already integrated and enabled but in the older ones, you need to check whether your device supports Miracst on Windows 10/1 or not. Let’s see how.
Also Read: Update Wifi Driver on Windows 10
How to See If The Windows Device Supports Miracast or Not?
In the process to see whether Miracast is supported on your device or not, you need to take the help of your DirectX Graphics Diagnostic dialogue box. Follow the instructions below to know what you need to do:
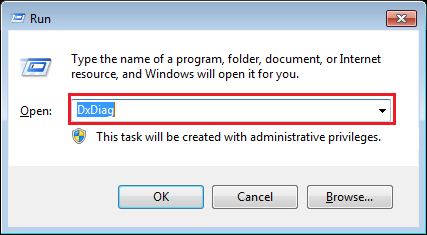
- Press the combination of Win+R keys on your device.
- Type dxdiag in the search bar and press Enter.
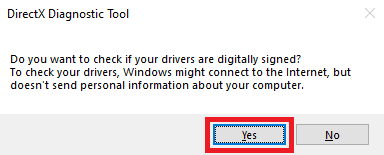
- Click on Yes to continue.
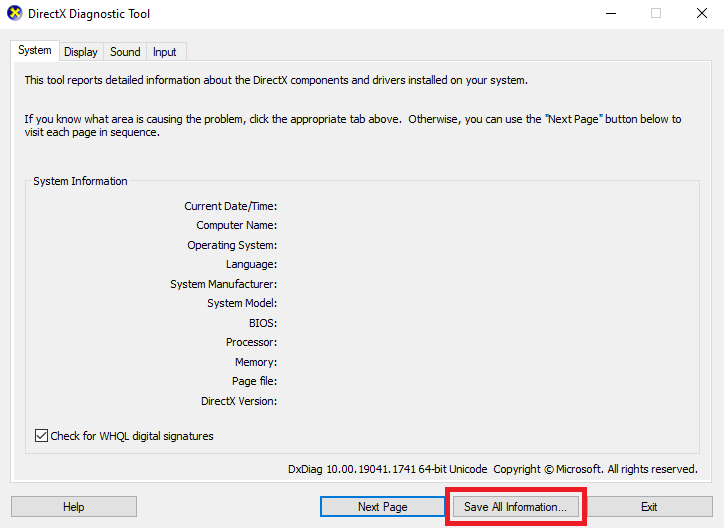
- The DirectX Graphics Diagnostic dialogue box will appear. Under the system category, click on the button named Save all Information to proceed.
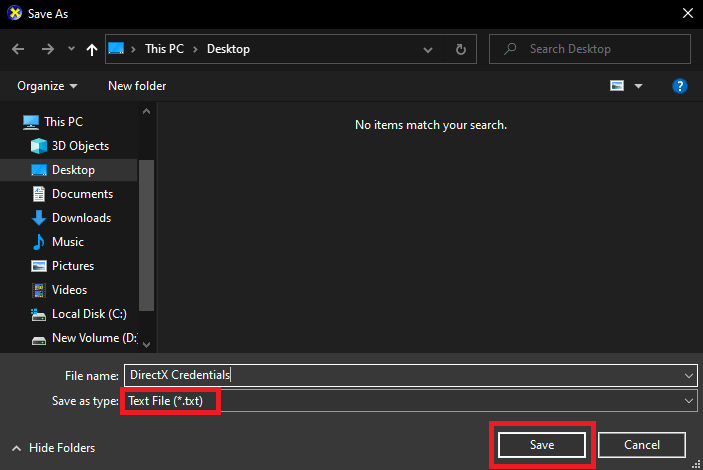
- Save the file under the .txt format.
- Open the saved file and press Ctrl+S keys and search for Miracast.
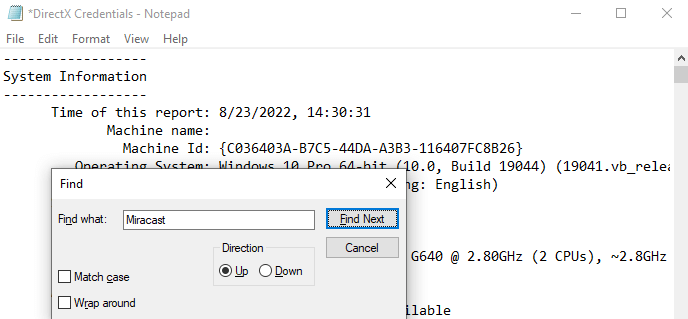
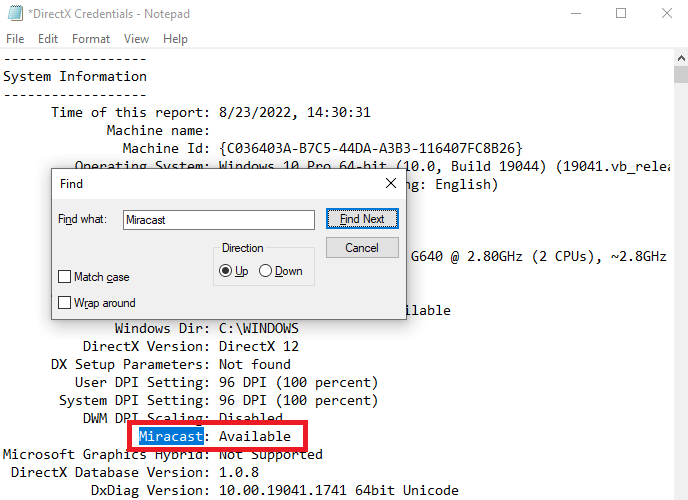
- If you find Miracast: Available then this means that your device supports Miracast.
- Miracast: Not Available means that your system can’t run Miracast on its own.
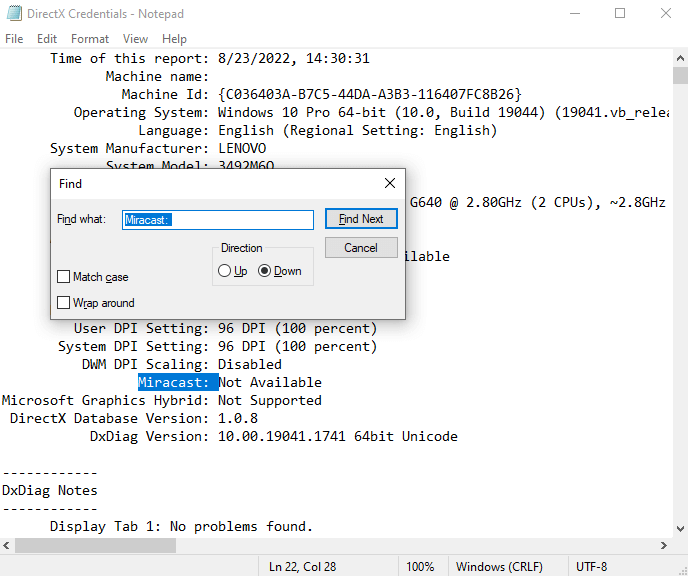
If you find out that Miracast is unavailable but want to use it, you need to make some changes to get Miracast for PC. For example, you can use an external device like the USB Transmitter or Screen Projector for ease.
How to Download, Update, and Install Miracast for Windows 10?
Miracast, just like any other device connected or integrated with the Windows system, works with the help of drivers. These drivers are the way for the system to communicate and connect with the device connected. Hence, if any driver is outdated or missing from the system, it can cause problems in running the device properly. The same goes for Miracast. For it to function without any interruptions, perform Miracast Windows 10 download for latest drivers.
To set up and use Miracast, you need to download or update Miracast or Windows 10/11. Here, the download means that you need to download the supportive drivers for Miracast. You can do this with ease using Bit Driver Updater. The tool is an expert in providing the best features to help you download, update and install all kinds of drivers.
Apart from this, the tool offers other features to you as well. Using Bit Driver Updater, you can easily update all types of drivers with a single click or even schedule the update if required. Additionally, the updater also provides some smart features to create a backup of drivers and restore them when required. The single-click Ignore Update feature is quite worthy as well.
All the drivers provided by the Bit Driver Updater are certified and trustworthy. This means that there is no threat of malware attack while using Bit Driver Updater. And that’s not all the software offers a lot of other features as well. You can find these out after downloading the tool.
For now, let’s know how to download and update Miracast on Windows 10 PC driver.
How to Use Bit Driver Updater to Get Miracast for PC?
Follow the steps shown below and use the Bit Driver Updater to install Miracast on Windows 10/11 very easily:
- Click on the Download button below and save the .exe file of Bit Driver Updater to your storage.

- Install the software and run the same on your system.
- Once the updater launches, it will automatically start scanning your system for outdated drivers. However, you may need to click on the Scan Drivers options to start the scanning.
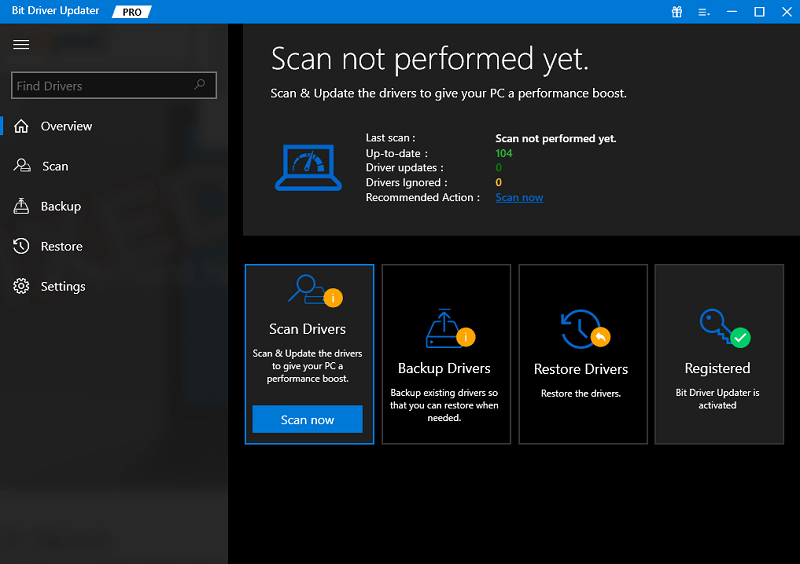
- Once the list of outdated drivers appears on your screen, click on the Update Now button(s) to update the required driver(s). Bit Driver Updater Pro users will also get an option to Update All drivers at once.

- Once all the updates are installed, click on Restart the system to do the same.
So, this is how you can download and update Miracast on Windows 10. Now, let’s proceed with the procedure to set up Miracast on your PC.
How to Set Up and Connect Using Miracast on Windows 11/10?
Once your system gets the latest drivers for Miracast for PC, you can now set up and use the feature with ease. However, before you proceed with the steps to set up the mirroring feature, you need to see if your TV supports Miracast as well. For this, you can either check out the device properties provided online or visit the apps section to find an app named Miracast. Apart from this, the presence of Screen Casting or Wi-Fi Casting suggests the same.
Additionally, you also need to ensure that both your Windows device and the TV are connected to the same WiFi network. This will allow you to connect using Miracast and share the screen easily.
Use Miracast Via Windows Settings
Windows Settings allow you to access and add any device you want. Hence, if your TV supports Miracast, then you can proceed to follow the below steps to use Miracast on Windows 10/11 via Settings:
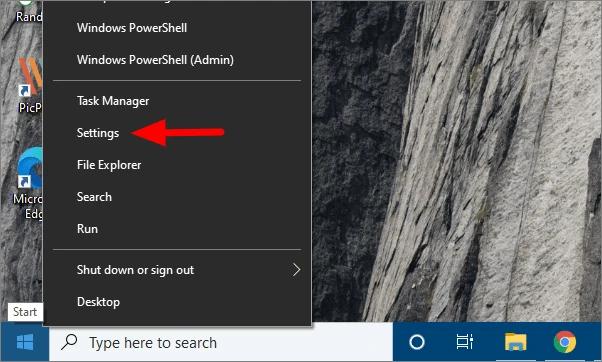
- Press Win+X keys on your device and open Settings.
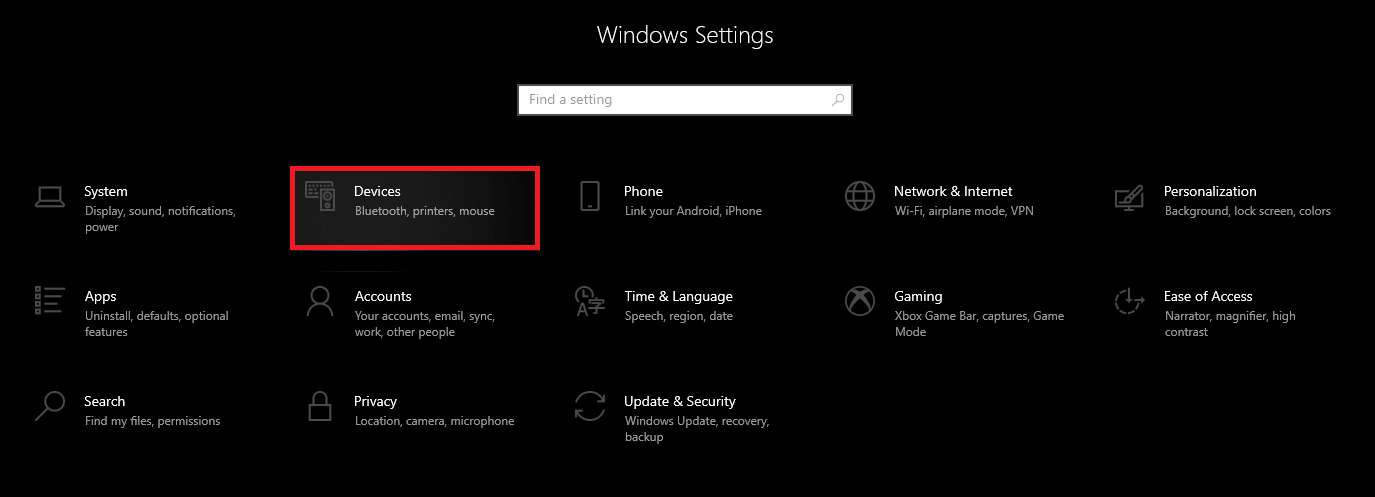
- Click on Devices to proceed.
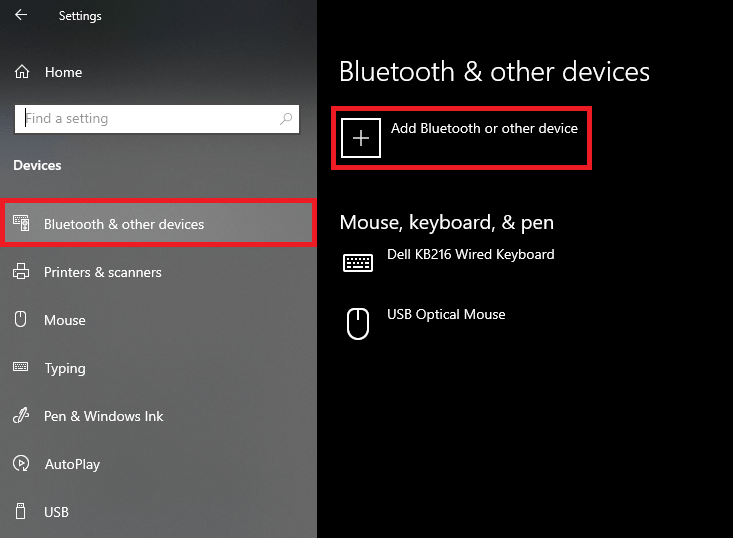
- Under Bluetooth & other devices, click on Add Bluetooth or other device.
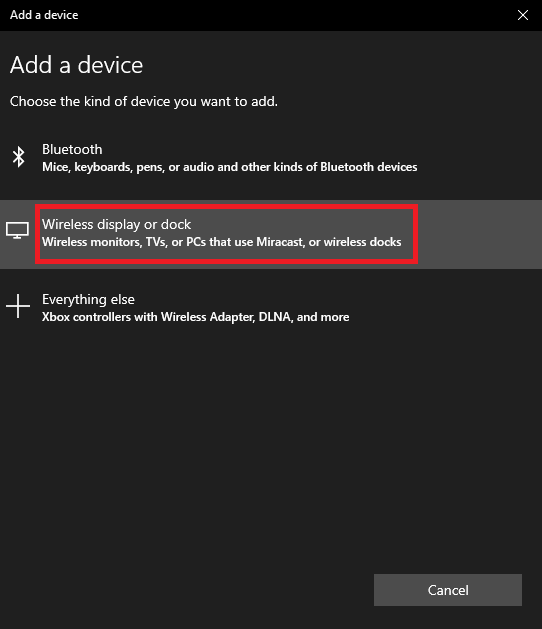
- Select Wireless display or dock from the service categories.
- From the list of devices, click on the TV name that you are using.
You may even try the alternate method to connect as well.
Use Projection Settings to Use Miracast on Windows 10/11
Apart from the system settings, you can also take the help of the Projection or Projector Settings on your device to use Miracast. For this, you can tackle the help of the steps provided below:
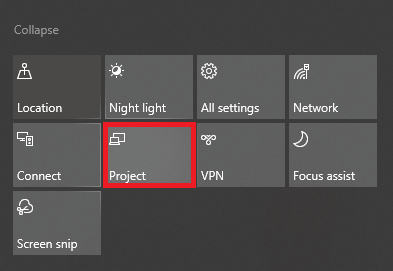
- Click on the Notifications button present on the right side of the Windows taskbar.

- Hit the Project button to proceed.
- Now, your system will show a variety of options for your display. Click on the button named Connect to a wireless display.
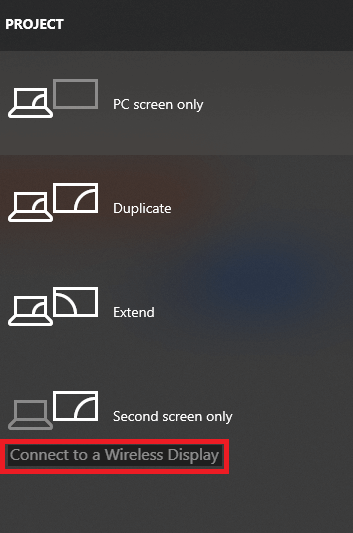
- Now, you can click on the name of your TV and cast the screen using Miracast.
If somehow, your system fails to find the TV, then you can also specify the TV’s name manually. For this, click on the option named Where’s My Device and enter the name of the TV.
Now, you can easily mirror the screen on the specified device.
How to Disconnect Miracast on Windows 10/11?
When you are done using Miracast, you might need to disconnect the feature and stop sharing the screen. The process to do the same is quite easy to follow and is provided below for your ease:
- Click on the Notifications button present on the right side of the taskbar.

- Hit the Project button to proceed.

- Now, your system will show a variety of options for your display. Click on the first one allowing you to Disconnect the screen.
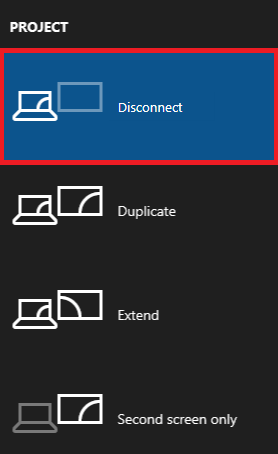
That’s it, your device will disconnect from the TV using this procedure.
What to Do If Miracast Stops Working?
Miracast for Windows 11/10 PC may also fail to work or stop working due to connection errors. If you face the same, you can easily fix the error by configuring the projection settings. Follow the steps below for precision:
- Press the Win+S keys on your keyboard, type Projection Settings, and hit Enter.
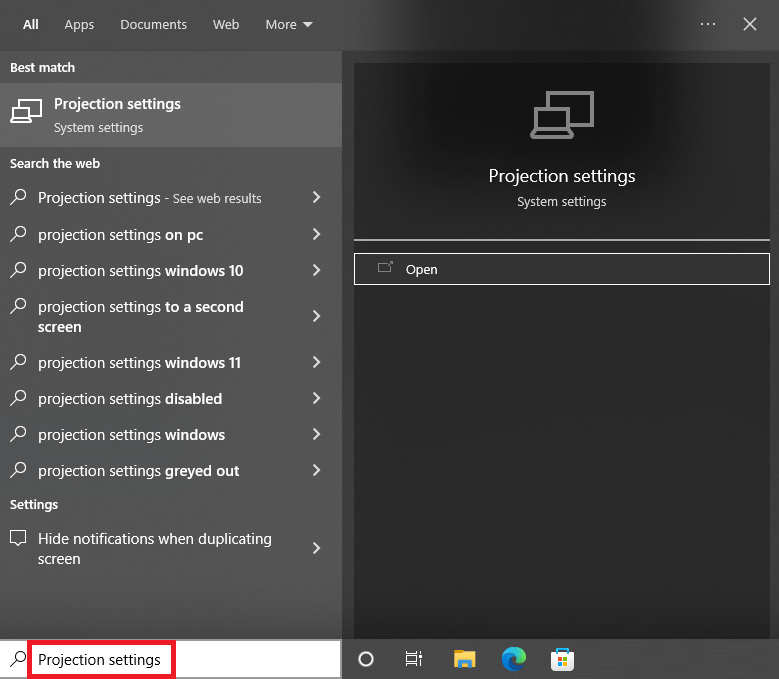
- Modify the Settings of the projector in the best way suited for your TV and Windows device.
After making the required changes, you will not face any problems in running Miracast.
Also Read: How to Set Up Google Chromecast on Your TV
Frequently Asked Questions (FAQs): Miracast Download for Windows 10, 11 PC
The following section answers some of the most commonly asked questions by users regarding Miracast Windows 10/11 download.
Q.1 Does my PC work with Miracast?
To check the compatibility of Miracast with your system apply the following steps:
Step 1: Open Windows Settings by using the shortcut keys Windows + I.
Step 2: Under the System Tab scroll to open Projecting to PC
Here the results displayed will be as follows. Also, this depends on the configuration of your PC.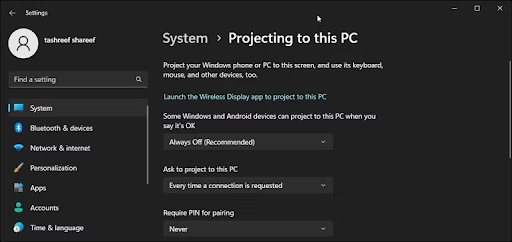
If the system is compatible with Miracast the options displayed will contain Wireless display.
For Add the Wireless Display option install Wireless dIsplay in order to allow Miracast.
Q.2 What if my PC doesn’t have Miracast?
If your PC doesn’t have Miracast support you can get a Miracast adapter. This adapter can be plugged into the HDMI port of your monitor. This Miracast Windows 10 adapter can help in communicating with your PC without any wired connections.
Q.3 Is there a free Miracast for Windows?
For users with Windows version 8 or higher, the MiraCast can be used. These devices have in built WiFi adapter. However, if your system is not equipped you need to purchase the dongle or adapter to connect Miracast wirelessly with your display device.
Download, Setup, and Use Miracast on Windows 11/10; Explained
We hope that the above-listed methods for how to download, update, and install Miracast on Windows 10/11 helped you. Using the further sections of the guide, you must have learned the process to set up and use the mirroring feature as well. The procedures are quite easy to follow as well as secure. These will not harm the integration of your system in any way.
If you face any type of problem while using or setting up Miracast on Windows 11/10, then you need to update the network and display drivers. For this, you can take the help of the Bit Driver Updater tool. The software is an expert in updating the drivers as well as fixing all the driver-related errors with ease.
If you loved this guide on everything related to Miracast for Windows 11/10, then show your love. Subscribe to the newsletter of the Techpout blog. This way you will get regular updates for all the new blogs.
For further assistance, you are free to use the comments section below. You can ask your queries related to Miracast on Windows 10 and provide suggestions as well. We will respond to your comments accordingly.

