If you are finding your Windows 10 system at 100% disk usage, then for sure something is stressing your hard drive and causing it to overwork. Your system will be unresponsive and it will lag and freeze when your system is using 100% disk.
In fact, the lagging and freezing makes us look at the Task Manager automatically to end tasks and processes. It is only then, that most users come across this underlying error of 100% disk utilization. Additionally, the event log may also represent several resets of the disk controller.
It sure is mind boggling to discover this anomalous behaviour of your system and we can’t help wondering which actions led to 100% disk usage error. But you will be relieved to know that it’s a genuine occurrence that happens on its own and can be fortunately fixed with some easy troubleshooting methods.
In this guide, we present to you 10 best ways in which you can fix 100% disk usage error.
All-in-One Solution to Fix 100% Disk Usage Error
Before trying the other high-level fixes, you should update the outdated drivers. Majorly, the system lags and freezes due to outdated or faulty drivers. And, updating drivers manually takes a long while, hence, you must use Bit Driver Updater to perform the same task automatically.
This ultimate utility not only lets you perform the driver update in one click but also elevates the performance bar of your system. If you have convinced yourself that this is the only tool you need, then you can click on the download button below to get this one-stop solution for free.

What Causes 100% Disk Usage In Windows 10
When a specific program demands more memory than expected it usually happens. Plus, this drives a lack of resources to other programs and thus results in slow down issues. If you are suffering from slow performance of your PC and don’t how to fix it. Then, this write-up will elucidate how to fix this issue quite quickly.
But, before moving forward, it would be better enough to know about the causes of it for future prevention. However, there are numerous causes of this problem but here are core ones. Have a look at them!
- Registry issues.
- Due to pending windows system updates.
- Corrupt, broken, old, or faulty system drivers.
- Faulty system files.
- Due to malware and viruses.
- Background running programs.
So, these are some of the significant causes of 100% Disk Usage and that makes your computer sluggish and vulnerable. But no worries, this write-up will explain to you some fruitful ways to fix this annoying issue. And, will surely bring back the actual effective performance of your system. So, without any further ado, let’s move ahead to know more about it!
Wholesome Guide To Resolve Windows 10 100% Disk Usage Error
Let us now get to the details of the troubleshooting techniques one by one in the below segment.
1. Disable Antivirus Software Temporarily
Your antivirus software sometimes might keep running in the background which might lead to 100% disk usage in Windows 10. What you can do in this scenario is to disable your antivirus tool momentarily to see if it is able to decrease the disk usage value from 100% to the minimum value.
Even when you are disabling the antivirus solution for a short while, you needn’t worry about your system becoming defenseless and vulnerable to cyber threats because, in Windows 10 system, the in-built Windows Defender stands guard against several manipulative cyber exploitation mechanisms.
To strengthen the security walls of your device we recommend you to use powerful antivirus software like ITL Antivirus along with Windows Defender. Give your device all-around protection from digital threats and harmful viruses with ITL Antivirus.
Read More: How to Fix Windows 10 Not Responding Error
2. Perform a Disk Check
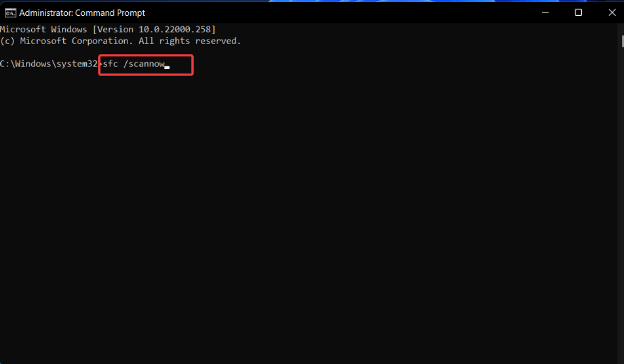
To do this you need to run the Command Prompt as an admin. You can give permission by clicking “Yes” at the User Account Control prompt. The below-mentioned steps will let you complete the disk check:
- In the Command Prompt window, key-in the following command and press Enter following that: chkdsk.exe / f/r
- Further, type Y to confirm that you would want to proceed with the desk check process the next time you restart your system.
Post this, you can open the Task Manager to verify if the 100% disk usage error has resolved or not. If it didn’t, then jump to the next solution.
3. Alter Energy Options From Balanced To High Performance
As suggested by many experts, altering the energy options to High Performance from Balanced works well with Windows 10 100% disk usage error. To do this, you need to follow the following steps:
- Navigate to the Power Options.
- Then, click on “Change plan settings.”
- Further, go to “Change advanced power settings.”
- Here, select the High-Performance option from the drop-down box and let all other plan settings be as per the default settings.

Finally, reboot the PC to see if the disk usage has changed.
Read More: Fix Steam Disk Write Error on Windows 10
4. Disable Windows Search
Windows Search searches files on your PC faster. If not needed then, it can be disabled temporarily as it will stop the indexing process of all files. Temporary disabling is recommended at first to see if this is the cause behind 100% disk usage error. You can do this as per the below steps:
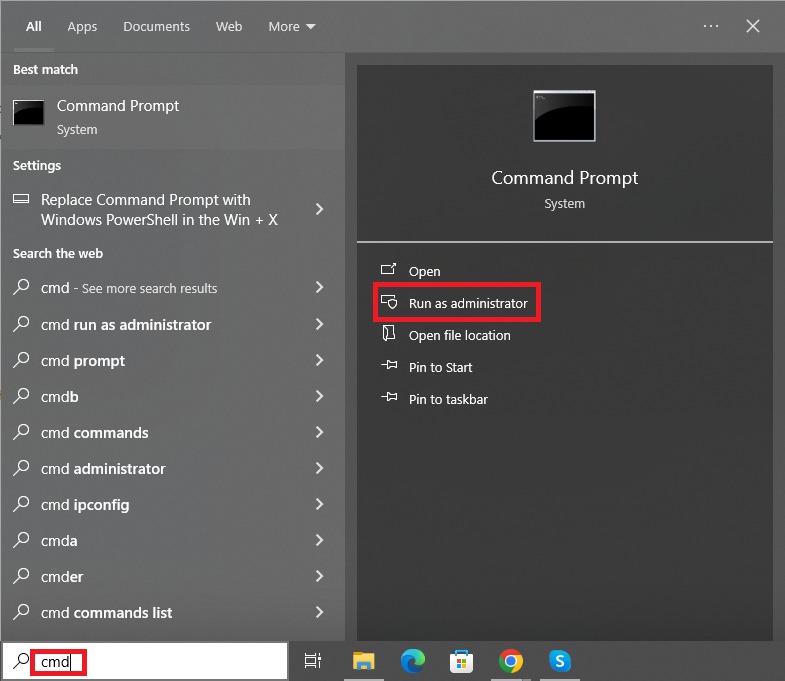
- Open Command Prompt as an administrator by hitting Windows and X keys together. Further grant permission to the user account control and type the following command and press the Enter key: net.exe stop “Windows search“
Now check if your disk usage level has come down to a normal level. If this method seemed to work out, then disable the Windows Search permanently.
5. Disable SuperFetch
SuperFetch in Windows systems is responsible for reducing the boot time and making must-load programs more efficient. However, a lot of times it has been identified to be a potential cause behind system lags. To disable the service you can look at the below steps:
- Launch the Command Prompt as an admin, type the following command and hit Enter – net.exe stop superfetch OR net.exe stop sysmain
After waiting for a few minutes, check if your system has become fast and stable? If so, then you have successfully fixed the 100% disk usage issue in the Windows 10 system.
6. Uninstall Flash Player Update
If you are still seeing Windows 10 high disk usage in the Task manager, then uninstall any flash player update. Several users have reported this technique to be effective. To uninstall flash player update, use the following path:
- Windows Settings > Update & Security > Windows Update > Advanced Options.
- Here, go to the “View your update history.”
- Then, go to “Uninstall updates” and uninstall the flash player update.

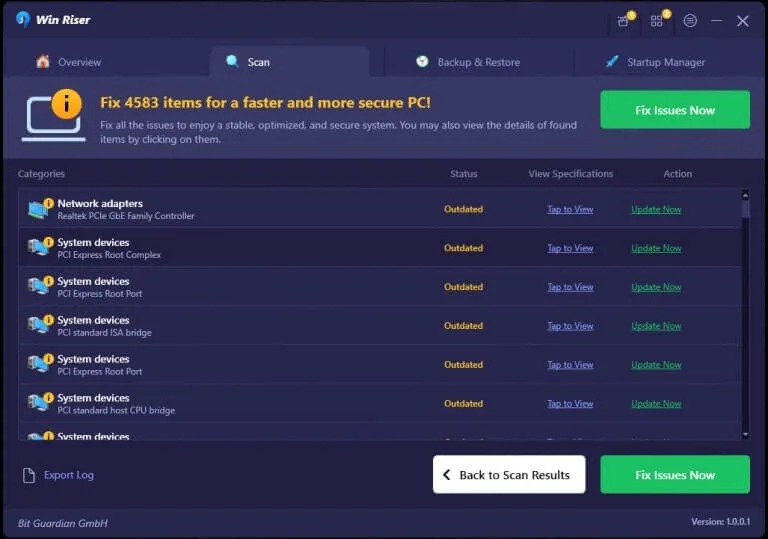
7. Update Device Drivers
If you are experiencing issues with your system’s performance, then the best step is to update the device drivers. Outdated, missing, faulty drivers often leads to system slowdowns and may even contribute to Windows 10 100% disk usage error.
What can you do in this scenario is update device drivers automatically with the help of a driver update software. You can install a top-notch driver updater tool on your Windows system and let it scan your PC to detect faulty and out-of-date drivers.
If you are confused which tool will suit you the best from the many available options then we recommend you to pick Bit Driver Updater for troubleshooting your driver-related issues. You can download this power-packed tool using the given link.
You can use the below guide to update your device drivers:
- Go to the website and install the Bit Driver Updater tool on your computer.

- Then, initiate driver analysis by performing a quick scan with this tool.
- Once it has detected the drivers that need fixing, you can automatically download the updated versions of the respective system driver software with its one-click update feature.
After installing the drivers, verify if the Task Manager is now showing a reduced disk usage value.
Read More: Best Disk Cloning Software For Windows
8. Reset Virtual Memory
Virtual memory is a combination of a portion of the hard drive and RAM. When the system is low on RAM, it starts storing files temporarily in the virtual memory. Whenever RAM is available, it swaps the files back from the virtual memory to the RAM.
Steps to Reset Virtual Memory:
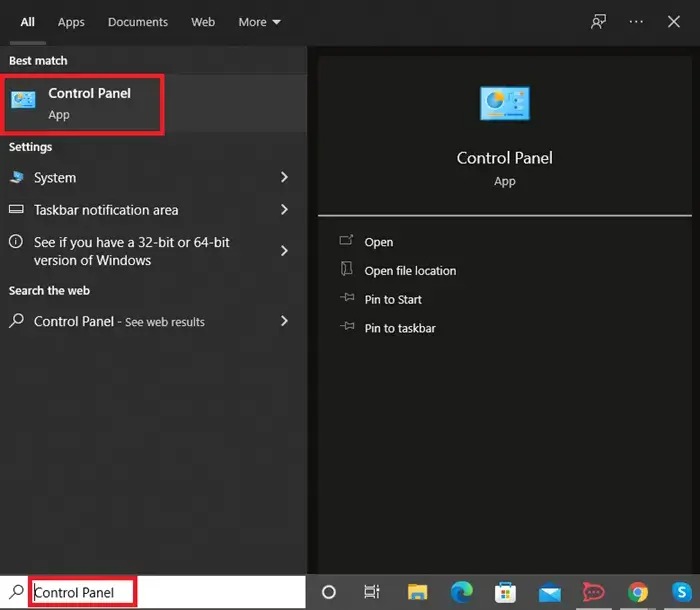
- Go to Control Panel > All Control Panel Items > System.
- Then, click on the Advanced system settings on the left-side pane.

- This will open the System Properties window.
- Under the Advanced tab, click the Settings button

- Go to the Advanced tab again and in the virtual memory section select the button labeled as Change…

Note – Ensure that the “Automatically manage paging file size for all drives” box is not checked.
- Now select the Windows drive (usually the C drive) and input the Initial and Maximum size for your virtual memory.

Note – The Initial size value can vary depending on your system and you may use the numbers from the Recommended category for this field.
The Maximum size value should not be set too high. Try to keep a value which is at the most 1.5 times the size of your physical RAM.
- Once you have set the values of virtual memory according to the above instructions, you can then click on “Set” and “OK” to continue further.
- Further, clear all the temp files from your computer and then check the disk usage percentage in the Task Manager.
This should successfully resolve the 100% disk usage problem in your Windows 10 PC.
Read More: How to Fix Discord Screen Share Audio Not Working [Solved]
9. Fix the StorAHCI.sys Driver
100% disk usage error may also be due to the Advanced Host Controller Interface PCI-Express (AHCI PCIe) models that run with the inbox StorAHCI.sys driver.
Due to a firmware bug, the SSD may not be able to complete input/output when Message Signaled Interrupt (MSI) mode is enabled. SO the Windows storage stack tries to reset the device after waiting on unresponsive read/write for some time.
Disabling the MSI mode via the registry can resolve your disk usage issue.
The way to determine if this is the cause of your current issue and if so, then fixing it up is outlined in the below points:
Determining if you are running StorAHCI.sys:
- In the Device Manager, expand the IDE ATA/ATAPI controllers section.
- Double-click the Standard SATA AHCI Controller.

- As the Standard SATA AHCI Controller Properties tab opens, go to the Driver Details located under the Driver tab.
- Here, if you can see storhci.sys stored in the path of the system32 folder, then you are running the inbox AHCI driver.
- Close the Driver Details window and then choose the Device Instance Path found under the Driver tab. You need to note down the path, beginning from VEN_.

Disabling MSI for the Controller via the Registry:
- Open the run dialog box and type “regedit” to open the registry editor.
- Then, navigate to the below path:
“HKEY_LOCAL_MACHINE\System\CurrentControlSet\Enum\PCI\< AHCI Controller> Device Parameters\Interrupt Management\MessageSignaledInterruptProperties”
- Alter the value of the MSISupported key from “1” to “0.”

- Finally, reboot your system to see if this worked or otherwise try the next solutions.
10. Disable Windows Update Service
Our next solution to fix 100% disk usage in Windows 10 is by disabling the Windows Update Service. It can be done as per the outlined steps below:
- Run “services.msc” and click “OK” to open the Services window.
- Scroll down to “Windows Update” and double-click on it.
- As the Properties window pops open, in the start type select the “Disabled” option and then press “Stop.”

- Followed by this, press “Apply” and “OK” to bring the change into effect.
Read More: Fix The Disk Is Write-protected Error On Windows 10/8/7
Summing Up
So, friends this was our wholesome guide to fix Windows 10 100% disk usage in Task Manager error. With this I hope that you are able to boost your PC performance. Always ensure to run only a few programs at a time to keep your PC performance at an optimum level.
Do let us know in the comments section which method worked for you or if you have any other suggestions.


1 Comment
Very nice post, I actually love this web site, carry on it