Main LogoLight Logo
  • Reviews
  • Top 10
  • How To
  • Tech News
  • OS
    • Windows
    • MAC
    • iOS
    • Android
  • Categories
    • Driver Updater
    • Cyber Security
    • Games
    • Fitness
    • Entertainment
    • Tips & Tricks
Reviews Windows
by Prachi Dani

Driver Booster 11 Review: Pricing, Features, Pros, Cons & Expert Advice

April 26, 2024
1

Is the Driver Booster tool worth downloading? Read this comprehensive and honest review of Driver Booster software to decide whether it is worth your time or not. 

Did your PC run into a problem and need a fix? Well, this can be due to outdated and broken drivers. The Driver Booster is a renowned driver updating tool that can offer the perfect solution and ensure the good health of your system. 

However, before we move ahead to learn about the features and functionalities of Driver Booster, i.e., one of the best free driver updater tools, let’s first have a quick look at some of the common system issues you can face due to outdated drivers.

What PC Issues Can You Face Due to Broken Drivers? 

  • Your internet connection may become unstable.
  • You may face frequent screen freezing and system crashing issues.
  • The hardware devices attached to your system including the printers, webcam, the scanner may stop to work smoothly.
  • You may also experience sound errors while listening to your favorite music piece.
  • Games may start running slow, they might hang and crash frequently.

So, we know how important are device drivers for your PC to run smoothly. Let’s get some useful insights about Driver Booster, its pros, and cons, features, and benefits along with its pricing policy.

Table of Contents hide
Driver Booster Free Version: All That You Need To Know
Tool Specification and Description
Pros and Cons
Driver Booster Free Version Review- Setting It Up
1. Installation
2. System Scan
3. Fixing Up
4. The Setting, System Support, and Additional Features
Performance Comparison in a Snapshot
Driver Booster Pro – A Brief Introduction
Frequently Asked Questions (FAQs) about Driver Booster
Concluding Words: Driver Booster Review 2024

Driver Booster Free Version: All That You Need To Know

Driver Booster is manufactured by IObit, a company that was founded in 2014 and deals in products like Malware Fighter, Smart Defrag, Advanced System care products and many more. Its line of business is mainly related to utility tools devoted to PC optimization tools, security software, and performance optimization. 

The tool is intelligently designed to perform a system scan, detect all outdated and broken drivers and fix them in no time. 

Windows Download Button

Tool Specification and Description 

Manufacturer IObit
Main Functionality One-click driver updater tool
Latest Version Driver Booster V 11.4.0
Driver Database 200% larger database with around 3,000,000+ drivers including drivers from AMD, Intel, Nvidia and many more.
Windows OS Windows 7/8/8.1/10/XP/Vista
Technical Support 24/7 Technical support
Installer File Size 28.3 MB
Menu Language 48
Additional Features and offerings One-click Update, Game Booster, Feedback channel, fix separate device issues, Secure driver update, create restore points, view system information

Driver Booster is available in three versions. One version is free but comes with limited features and its other version is known as Driver Booster 11 Pro Trail, while its paid version is known as Driver Booster 11 Pro. Its yearly subscription costs $19.95 and $22.95 and can support 1 and 3 systems respectively.


Pros and Cons

Pros

  • Automatic Tool that works when you are away and the system is idle.
  • Can fix and repair your broken and outdated device drivers in a single click
  • It can automatically reboot your system once the drivers are updated and repaired completely.
  • It is compatible with all Window versions
  • It creates a backup of all broken drivers before updating them to avoid any data loss.

Cons

  • The Application is not compatible with Mac, Linux, and Android devices.
  • Does not give details of all missing drivers.
  • At times it is unable to update specific drivers, which have to be updated manually.
  • Contains a lot of ads for other IOBit applications and services.

Driver Booster Free Version Review- Setting It Up

Windows 7 users form the majority of the PC users which require driver updater on a regular basis, Windows 10 system falls in the category of advanced systems which hardly require a driver booster, while the earlier Windows versions are hardly in use. According to experts, the 64 bit Windows 7 system is the most suitable machine for setting up Driver Booster.

Windows Download Button

For better understanding let’s set it up on two devices with the below-mentioned specifications:

Specification Device 1 Device 2
Device Type PC Acer Aspire Laptop
RAM 8GB RAM 3GB RAM
CPU Intel Celeron CPU of 2.60 GHz Intel CPU of 1.30GHz
Screen Resolution 1920*1080 1366*768

Let’s assume that both the devices have not been updated from the last month. During the update search, we found out close to 70 optional and 135 crucial updates. Let’s get started with the actual installation process now.

Read More: CCleaner Review: Product Details, Features, Price & More

1. Installation

The installation process of driver booster is quite simple, just download and set up the installation file from the publisher’s website. 

Driver Booster Installer
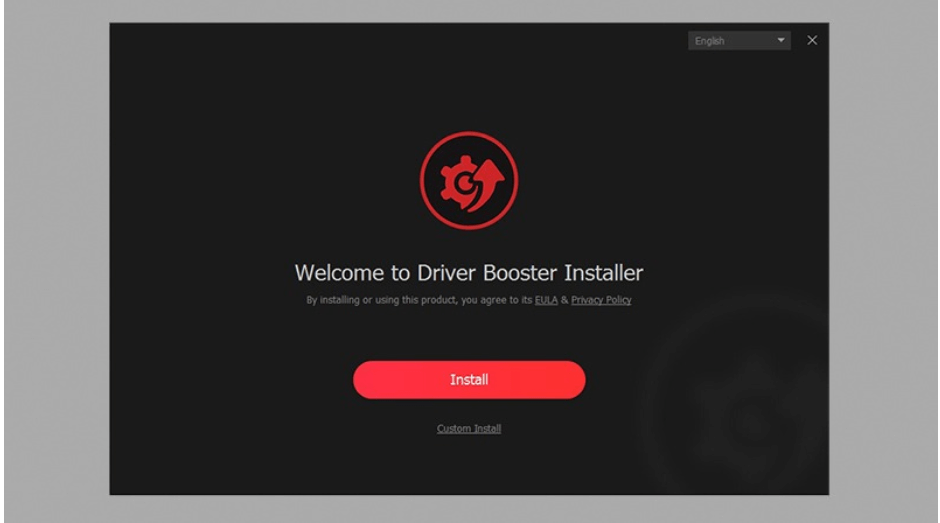
  • To start with, set your language preferences on the Welcome screen.
  • On the Welcome site, you will see two buttons, one of the red color install button while the other one is for custom installation.
  • We recommend you to go with expert advice and choose the Custom installation. 
  • With the custom installation option, you will be able to skip or install additional tools. 
  • Apart from this, you will also be able to select a path, pin to the taskbar and create a desktop icon.
Select Best Path To Install Driver Booster
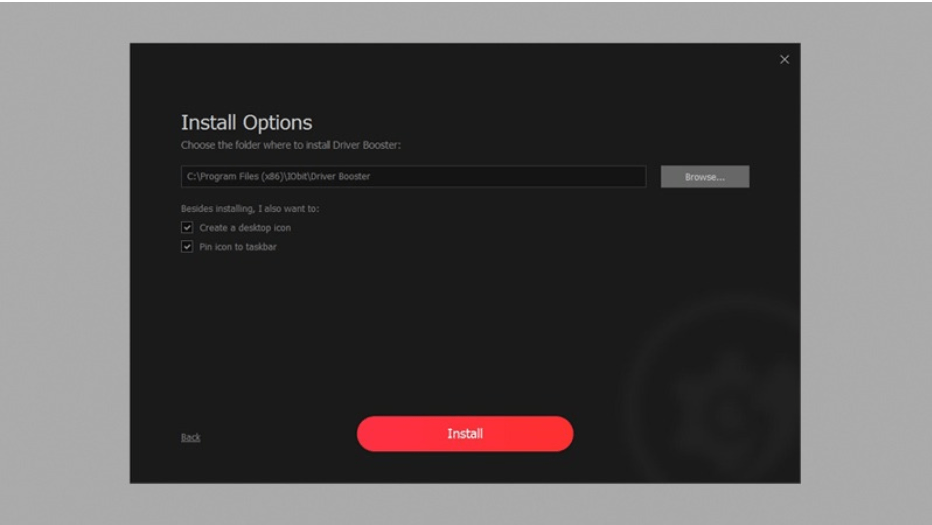
  • Once you are done with these specifications you can click on the Install button to start the download process. 
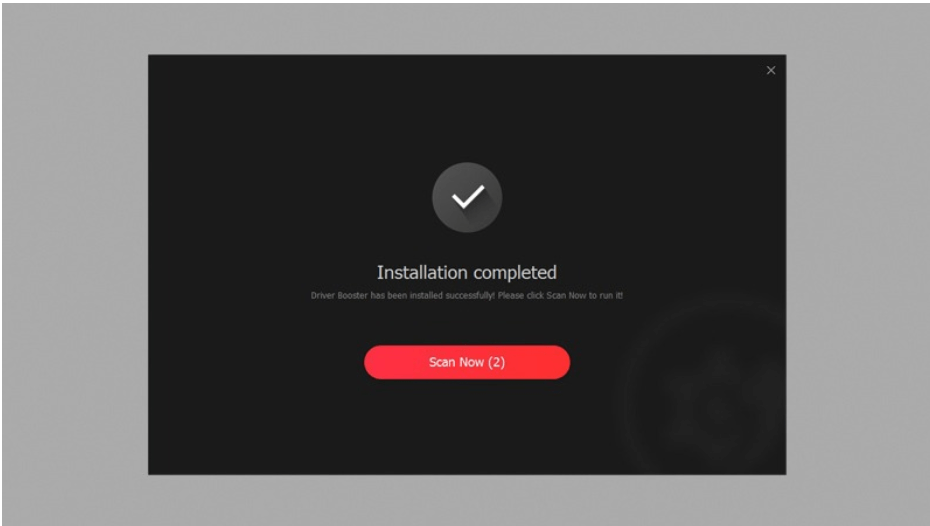
  • Post successful installation of the driver booster, you can straight away jump to the system scan. 
Installation of The Driver Booster

Read More: Best Tips to Speed up Windows 10 Computer

2. System Scan

The advanced working of the driver booster can leave you in complete awe. If you do not click on the Scan button within 5 seconds after the installation, the tool will automatically start a system scan. The main scanning screen comprises a big Scan/Stop button placed in the center along with a Device Driver and Game Components placed on each side of the central scan button. This tool quickly starts and sums up the scan. All under a couple of minutes.

Update Outdated Drivers With Driver Booster

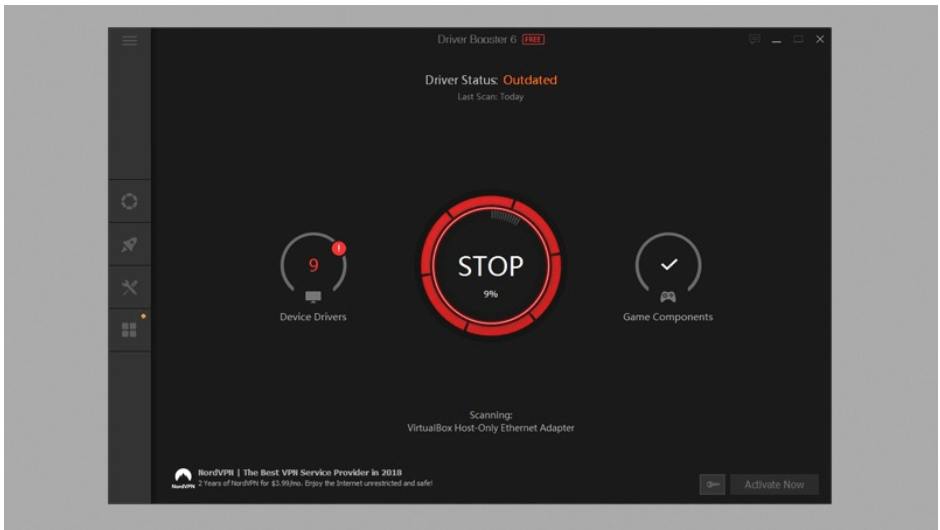
Click on the scan button to start system scanning using the driver booster tool. And now comes the big factor, the detection of outdated and broken drivers. We tested it on both the devices and the results were appropriately corresponding to the health of the two machines.

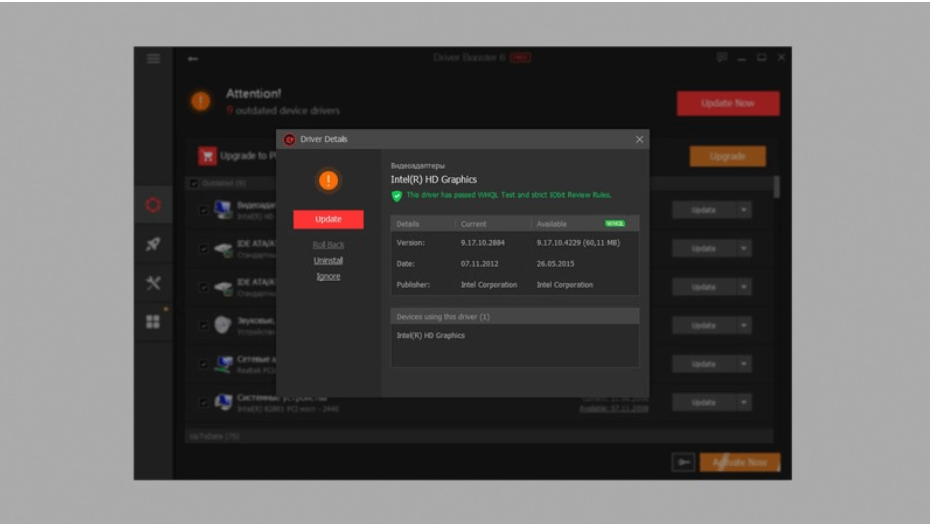
Once system scanning is complete, the driver booster will display a list of all broken drivers which need to be fixed. Apart from this other additional information is also displayed which includes. 

1. The name and category of the device driver.

2. Details of the current version along with the publisher’s name and date of publication.

Activate Driver Booster

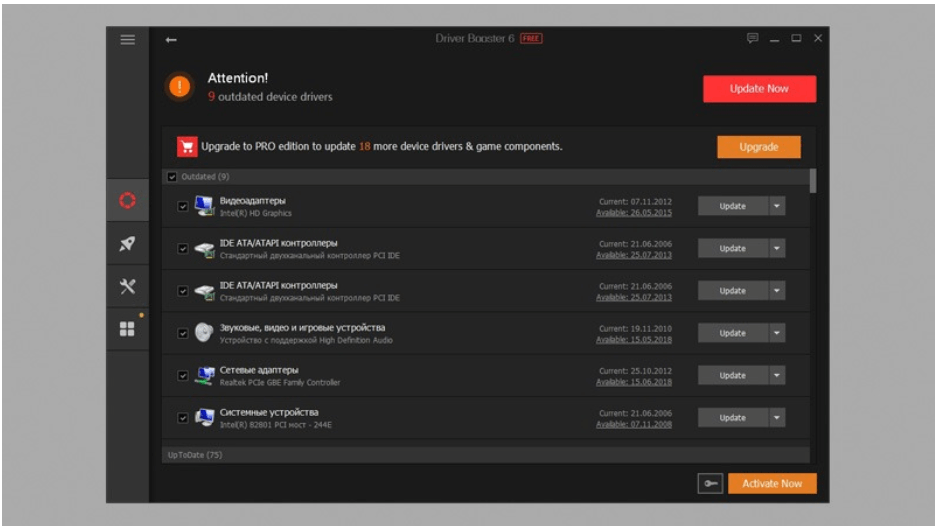
3. Details of the new available version, its publisher and date.

4. Here users have the option to either install, uninstall, ignore or perform a one-click update of all broken drivers.

Update All Broken Drivers With Driver Booster

Read More: List of Best Bluetooth Software for Windows 10 

3. Fixing Up

Once the driver booster software is through with the system scanning process, it’s now time to fix and repair the identified drivers. During the repair process you will also be notified of all system reboot requirements, conflicts with system security software, program crashes and network disconnection issues.

Driver Booster Software

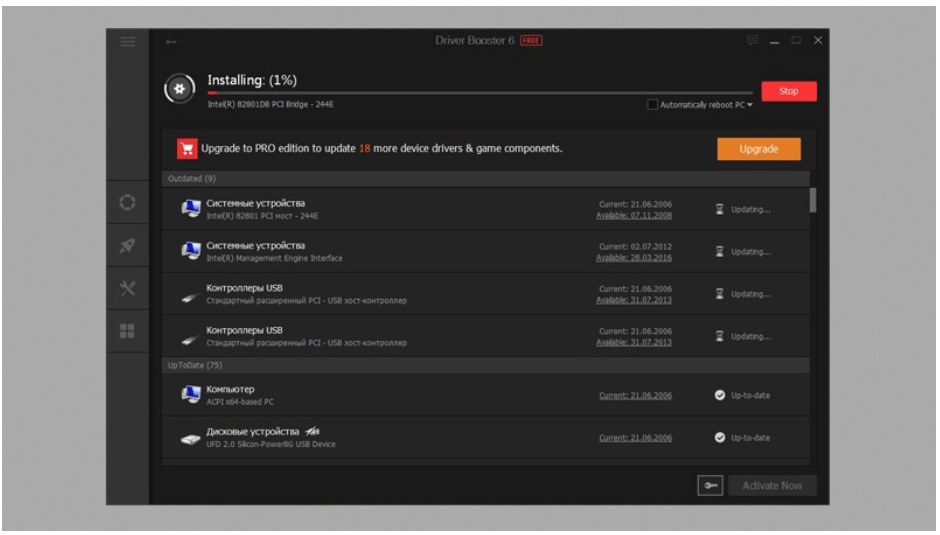
The repair window also gives you real-time update status of each driver and categorizes the progress under headings like preparing, downloading, completed and reboot required.

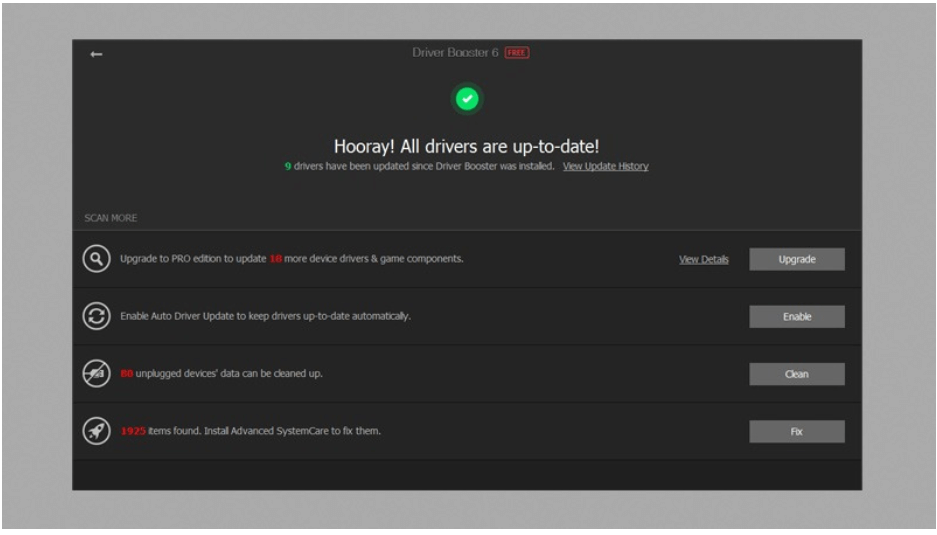
Once the repair and reboot process is complete you will get a notification stating that “All the drivers are up-to-date”. 

All Drivers Are Up To Date With Driver Booster Software

4. The Setting, System Support, and Additional Features

  1. The Driver booster tool comes with an easy-to-use functionality powered by a clean interface.
  2. Its main page is well designed for a better user experience.
  3. You can customize the page and choose your preferred font size, language, and layout transparency.
  4. It also creates a backup of all drivers.
  5. The tool offers drivers for display devices, graphics cards, and other devices. This helps in improving the gaming performance of your device.
  6. This power-packed tool can effortlessly launch a system scan, can reboot your system automatically, run scheduled systems and repair all outdated drivers in a single click.
  7. It also comes with a 24/7 operation chat window which you can use to discuss your queries with the Driver Boosters team.

In addition to the above-mentioned functionalities and offerings, Driver Booster is also powered with several other useful features. 

  • Smart Defrag: Use it to defrag, optimize and organize your system hard drive. It helps in enhancing the response time of your device.
  • System Optimize: Perform system scan, remove junk and unwanted system registry files to improve the overall health of your system.
  • Game Boost: Enjoy a perfect and uninterrupted gaming experience and configure gaming apps. 
  • IObit Malware Fighter: Add an additional security layer and protect your system against malicious malware, spyware, and other PC threats.
  • Manage multiple passwords with the Dashlane feature of Driver Booster.
  • Apart from this, it also comes with several other tools that can help you fix network failure, bad resolution, no sound, and many other problematic system areas.

Performance Comparison in a Snapshot 

Activity PC Laptop
Installation Time 35 seconds 2 minutes
Scanning Time 30 seconds 2 minutes and 30 seconds
Outdated Drivers Found 9 outdated and 75 good drivers 33 broken and 70 good drivers
Driver Update Time 5 minutes 45 seconds 22 minutes 10 seconds

So this is the final performance summary of Driver Booster 11 free version. However, to get more realistic and definite results we also tried comparing it with few other drivers. By far this is the best tool we have come across and on top of it, it does not use much system resources and is relatively light in weight.

The tool offers value for money to all its users. Some other viable alternatives to this updater charge relatively high prices to offer the same features and functionalities as the app. Thus, making it a cost-effective alternative for you.


Driver Booster Pro – A Brief Introduction

Powered with high-end features and benefits, Driver Booster Pro is the enhanced version of the free version. It comes with a rich database of more than 6.5 million drivers and is capable of detecting even the smallest issue including the gaming components. These drivers are gathered after analyzing over 1200 different brands for better inclusion.

Here are a few highlights about this stunning tool:

  • It comes with a one-click update feature.
  • It is also an Advanced System care tool that can clean system junk, registry entries, and privacy traces to optimize the overall performance and working of your device.
  • It is also capable of scanning spyware.
  • As an additional feature, it also gives its users the power to switch between various interface skins including blue, black, white and many more.
  • Apart from this, for better customer satisfaction it also comes with a 60-day money-back guarantee. 

Frequently Asked Questions (FAQs) about Driver Booster

Q1. Is The Driver Booster Free?

Yes, Driver updater is completely free of cost and can seamlessly scan your system and update all broken and corrupted Drivers. If you wish to enjoy added benefits like gaming optimization, error fix and automatic updates you can opt for its pro version.

Q2. Who Makes The Driver Boosters?

Driver Booster is developed by IObit.

Q3. How Do I Update All My Drivers For Free?

You can update your device drivers for free with the Driver Booster Tool. It is an automatic tool which performs system scan, detects all problematic drivers and updates them in no time.

Q4. What Does a Driver Booster Do?

Driver Booster is a power-packed driver updater tool. It can automatically scan your PC/ laptop for corrupted and outdated drivers and update them. 

Q5. How Do You Check If Drivers are Up To Date?

You can either use a manual way or an automated tool to check the health of your device drivers. The manual ways include two ways: Windows Update and Device Manager option. Alternatively, you may use an automated driver updater tool like Driver Booster to fix your device drivers.

Q6. How Can I Update My Drivers For Free Windows 10?

The best way to update your device drivers is through an efficient driver updater tool. The market is filled with multiple options, if you are looking for free software, you can pick Driver Booster for smooth system performance and hassle-free operations.

Q7. How much space does Driver Booster take up?

Driver Booster only takes up to 28 MB of space on your system and thus, is lightweight.

Q8. How does Driver Booster work?

The working of Driver Booster is simple. It just scans your system for outdated drives, shows you the results, and then updates the same.


Concluding Words: Driver Booster Review 2024

Above, we have shared all the features, functionalities, specifications, and positive & negative aspects of the Driver Booster software. Based on this review you can decide whether to download Driver Booster on your Windows PC or not. 

We hope that you found this review of Driver Booster informative and helpful in selecting a good driver update and repair software for your laptop or desktop. If you are interested in reading more such software reviews & tech-related posts, then do not forget to subscribe to our newsletter. 

Author

Prachi Dani

Prachi Dani is a technical content writer who specializes in areas of science and technology. She is highly up to date with technological transitions and transformations. Writing is not her passion but the only thing that carries satisfaction in life. If not writing, you may find her engrossed playing action games on her treasured smartphone.

View all posts

Related Posts
Solve-USB-Drive-Not-Showing-Up-on-Windows-10

[Solved] USB Drive Not Showing Up on Windows 10

February 4, 2021
0

Recently, numerous users have complained about the “Windows 10 USB Drive Not Showing up” issue. Are you one of them? Then, you are not alone. Through this write-up, we have brought-up the easiest and productive ways to fix the same issue. To get an in-depth understanding of it, read on the entire write-up!

Before we roll ahead towards the troubleshooting ways, here is a briefing about the issue. However, this issue is pretty general and related to external storage devices. USB is literally a crucial variant of technology that lets you connect numerous devices to your computer. Majorly, broken USB flash drive, partition problems, outdated drivers, and software causes this issue.

Though it is pretty effortless to set up a USB at the same time it isn’t all about the plug and play. Sometimes, the USB drive doesn’t show up. In this event, what will you do in order to recover this issue? Fortunately, dealing with this issue is quite an easy task. Try the below-mentioned troubleshooting methods to fix the same issue.

Quick Methods to Fix USB Drive Not Showing Up on Windows 10

However, it is not easy to point out the definite reason why your USB drive not showing up on Windows 10. But, you can try numerous solutions until it works again perfectly as it used to. In this write-up, we’ve listed down some easy and effective methods that you can use when you are encountering USB connection issues. So, without further ado, let’s move to the next section!

Method 1: Inspect for Device Compatibility

A basic workaround that you can do to fix the thumb drive not showing up issue is checking for the device compatibility. However, USB 3 tools can easily connect to USB 2 ports. But, USB 3 devices need more robust and suitable ports to run perfectly. So, before shifting towards other advanced solutions, first, reveal overall compatibility information.


Method 2: Plug into another PC or USB port

Try to plug your USB drive into another PC or USB port, and then check if the USB drive shows or not. If the USB drive won’t show up on another system or a new USB port then the older system itself may have an issue. Damaged and broken USB ports may lag in recognizing the USB flash drive. Plus, always be sure that the port should be clean and dust-free.

Also See: Fix USB Ports Not Working in Windows 10


Method 3: Update USB Drive Drivers via Bit Driver Updater

If the USB stick is working flawlessly on another computer or new USB port then it is clear that the fault is with the USB drive driver on your system because of which you can’t access USB drive Windows 10. So, in that scenario, you have to be sure that your USB drive drivers should be updated to their latest version.

However, you can do this task using a Device Manager but for the very same you need to have distinct knowledge about the tech skills. Plus, it takes a lot of time as well. Alternatively, you can use Bit Driver Updater, a fully automatic driver updater tool that automatically searches for outdated drivers and updates them as well. Follow the instructions given below to update drivers with Bit Driver Updater!

Step 1:- Click on the download tab given below to install the Bit Driver Updater.

Windows Download Button

Step 2:- After this, wait for a while until it completes the scanning for the outdated drivers that need an update.

Bit Driver Updater Tool


Step 3:- Thereafter, it will produce the list of the drivers that need an update and you have to inspect the list.

Bit Driver Updater Software

Step 4:- At last, click on the Update Now option.

Just like an extra topping, Bit Driver Updater gives you an option to update all the drivers at a time. For performing so, you need to click on the Update All option instead of Update Now. This software is available in two variants i.e., free and paid. So, if you want to use the advanced features of this software then you have to purchase its pro version. Update USB drivers and check to see you can’t see USB drive error solved.


Method 4: Disable USB Selective Suspend Setting

Basically, it is a power-saving attribute that usually works to dilute the power of the USB when it is connected to the system. Hence, to make sure that your USB drive is not powering down for any cause, turning off the USB Selective Suspend setting. Follow the below-shared steps that explains how to open a flash drive on Windows 10 by disabling the USB Selective Suspend Setting:

Step 1: In the search bar of your Windows, then type Control and choose the best match of it.

Step 2: Later on, set the view by as Category and click on the Hardware and Sound option.

Launch the Control Panel on your Windows device

Step 3: Then, select Power Options and click on the Change Plan Settings.

Hardware and Sound option

Power Options

Step 4: Next, click on Change Advanced Power Settings.

Change Advanced Power Settings

Step 5: Now, from the next pop-up window, locate USB settings and click on the “+” icon to expand it.

Step 6: Thereafter, click on the USB Selective Suspend setting and choose Disable.

USB Selective Suspend setting

That’s all you are required to follow in order to disable this setting. Try this and check if the USB drive not showing up Windows 10 fixed or not.

Also See: How To Enable Disable USB Port in Windows 10


Method 5: Run Windows Update

It might be possible that your Windows outdated version is a reason behind the USB flash drive not showing up windows 10. Therefore, you need to update the Windows operating system instantly. For the same, we’ve shared the steps below!

Step 1: Press Win and I key at the same time from your Keyboard to invoke Windows Settings.

Step 2: Then, navigate to Update & Security and click on it.

Windows Settings

Step 3: After this, choose Windows Update from the left pane and then click on the Check For Updates.

Click On The Windows Update

Now, Windows will automatically start searching for the available Windows updates. Plus, automatically finds other issues and fixes them too. So, try this method and check whether USB not showing up on Windows 10 fixed or not.

Also See: How to Update USB 3.0 Drivers


Method 6: Try Disk Management Tool

Using this tool you will get to know whether Windows will recognize your USB flash drive or not. Apart from this, it also reveals all the hard discs connected to your PC and allows you to see the information about the partitions, sizes, and so on. For many users, the above solutions don’t work and they keep on complaining “we can’t find a USB flash drive”. Those can use this troubleshooting method to fix the issue.

Step 1: Connect your USB stick and then click right on the Start icon.

Step 2: Then, choose Disk Management from the list of options.

Disk Management

Step 3: Now, if you could see your USB stick named as Removable then you can generate a new volume or assign a new drive letter.

Disk Management Tool

This is how you can partition or format your USB stick to make it easily identifiable. And, just in case, if your external USB not showing up windows 10 then it might be possible that your USB stick is dead.

Also See: Fix Unknown USB Device (Device Descriptor Request Failed)


USB Drive Not Showing Up on Windows 10 [SOLVED]

If any of the above methods doesn’t help you in fixing the issue then as a final bet you can change your USB stick. But, hopefully, this guide will help you. Now, you know what to do when the USB drive not showing up on Windows 10. So, that’s all, as for now, share your opinions regarding this in the comment box below. And, do not forget to subscribe to our Newsletter to get more informative write-ups. Till then, stay tuned!

How to Fix OBS Not Picking Up Mic Windows 11,10

How to Fix OBS Not Picking Up Mic Windows 11,10

September 11, 2022
0

You may read this article to fix the OBS Studio microphone not working issue effortlessly.

Open Broadcaster Software (OBS), as you may know, is an open-source software to record videos and stream live. It is currently among the best free video recording and live streaming programs. However, many users recently reported an issue where their OBS mic is not working, hindering their experience with the software.

If you also happen to be one of those troubled users, there is no need to panic. Now that you have landed on this article, you may fix the OBS microphone not working issue quickly and easily. This article will guide you through the best possible solutions to this problem.

However, before discussing the fixes to the problem, let us first talk about why OBS is not picking up the mic in Windows 11/10.

Reasons OBS Mic Is Not Working

The following may be possible causes behind the OBS microphone not working problem.

  • No permission to use the microphone
  • OBS is on mute
  • Your microphone is not the default audio device
  • Exclusive mode is active
  • Out-of-date audio driver
  • Issues with the OBS audio settings
  • Random bugs or missing OBS files

Above, we listed the common reasons OBS mic may not be working to help you fix the issue effectively. Now, let us discuss the fixes to this problem.

100% Working Fixes to the OBS Mic Not Working Issue

You may apply the following solutions to get rid of the issues because of which the OBS is not picking up the mic on Windows 11/10.

Fix 1: Give microphone access to the software

Your computer should grant OBS permission to use the microphone. OBS mic may not be working as the software does not have microphone access. Hence, you should follow these steps to provide the necessary permissions.

  • Invoke the settings panel using the keyboard shortcut Windows+I. 
  • Select the setting for Privacy on your computer.Select the Privacy in windows setting
  • Pick Microphone from the pane on the left, select Change, and turn the Microphone access for this device toggle on.
  • Allow apps access to your microphone. Allow apps to access your microphone option
  • Now, check whether the issue is resolved or the OBS Studio mic is not working.

Also Read: How to Fix Logitech G935 Mic Not Working in PC


Fix 2: Unmute the OBS

The OBS microphone will not be working if the OBS is on mute. Hence, below is how to unmute the OBS to fix the problem you are experiencing.

  • Right-click on the taskbar’s speaker icon to Open Volume Mixer. Open Volume Mixer
  • Click on the OBS speaker icon to unmute it.
  • Confirm whether the problem has disappeared or the OBS mic is not working.

Fix 3: Set the microphone as your default audio device

The OBS Studio mic may not be working if the microphone you are using is not the default audio device. Hence, you may take the following steps to set it as default to solve the problem.

  • Right-click the speaker icon on the taskbar and choose sounds from the on-screen menu.Select Sounds from the menu
  • Choose Recording from the top menu, right-click the empty space, and Show Disabled Devices. Tick on Show Disabled Devices option
  • Right-click your microphone and Enable it.Microphone - choose the Enable option
  • After enabling the microphone, right-click on it and choose the Set as Default Device option.Set as Default Device
  • Lastly, click on OK to confirm the changes.

Fix 4: Turn off the exclusive mode

Exclusive mode stops the mic from connecting to OBS when you use chat applications, such as Skype. Hence, you may follow these directions to turn off the exclusive mode to fix the OBS microphone not working issue.

  • Right-click the speaker icon and open sounds. 
  • Select the Recording tab, right-click your microphone, and pick Properties from the context menu.Microphone Properties
  • Under the Advanced tab, find and uncheck the option to Allow applications to take exclusive control of this device.
  • Click on Apply and OK to confirm the changes.Allow applications to take exclusive control of this device
  • Try to use your microphone on OBS to check whether the software is picking up the mic on Windows 10/11 or not.

Also Read: How to Fix Corsair HS35 Mic Not Working [Easily]


Fix 5: Update the out-of-date audio driver (Recommended)

The outdated audio driver is a common factor responsible for almost every issue, such as the OBS mic not working. Hence, updating the driver is among the most recommended ways to fix this and many other problems.

You may update the drivers automatically and flawlessly using an expert software called Bit Driver Updater. The Bit Driver Updater program downloads and installs driver updates with one click, backups up and restores drivers, increase the pace of downloading drivers, and offers many other benefits.

Below is the link from where you may download this software and install it.

Windows Download Button

Within some seconds of downloading and installing the Bit Driver Updater program, you get the outdated drivers on your computer screen. You may now select the button to Update All with one click.Update all the driver - Bit Driver Updater

You may choose to Update Now to update only the driver for audio. However, experts prefer updating every out-of-date driver for the best PC performance.


Fix 6: Check the OBS audio settings

There is a Push-To-Talk (PTT) feature in OBS allowing voice recording only when you hold its hotkey. Hence, the OBS may not be picking up the mic on Windows 11/10 if the PTT function is active. You may turn off this feature by following the directions below.

  • Launch OBS and choose Settings from the lower-right corner of the OBS window.Check the OBS audio settings
  • Select Audio from the left pane.
  • Find and remove the checkmark from the option to Enable Push-to-talk. Enable Push-to-talk
  • Choose Hotkeys from the left.
  •  Delete the Push-to-talk key.Delete the Push-to-talk key
  • Select Apply and OK to make the changes.
  • Check if the OBS mic not working problem is solved or not.

Also Read:  How To Fix Discord Mic Not Working Issue


Fix 7: Install OBS again

OBS may have some unidentified random bugs or a few crucial files may be missing, resulting in the OBS Studio mic not working issue. Reinstalling OBS can help you fix this problem. Hence, below is how to reinstall it.

  • Invoke the Settings panel (you may apply the Windows+I shortcut command).
  • Choose Apps from the options present on your screen.select apps
  • Find and select the OBS Studio and click on the button to Uninstall it.OBS Studio Uninstall
  • Now you may reinstall OBS from its official website.
  • Lastly, launch the OBS application and check whether the OBS microphone is working or not.

Fix 8: Send log files to OBS support for analysis

If the above methods are not working to fix the OBS microphone not working issue, you may send the log files for analysis. Below is the step-by-step procedure to do it.

  • Launch OBS and choose Help from the menu present at the top.
  • Choose Log Files from the Help menu and click the Upload Last Log file option.Upload Last Log file
  • Click on the Copy URL button.Upload Last Log
  • Go to the OBS Analyzer web page. 
  • Paste the URL you copied earlier and click on the Analyze button.Analyse OBS log
  • Follow the OBS support’s instructions to drive the OBS not picking up the mic issue away from Windows 11/10.

Also Read: How to Fix Webex Microphone Not Working in Windows


OBS Mic Not Working Issue Fixed

Through this article, we talked about how to fix the OBS microphone not working problem. You may troubleshoot the issue using the fixes shared above.

If trying all the fixes is not possible, you may update the drivers through Bit Driver Updater to solve this and many other issues in an instant. And for more troubleshooting guides, stay connected to this blog.

1 Comment
    John says: Reply
    May 15th 2020, 4:25 am

    It is very helpful and informative. thanks for sharing.

Leave a Reply to John Cancel reply

Your email address will not be published. Required fields are marked *

Sidebar Image bit G ad1

Latest Posts

  • Best VirusTotal Alternatives for windows in 2026 
    by Dikshika Singh / April 30, 2026
  • Best Ways to Fix Facebook Session Expired Loop Error  (1)
    Best Ways to Fix Facebook Session Expired Loop Error 
    by Gunjita Sompura / April 28, 2026
  • React vs Vue
    React vs Vue Detailed Comparison in 2026
    by Gunjita Sompura / April 23, 2026
  • Top Image Resizing software for Windows PC 
    by Dikshika Singh / April 21, 2026
  • How-To-Download-and-Install-Windows-Fax-And-Scan-In-Windows-11
    How To Download and Install Windows Fax and Scan in Windows 11
    by Dikshika Singh / April 15, 2026

Categories

  • Cyber Security
  • Driver Updater
  • Entertainment
  • Fitness
  • Games
  • How To
  • laptop
  • OS
  • Reviews
  • Tech News
  • Tips & Tricks
  • Top 10
Sidebar Image bit G ad1
Best Free Private Instagram Viewer Best Private Instagram Viewer Apps, Tools & Sites in 2024by Niharika / April 25, 2024
How To Make A Picture Less Blurry (Easy & Quick Steps)by Harshita / April 26, 2024How To Make A Picture Less Blurry
TechPout Footer Logo

We at TechPout promise to put forth stories that help people to learn and simplify their digital life. Our purpose is to share the true essence of technology with our tech-loving community.

Useful Links

  • About Us
  • Contact us
  • Privacy Policy

Popular Posts

  • Best PC Optimizer Software
  • Best Mac Cleaner Apps
  • Best Driver Updater
  • Duplicate Photo Finder and Cleaner Software
  • Best Free Movie Download Sites
  • Best IPTV Players

Follow us

Copyright © 2026 www.techpout.com. All rights reserved
DMCA.com Protection Status