
You can change icon size on the Windows 11 desktop easily to customize how icons display, such as This PC on the desktop, and troubleshoot issues like too small or too large icons, or to match your icon preference.
Windows includes built-in methods, such as context menu (right-click menu) options, keyboard shortcuts, mouse scroll options, scale and layout settings, and Registry Editor options to change the desktop icon size. This article explains these methods in detail for Windows 11.
How to Change Icon Size on Desktop
As mentioned before, context menu options, keyboard shortcuts, mouse scroll, scale and layout settings, and Registry Editor are ways to change your desktop icon settings. The easiest way to change the icon size is using the right-click menu. Desktop shortcuts come in handy when you want to change the desktop icon size quickly. Mouse scroll offers greater control over the icon size on the desktop. Changing the scale and layout settings works when you also want to change the size of all the text and other items on the desktop. Editing the Windows Registry is an advanced method that requires you to be extremely careful, as incorrect Registry changes can cause system instability. Below are all the methods explained step-by-step.
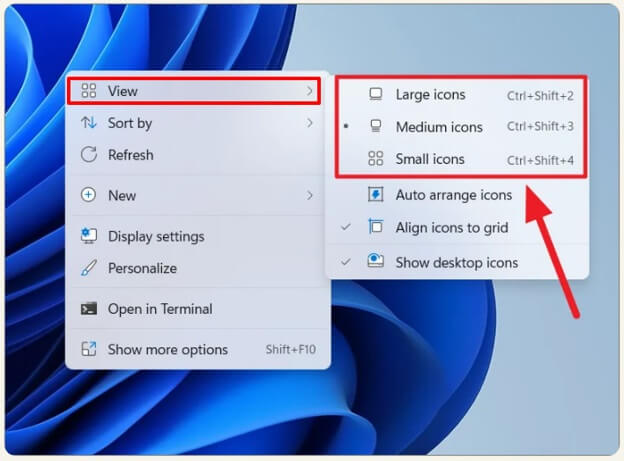
The right-click or context menu is the most beginner-friendly way to change the desktop icon size to large, medium, or small icons. Below are the steps to do this.
- Right-click an empty desktop space.
- Click View in the context menu.
- Select Large icons, Medium icons, or Small icons, depending on your preferences, from the options that appear. Note that these desktop icon sizes depend on the DPI settings and screen resolution. For example, the small or large options may be very small or very big for your desktop if you are using a 4K monitor with recommended DPI settings.
Also know: Best Easy Ways to Change Drive Icon in Windows 10
Method 2: Change icon size using keyboard shortcuts
Windows supports keyboard shortcuts to adjust desktop icon sizes quickly and easily in Windows 11. Below is how to change the size of icons using keyboard shortcuts.
- Minimize all open windows to view the desktop.
- Select any icon or an empty area.
- Use one of the following key combinations to change the Windows desktop icon size.
Ctrl + Shift + 1: Huge desktop icons
Ctrl + Shift + 2: Large desktop icons
Ctrl + Shift + 3: Medium desktop icons
Ctrl + Shift + 4: Small desktop icons
Method 3: Use the mouse scroll to change desktop icon size
The scroll wheel on your mouse is another way to change the icon size on the desktop precisely to your requirements. Here are the steps to change desktop icons with the mouse scroll.
- Minimize all open windows.
- Click an empty desktop space.
- Press and hold the Ctrl key.
- Continue holding the Ctrl key while scrolling the mouse wheel upward to increase the desktop icon size or downward to decrease the icon size.
- Release the Ctrl key when you are done changing the icon size according to your preference.
Method 4: Change scale and layout to modify the desktop icon size
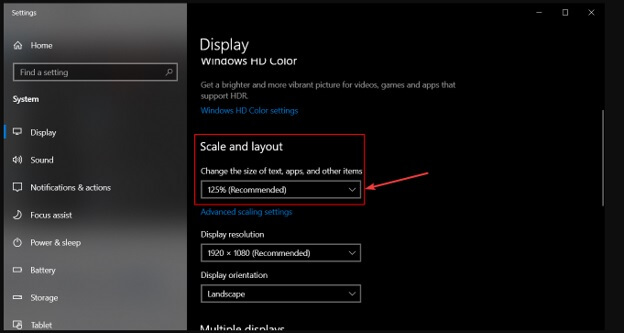
Changing the scale and layout or display layout also changes the desktop icon settings. However, it also changes the text and all other items on the desktop. If you are fine with this change, below is how to change the display layout settings.
- Right-click an empty desktop space.
- Click Display settings in the menu that appears.
- Next, click the Scale and layout drop-down in the right pane of Display Settings.
- From the available options, select the scaling that matches your requirements.
Also know: Best Ways To Run PowerShell As An Administrator
Method 5: Use Registry Editor to change desktop icon settings
You can use the Registry Editor to change the icon settings on the desktop, adjusting the space between desktop icons. Create a Registry backup before editing it. To back up the Registry, follow the path: Windows key + R > type regedit.exe > press Enter > click File > click Export > select the location where you want to save the Registry backup> type a name for the backup file in the File name field > click Save. After creating a Registry backup, follow the steps below to change the vertical and horizontal spacing between desktop icons using the Registry Editor.
- Press the Windows key + R.
- Type regedit in the Run tool.
- Press Enter.
- In the Registry Editor, navigate to the path: HKEY_CURRENT_USER\Control Panel\Desktop\WindowMetrics
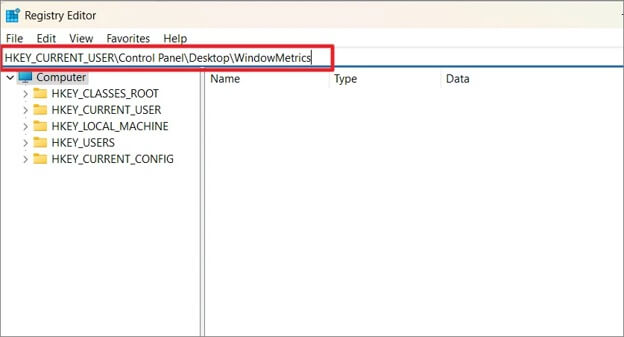
- In the WindowMetrics folder, locate the IconSpacing and IconVerticalSpacing entries in the right pane.
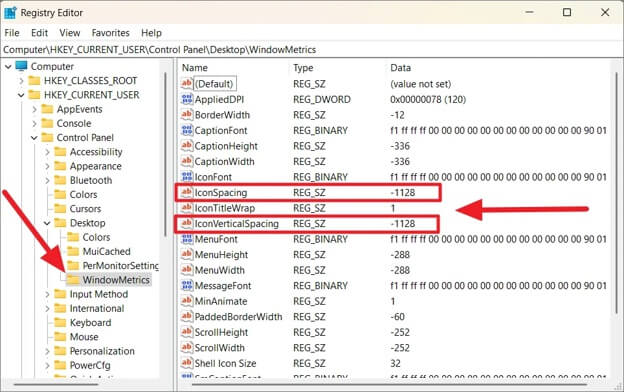
- Double-click IconSpacing to adjust the horizontal spacing.
- In the Value data field, enter a value between -480 and -2730. A value closer to -480 reduces the icon spacing, while a value closer to -2730 increases the icon spacing. The default value is -1128.
- Click
- To change the vertical spacing, double-click IconVerticalSpacing and set a value between -480 and -2730.
- Click OK to save the changes.
- Lastly, restart your PC to apply the changes.
However, if you encounter issues like desktop icons not showing, blank space on the desktop after changing the icon size, or icons scattered all over the desktop, check the solutions below.
Troubleshooting Common Desktop Icon Size Issues
Follow the steps below to solve the desktop icon problems on your desktop.
- Right-click the desktop, hover your mouse over the View option, and check View desktop icons if the desktop icons are fixed.
- To fix the blank space on your desktop after changing icon size, right-click an empty desktop space, click Display settings, click the Scale and layout drop-down, click the recommended scaling option, and then restart your PC.
- To fix the icons that are scattered all over the desktop, right-click the desktop, hover the mouse over the View option, and check the Auto arrange icons and Align icons to grid options.
Below you will find the answers to some of the most common questions about desktop icon size changes to clear up any persistent doubts.
Frequently Asked Questions
Q1. How do I change the icon size in Windows 11?
To change the desktop icon size, right-click an empty space, click View, and then click Large icons, Medium icons, or Small icons depending on your preference. For details and more methods, refer to the guide above.
Q2. Why are my desktop icons so big?
A change in the screen resolution, an outdated or faulty video card, or an accidental icon size change may be why your desktop icons are suddenly so big.
Q3. How do I hide desktop icons on Windows?
Right-click an empty desktop space, click View, and then uncheck Show desktop icons to hide them.
Q4. How do I reduce desktop icon space?
To reduce icon space on your desktop, put the icons in a folder or right-click an empty space, click View, and then click Auto arrange icons.
Q5. How do I change Windows 11 taskbar icon sizes?
To change the taskbar icon size, back up the Windows Registry. Then, in the Registry Editor, navigate to the path: HKEY_CURRENT_USER\Software\Microsoft\Windows\CurrentVersion\Explorer\Advanced, right-click the Advanced folder, click New, click DWORD (32-bit) Value, name the new value TaskbarSi, double-click TaskbarSi, change its Value data to 0 for small size/1 for medium size/2 for large size, click OK, close the Registry Editor, and then restart your PC.
Q6. How do I change Windows 11 folder icon sizes?
To change the folder icon sizes in Windows 11, press the Windows key + E, go to the folder where you want to change the icon size, click View, and then choose from Extra large icons, Large icons, Medium icons, or Small icons in the Layout options.
Q7. How do I change Windows 11 app icons?
To change app icons in Windows 11, right-click the app icon you want to change, click Properties, click Shortcut, click Change Icon, select the icon you want to change to, and then click OK.
Hopefully, this answers all your questions about how to change the icon size on the Windows 11 desktop according to your preference. Leave us a comment if you have any unanswered questions or want to share your feedback about this post.