Did you just come across the Windows 10 black screen of death error? Windows 10 has always been engulfed by several performance problems like freezing issues, blue screen of death, black screen issues, etc. In fact, the black screen of death error is not a new problem as this has been a persistent problem since the time of Windows 7.
Users have time again tried troubleshooting one or the other issues but fixing black screen problems has particularly been challenging as it does not give an error code that gives a hint as to where to start troubleshooting. In this article, we will take an exhaustive look at this problem and also learn about how to solve it.
What is Black Screen Issues on Windows 10?
To put it simply, black screen error on Windows PC happens when there is some error with the GUI.
Black screen error on Windows 10 can be due to problems with the Windows Explorer or the user account profile. This kind of issue could also be triggered by a malfunctioning graphics driver or if there is any disturbance in the physical connection between the display and video adapter. Sometimes, it may also be the result of some faulty feature update patches.
However, you can be at peace because a black screen error doesn’t lead to any sort of data loss.
How to Fix the Black Screen Problems on Windows 10
There could be a number of approaches to resolving black screen issues which have been outlined below.
1. The Trouble with the Windows Explorer
The trouble with the Windows Explorer is indicated when you are able to sign in to your account but still see a black screen. You can troubleshoot the black screen of death problem related to Windows Explorer with the help of the following steps:
- Open Task Manager.
- Go to the Processes tab.
- Then, using right-click action, select the ‘Restart’ option on the Windows Explorer service. This should enable you to access the desktop again.
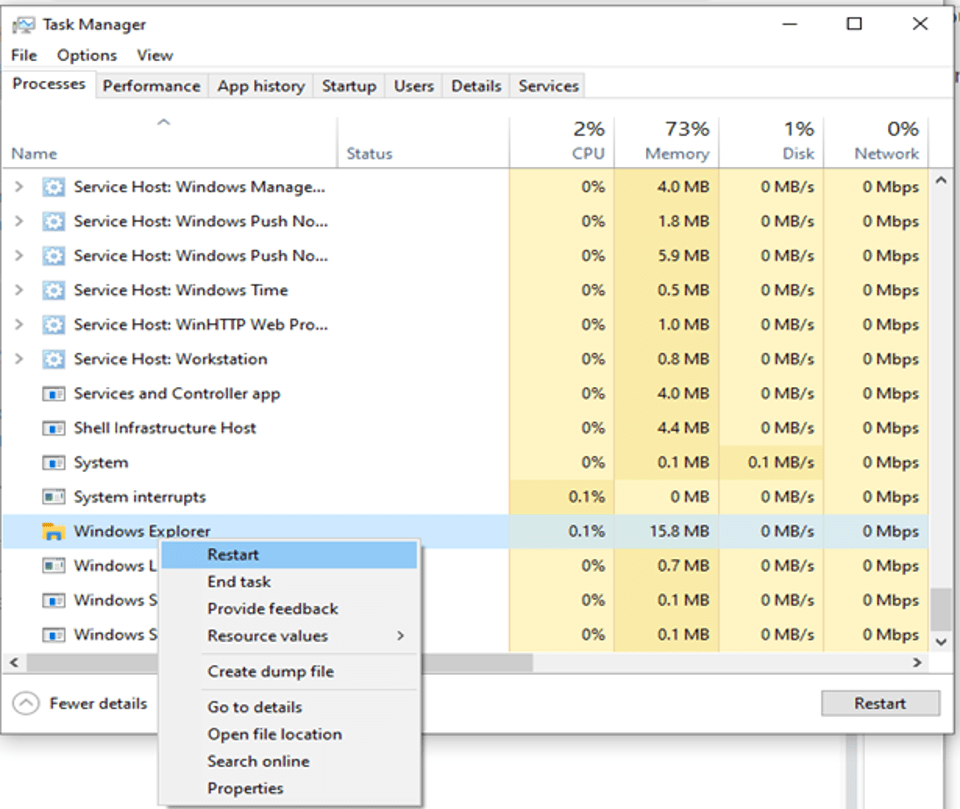
- Alternatively, if the above steps have not resolved the issue, then you could also choose to end the Windows Explorer process and run it again.
- To run it, you need to go to the ‘File’ menu and select ‘Run new task’.
- Then, enter ‘explorer.exe’ and click ‘Ok.‘
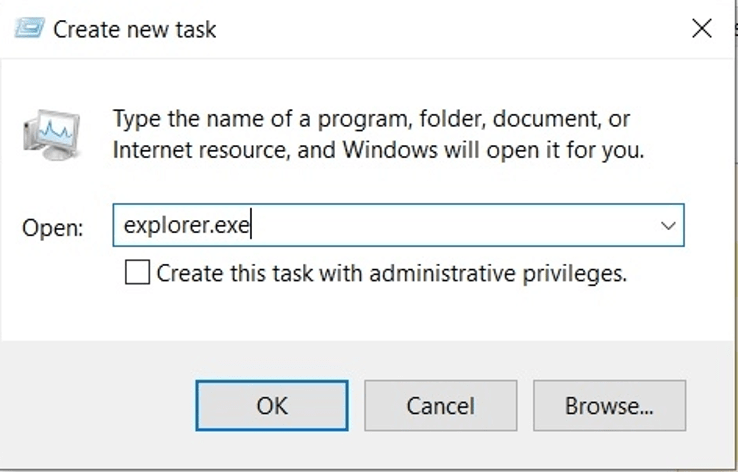
- This should resolve the issue.
Read Also: How To Fix Flickering Screen Issues on Windows 10
2. Update the Graphics Driver
Many times the heavy games can cause stress on the GPU, which may lead to black screen problems. Graphics drivers can be updated in two distinct phases. The first step is to boot the system in safe mode, followed by fixing the graphic drivers.
- First, you need to open a new window and then click on Restart while holding the shift key simultaneously. Once the screen shows the “Please Wait” message, then release the shift key.
- Then, click on Troubleshoot first, followed by opening the Advanced Options.
- Boot in safe mode by going to the “Startup Settings” option.
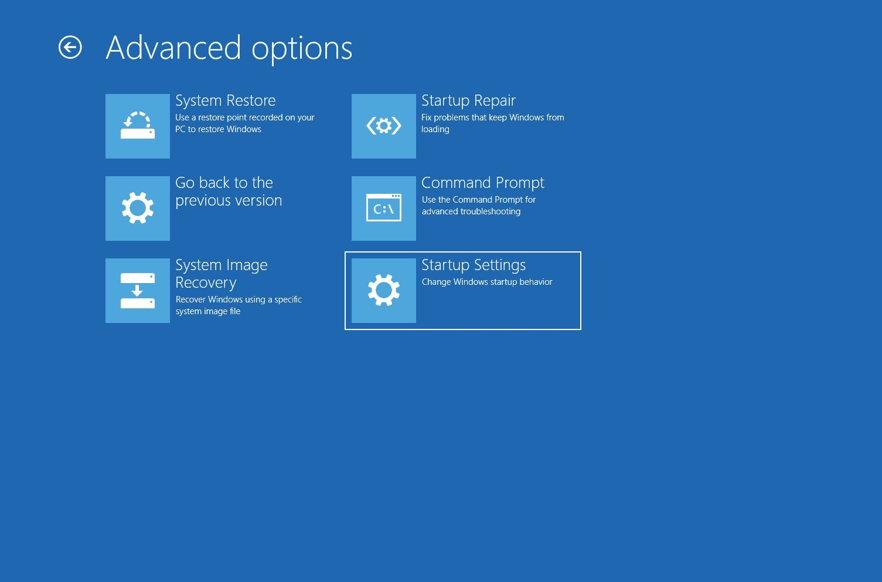
- Then, click on the ‘Restart’ button.
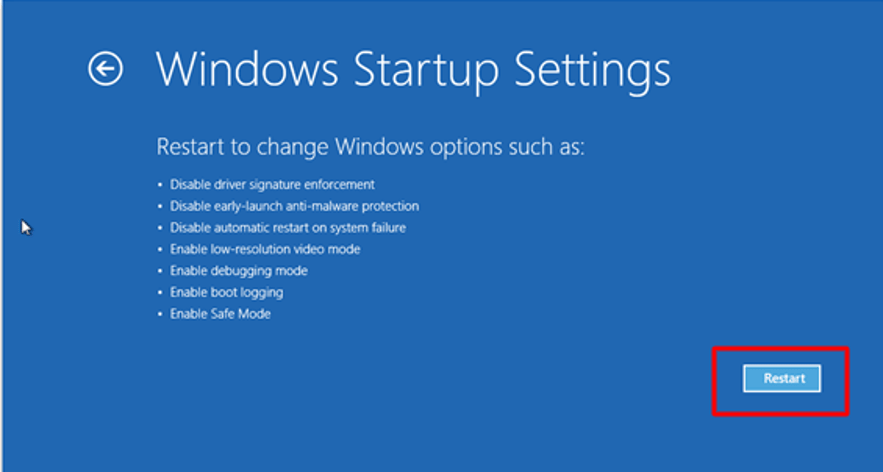
- Finally, you can press F5 or 5 key to choose the option of “Enable Safe Mode with Networking.”

- Now you can go to the Device Manager and open the Display Adapters section.
- Here, you can go for the following options:
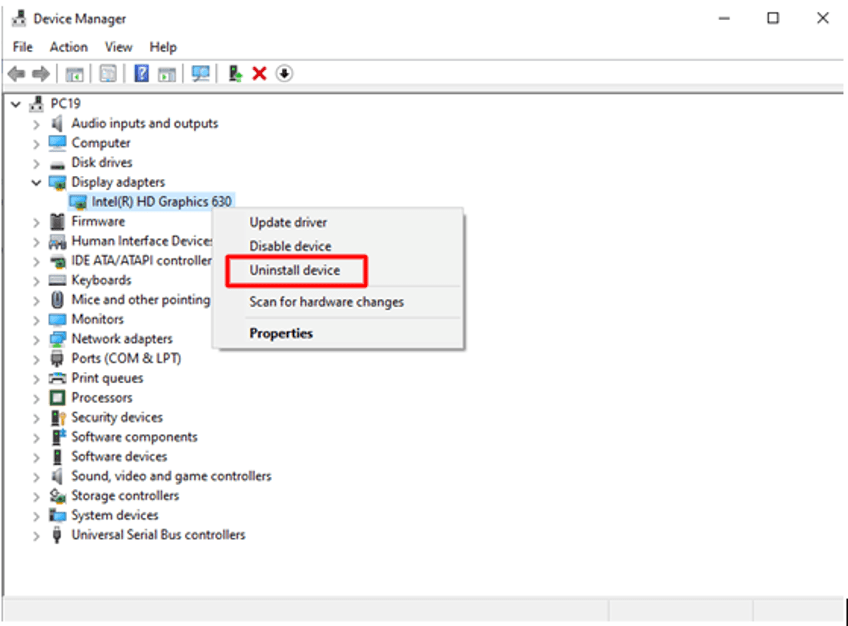
Uninstall the Graphics Driver
You can right-click on the graphic driver to select the option of ‘Uninstall Device.’ Once the uninstallation completes, you can restart your system. Post this, Windows 10 should automatically reinstall the graphics driver and resolve the black screen issue.
Update the Graphics Driver
If the issue of the black screen still persists then, you can opt to download the graphics driver from the manufacturer’s website or else, update the driver directly from the Device Manager.
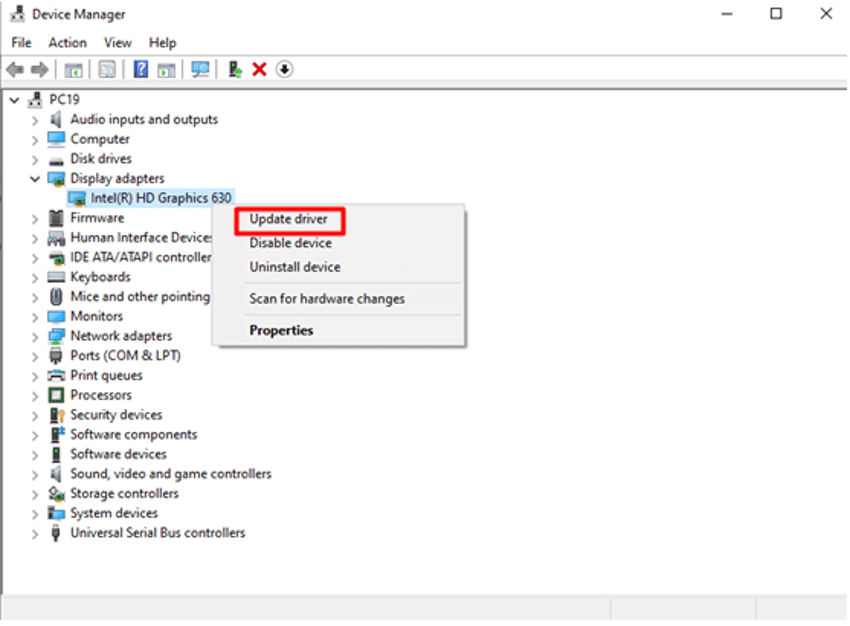
For this, you can go to the Device Manager and expand the graphics driver section.
You can then right-click on the name of the graphic driver and choose the ‘Update driver’ option.
You can then choose the “Search automatically for updated driver software” in the following prompt and then restart your system
If the problem still persists, you can always go for an automatic driver update software which will really make your job much easier for sure.
Driver Updater Tool
Updating device drivers manually can be a tedious task and requires a lot of computer knowledge and patience. Therefore, you can always use a potent driver updater software, i.e., Bit Driver Updater to find the ideal drivers for your computer and update them automatically.
Here’s how to update the graphics driver automatically using Bit Driver Updater.
- Download Bit Driver Updater setup file by clicking on the button below.

- Run the downloaded setup file and then follow some simple on-screen instructions to install the application on your system.
- After this, open the application and click on the “Scan Drivers” button to get a complete list of all missing, faulty, or outdated drivers present on your computer.
- Once you get the list, go to the graphics card driver and select the “Update Now” option to download and install its most updated version automatically.
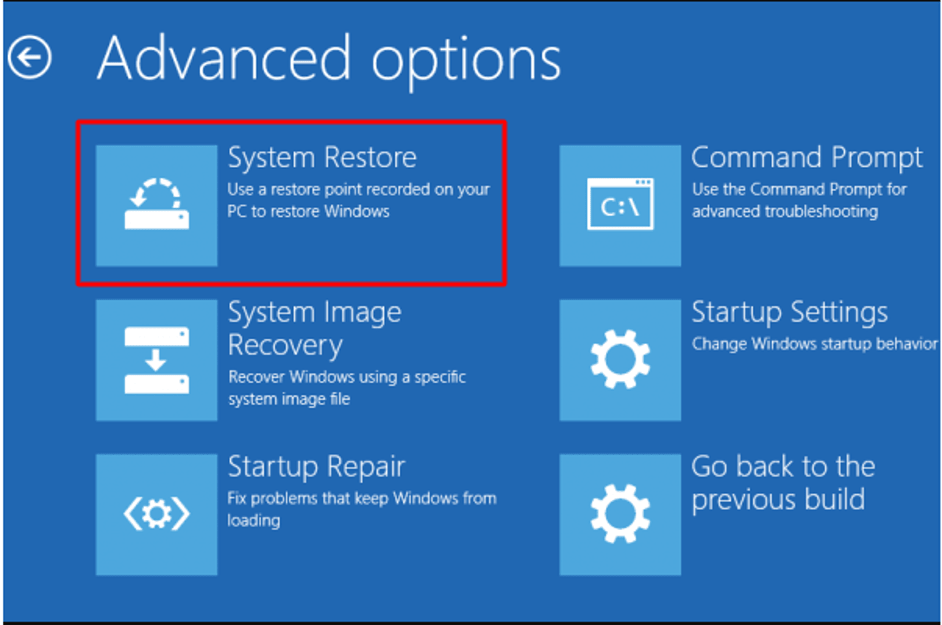
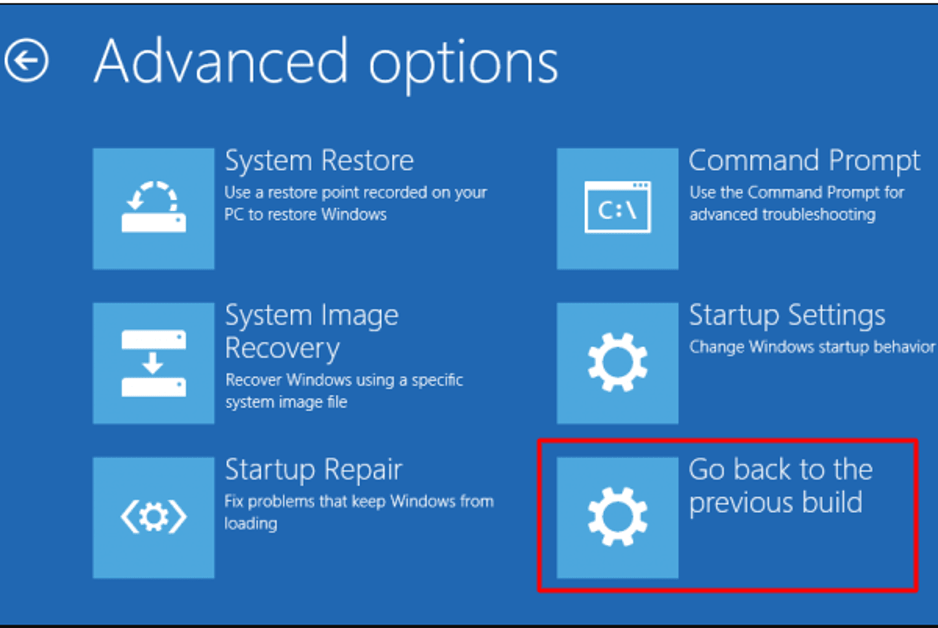
3. Fix Black Screen Problem via the Advanced Options
If none of the above options has solved your black screen of death problem so far, then you can go for two other alternative options viz; use “System Restore” or “Go to the Previous Version.”
System Restore can take your computer to the most recent system restore point but there are chances that you lose programs and files that you have installed on your system post that point.
On the other hand, rolling your PC back to the previous stable version will not impact your personal files.
4. Reset the PC
If you are viewing a black screen just after switching on the computer, then you can choose to reset your computer as the final way to resolve the black screen problem.
- For this, you can go to the ‘Update and Security’ of Windows Settings.
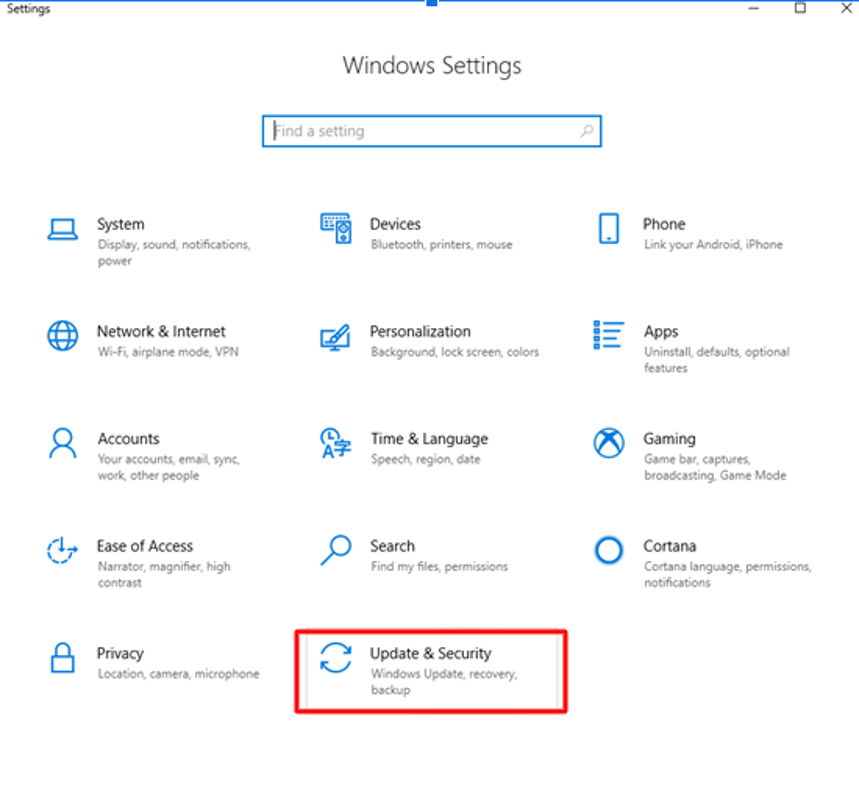
- Then, go to the Recovery tab and click on “Get Started.”
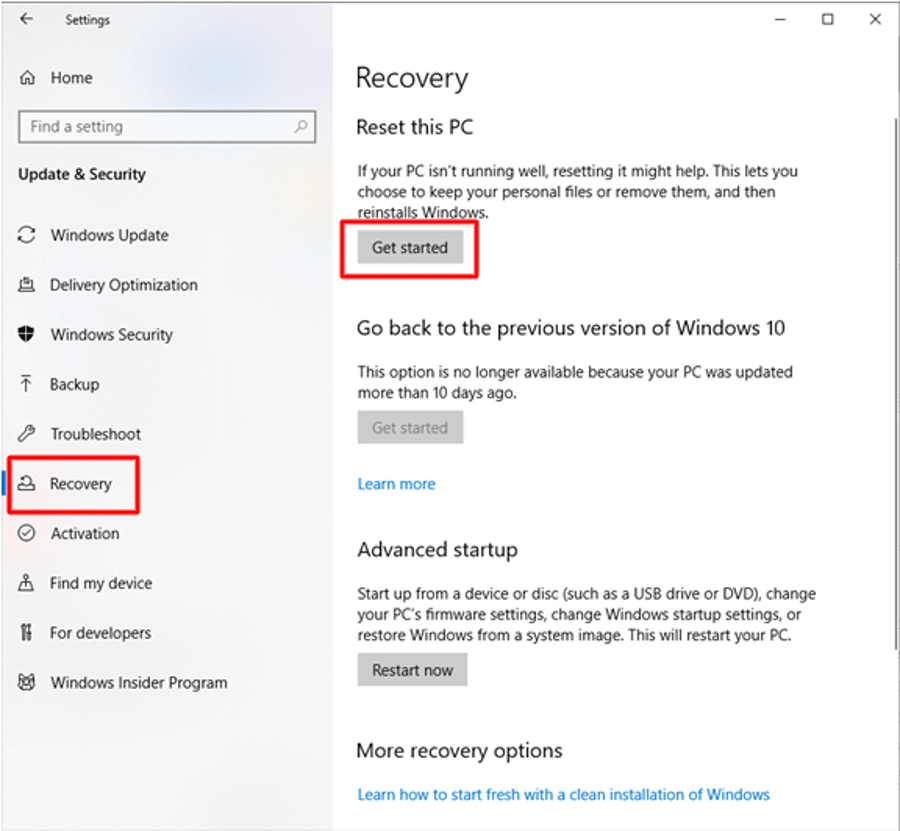
- This will further lead you to two options viz; “Keep my files” and “Remove Everything.” You can choose the option which is most suitable for you.
5. Other Fixes
As it is known that there could be multiple reasons behind a black screen problem, therefore based on the various causes of issues, here are some other fixes for the black screen problem.
Disable High Contrast
Settings > Ease of Access > High Contrast > Turn it off > Restart
Uninstall Updates
Start > Control Panel > Programs and Features > View installed updates > Uninstall the most recent updates > Restart the PC
Uninstall Security Software
Settings > Apps > Apps & Features > Security Software > Uninstall > Restart the PC
Create a New User Profile
- Go to Command Prompt and run as administrator.
- Then, type “net user tempuser / add,” and further press Enter. Give the name of the account in place of the “tempuser.”
- Followed by this, type “net localgroup administrators tempuser / add” to change the account type.
- Finally, restart your computer and sign in with the newly created account.
Read More: How to Remove Junk Files From Windows 10
Black Screen Problems on Windows 10 – [Solved]
Therefore, with the help of this post, you can hopefully troubleshoot your PC’s black screen of death problem and get your PC back in the normal state. The use of an impressive driver updater tool can always help to deal with issues related to graphics drivers. It is quite an established fact that any problem with the graphic driver often leads to multiple problems associated with the display of the system. Hence it is very essential to always have them updated with the help from an all-round driver update software.


![[Fixed] Windows Update Error Code 0x80073712 On Windows 10 PC](https://wpcontent.techpout.com/techpout/wp-content/uploads/2020/12/16162040/Fixed-Windows-Update-Error-Code-0x80073712-On-Windows-10-PC-150x150.jpg)

1 Comment
[…] you use your PC for work or leisure, and you’ve spent time making it as stable as it can be, you want to make sure it’s safe as well, which is why we’ve put together five of the best […]