Main LogoLight Logo
  • Reviews
  • Top 10
  • How To
  • Tech News
  • OS
    • Windows
    • MAC
    • iOS
    • Android
  • Categories
    • Driver Updater
    • Cyber Security
    • Games
    • Fitness
    • Entertainment
    • Tips & Tricks
How To Windows
by Snigdha

How To Setup & Use a VPN in Windows

April 6, 2020
1

Connecting to a Virtual Private Network (VPN) on a Windows 10 PC is the need of the day but do you know how to set up a VPN on your own? VPN is your best chance to secure your sensitive data whether you need to use it for your company or personal use.

You could certainly get your hands on a premium VPN application that only needs to be installed and all you need to do is to switch it on to be protected against online scams and threats. Alternatively, you may need to set up a free VPN and it could be due to the following reasons:

  • You are running Windows 10 PC in the safe mode that prevents you from installing external apps.
  • You are using a VPN without a client.
  • You want to use a VPN protocol that is not supported by your VPN’s client like IKEv2.

VPNs encrypt your data apart from masking your online identity and prevent tracking of your Geo-location. They typically route the internet connection of the device through the chosen VPNs private server rather than the ISP (Internet Service Provider). During transmission of data, it appears to be coming from the VPN rather than the computer.

During the unfortunate times of COVID-19 pandemic, when more than half the world is shut in their homes and the majority of work and business is being carried on from home, it has become very crucial to have VPN protection by your side. 

Most of the VPN connections are either handled by custom software or third-party generic software (i.e. Cisco AnyConnect). Another way is to use Microsoft’s in-built VPN client. So, in this tutorial, we will see how to set up a VPN for Windows 10 effortlessly.

Table of Contents hide
Pre-Requisites of Setting Up a VPN:
Process of Setting Up a VPN:
Steps to Set Up a VPN:
Connecting to a VPN:
Wrapping Up

Pre-Requisites of Setting Up a VPN:

  • Premier VPN Service (ExpressVPN, NordVPN, etc.)
  • Windows 10 OS

Process of Setting Up a VPN:

Before we begin, you need to understand that it is essential to have a VPN profile on your Windows 10 PC in order to establish a connection with a VPN. There are two ways to do so, either create a VPN profile on your own or set up a work account to acquire the VPN profile of your company. You can look at the below-given ways to successfully create a VPN profile:

For Work: You can view the VPN settings or look for the VPN app on your company’s intranet site. Or else, you can get in touch with the support desk of your company.

For Personal Use: If you have subscribed to a VPN service, then look for the Windows-compatible app. You will then have to go to the VPN service’s website to check if the VPN connection settings are given there like the lists of server’s location and the address needed to set up a VPN manually. 

Additionally, you should have manual sign-in info from your VPN provider that will be needed to set up a VPN manually. It can either be in the form of sign-in credentials or a certificate based on the type of service.

Read More: How to Hide Your IP Address For Free

Steps to Set Up a VPN:

Here are the steps that you can use to set up a VPN in your Windows 10 system:

  • Begin by going to the Settings of your Windows 10 computer from the Start menu.
  • You will see an option called ‘Network & Internet.’
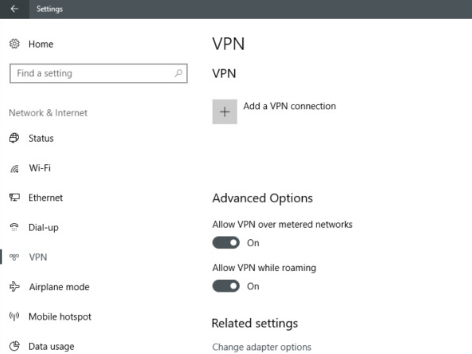
  • Once you enter the ‘Network & Internet’ segment of the Settings, you will now see an option called VPN on the left panel.
  • Now, you can click on ‘Add a VPN connection.’
Steps to Set Up a VPN
Image Source: PC World
  • A dropdown menu will appear below the VPN provider that you have to click.
  • Now you can choose the Windows (built-in) option as the VPN provider.
  • Further, you can choose to enter the Connection name, which you can input as per your choice (for example, “Personal VPN”) in the input box.
  • Followed by this, you will have to enter the address for the VPN server in the Server name or address field. It is possible to find the server address in the VPN account.
  • After this, you need to select the VPN type. To do this, you can click on the dropdown menu and select an appropriate option.
  • When you are done with the above steps, you will then need to select a connection protocol.
  • You can Type the sign-in info from the dropdown menu. 
Fill all the required info
Image Source: Server Fault
  • Choose a sign-in method and furnish the username and password, one-time password, certificate, or a smart card (if you are using a VPN for work purposes). 
  • Finally, you can click Save. 
  • If you need to make some changes in the VPN connection info or set up some additional settings, then you can do so with the help of Advanced Options.

Read More: How to Fix Windows Update Problems

Connecting to a VPN:

Once your VPN profile is set up, it’s ready for use. Here’s how you can use a VPN:

  • Click on the Network icon of your system.
  • Then, you can choose the VPN connection that you want to use.
  • Further, you can connect to the VPN by clicking on the Connect button.
Connect the VPN
Image Source: Windows Central
  • Enter your sign-in info or the username and password as needed.

Thus, this is how you can set a VPN in your Windows computer and you are all set to use your VPN connection and secure your internet connection.

Wrapping Up

Following the above steps can help you set up a VPN for your Windows 10 computer effortlessly. Using Windows built-in VPN client offers a quick solution for gaining online security and anonymity; however, there is only a specific server that you can connect to instead of having a large number of server options.

Author

Snigdha

Snigdha is a technical content writer with expertise in the field of science & technology. Though she has a very diverse academic and professional profile yet she finds writing to be a creative form that she was unable to explore so far. When not writing, she can be found indulging in other forms of creativity like painting or travelling.

View all posts

Related Posts
How to Fix Webex Microphone Not Working in Windows

How to Fix Webex Microphone Not Working in Windows 11/10 [Easily]

March 23, 2022
0

The post contains effective ways to fix Webex microphone not working on Windows 10/11 PC. After reading this troubleshooting guide, you will be able to resolve the problem on your own.

Webex by Cisco is a popular enterprise solution for online meetings, video conferencing, screen sharing, and webinars. The program has made having video conferences or meetings pretty easy, even with a free profile. People can have reliable and safe group video meetings in just a single go and enjoy plenty of additional features such as virtual background, polls, and many more.

Undoubtedly, Webex is the leading platform for video meetings, but we have seen a lot of users lately complaining about the Webex mic not working. Facing troubles with the audio is really frustrating. This could either have occurred due to outdated drivers or when the Webex doesn’t have access to the microphone or else. Well, whatever the reason is, the issue can be fixed, easily or quickly. In this write-up, we are going to explain a few easy but effective ways to get rid of this issue.

Try These Solutions to Fix Webex Microphone Not Working on Windows 10, 11 PC

Are you shouting, “how to fix Cisco Webex microphone not working on PC”? If yes, then you can consider these possible workarounds. Now, let’s discuss them below:

Solution 1: Check If Webex has Access to the Microphone

Apps like Webex on your PC require permission to access the microphone to function properly. If the application doesn’t have access to the microphone, then you can’t hear any sound in the meeting. Hence, you should ensure that the Webex has access to the microphone. Want to know, “how do I enable a microphone in Webex?”, follow the steps below:

  1. Launch Windows Settings by quickly hitting the Windows + I keyboard keys at a time.
  2. Then, choose Privacy to proceed.Select the Privacy in windows setting
  3. On the left, scroll down until you see Microphone under the App permissions and select it.
  4. Now, check to see whether the microphone access for this program is on. If not, then make a click on the Change option and click on the toggle button to switch it on.
  5. Next, be sure that the toggle button for Allow Apps to access your microphone is also on. If it is not, then turn it on.
  6. After that, scroll down and locate the Allow desktop apps to access your microphone. It is important to make sure that this setting is on because Webex is a desktop application, not a Microsoft application.

Once done, reboot your computer and check if the Webex microphone not working on Windows 10, 11 is fixed. If not, then proceed to the next solutions.

Also Read: Zoom Microphone Not Working on Windows 10 PC {SOLVED}


Solution 2: Verify Additional Permission

Are you using the Webex application directly from the browser rather than the desktop version? If yes, then verifying the additional permissions is recommended. The above-suggested permissions will allow your web browser to access the mic, but the site for Webex also requires precise permission. Here’s how to allow Webex to use a microphone:

  1. Open your Webex meeting on your browser, and click the lock icon shown on the left side of the address bar.
  2. Be sure that the Microphone setting is set as Allow. If it is not, then expand the drop-down menu and choose Allow.

After enabling the additional permissions, your microphone should start working fine as you expect. But, unfortunately, if the Webex mic still does not work, then move on to another resolution.


Solution 3: Troubleshoot the Microphone

Wondering, “why is my mic not working on Webex”? Running the troubleshooter always helps users detect and fix the problem. Maybe, this works for you too. To try this fix, follow these simple steps:

  1. Launch Windows Settings.
  2. Find and click on System.Select - System for Troubleshooting
  3. After that, navigate to the Sound from the left menu.Click on Sound setting
  4. Then, locate the Microphone under the Input category and be sure that the right microphone is chosen.
  5. Next, make a click on the Troubleshoot option in order to run the troubleshooter for your microphone.run the troubleshooter for your microphone

Now, wait and let Windows troubleshoot the microphone. In case, any problem is detected, then Windows will automatically bypass the issues. Once everything is done, then check to see if the microphone not working in Webex has disappeared. Try the next solution, if it didn’t work for you.


Solution 4: Update the Drivers

The issue with the microphone mainly occurs due to outdated, broken, or corrupted audio drivers. Therefore, it is very important to update the respective drivers from time to time in order to deal with problems like the microphone not working on Webex.

By going to the official site of PC manufacturers, you can find, download & install the accurate drivers. However, this requires expertise in a technical niche along with a lot of time or patience.

But, if you do not have time or the required skills to perform this task on your own, then you can try Bit Driver Updater. It is the best driver updater software available in the market. Using this driver updater utility, you can easily update outdated drivers within one or just two clicks of the mouse. Here is how:

  1. From the below-given download button, get the Bit Driver Updater for Free.
    Windows Download Button
  2. Run the setup file and install the software by following the on-screen instructions.
  3. Launch the utility tool and click on Scan.Bit Driver Updater -scan your drivers
  4. Wait for the scanning to be completed. Check the scan results and find the outdated microphone driver, then click on the Update Now button beside it. Additionally, you can also update the other drivers along with the same by clicking on the Update All button instead.Update All the Driver with Bit Driver Updater

However, for this, you need to use the pro/full version of Bit Driver Updater. The full version also provides 24*7 technical support and a 60-days complete money-back guarantee. So, using the pro version will be more convenient and worthwhile for you.

After updating the outdated audio or microphone driver, the Webex microphone not working on Windows 11, 10 will be resolved.

Also Read: How to Fix Logitech Webcam Microphone Not Working


Was this Helpful?

Using these resolutions you can fix the Webex microphone not working on Windows 10, 11 and easily make your microphone work again. We hope you find this troubleshooting guide useful. Drop your doubts or further suggestions in the comments below. Also, do tell us in the comments, “which solution worked best for you”.

Last but not least, if you want to read more tech-related blogs or write-ups, then do subscribe to our Newsletter. Apart from this, you can also follow us on Facebook, Twitter, Instagram, and Pinterest.

[FIXED] A Ubisoft Service Is Currently Unavailable

[FIXED] A Ubisoft Service Is Currently Unavailable

March 28, 2022
0

Getting an error message saying, “A Ubisoft Service is Currently Unavailable” while trying to launch Ubisoft? Nothing to worry about, some solutions can help you fix this problem.

Uplay is offered by Ubisoft Studios and is currently known as Ubisoft Connect. It is a well-known store for games like Far Cry, Tom Clancy, Assassin’s Creed, Just Dance, Watch Dogs: Legion, and many more. Uplay or Ubisoft Connect, is a proprietary video game distribution platform created by Ubisoft in order to handle Ubisoft games and related content on PCs. It is a crucial piece of element of each Ubisoft game, and still, it has bugs or errors. Likewise, we have seen several Windows PC users complaining about an error reading, “A Ubisoft Service Is Currently Unavailable” while trying to access the program.

Usually, the error appears when you try to launch the program. Apart from this, incorrect time & date, network issues, outdated drivers, and Hamachi software could also make Ubisoft or Uplay unresponsive. But, fortunately, there are numerous approaches to resolve this error. The post shows you a couple of 100% working hacks to fix, A Ubisoft service is currently unavailable error.

Easy & Quick Solutions to Fix A Ubisoft Service Is Currently Unavailable Error on Windows 10, 11, 8, 7

Before heading towards the other solutions, restarting the computer and freeing up drive space in Windows PC should be your first fix to resolve the error. Additionally, considering unplugging and then re-plugging the power card of both systems can bypass the problem. Sometimes, these basic things work like magic, so you should give them a try.

And, if these tips didn’t help, then you can use the advanced solutions. Using the below-mentioned powerful resolutions, you can easily fix ‘A Ubisoft service is currently unavailable’ error on your Windows operating system.

Solution 1: Resetting Windows Sockets

If the error occurs due to connectivity issues, then you can try to reset the Windows sockets. This might fix A Ubisoft service is currently unavailable error. Here is how to do that:

  1. Just hit the Windows + R keys at a time.
  2. This will open the Run Dialog box on your screen. Input cmd inside the run box and altogether press SHIFT + CTRL + Enter keys.Run window cmd
  3. Now, Command Prompt will trigger under the Administrators privileges. Write the following command and press Enter to flush the currently existing DNS configuration.
    ipconfig /flushdns
  4. After that, you need to readjust the IP configuration settings. In order to do so, you just have to write the following command and press Enter.
    netsh winsock reset

Once done, close the command prompt (admin) window and reboot your system. Then, try to run Ubisoft Connect on your device to check whether the error is fixed or not.

Also Read: Fix “DNS Server Not Responding” Error On Windows


Solution 2: Use Static IP and DNS Addresses

The IP & DNS address of your system changes over time by default. However, this is generally not erroneous but a lot of Windows PC users have reported that rationing the static IP and DNS addresses to your PC can help you fix, “A Ubisoft service is currently unavailable”. To do that, follow the simple steps shared below:

  1. To get started, you need to first launch Command Prompt as Administrator.
  2. Write the following command and scroll down until you see the network adapter which communicates with the connection you are currently using.
    ipconfig /all
  3. Thereafter, summon the Run terminal by pressing Win + R keys.
  4. In the run box, type ncpa.cpl and press Enter.ncpa.cpl in the run box
  5. In the Network Connections window, click right on your network adapter and choose Properties.Network Connections window
  6. Next, locate and select Internet Protocol Version 4 (TCP/IPv4) in order to access it.Internet Protocol Version 4 (TCP)
  7. Click on Properties.
  8. In the General tab, click the radio button beside the Use the following DNS server addresses and input 8.8.8 and 8.8.4.4 respectively. Next, switch the radio button to Use the following IP address and input the same number as Default Gateway.
  9. Lastly, click OK to apply changes.

Once you have done, then restart your computer and check to see if the connection lost to a Ubisoft service is currently unavailable error has disappeared. If not, then you can move on to the next solution.


Solution 3: Check the Time and Date

Another way to fix the problem is to check the PC’s time and date settings. Having such settings set up correctly is something you must check in order to prevent numerous security issues. Here is how to fix a Ubisoft service is currently unavailable by setting up the time and date correctly on your computer:

  1. Launch Windows Settings.
  2. Make a click on Time & Language.Time & Language
  3. Be sure the Date & Time is selected from the left pane. After that, set the toggle button of Set time automatically to off.
  4. Then, toggle the Set time zone automatically to off in order to set the time zone manually.
  5. Click Change.
  6. Now, you can modify the date settings.
  7. Likewise, alter the accurate Time as per your local time.
  8. Click on Change.Change date and time
  9. Next, scroll down the drop-down list of Time Zone to choose your time zone.Time Zone to choose your time zone
  10. Lastly, close the Windows Settings.

Alternative Way: Users who find it difficult to solve their problems by modifying the settings in this manner, can also do it using the Control Panel. However, the settings are similar but now you can sync your time with the Internet time. Here is how:

  1. Using Windows + R keyboard keys, open the Run window.
  2. Type timedate.cpl then either hit Enter key or click on the Ok option.timedate.cpl in the run box
  3. Now, the Date and Time prompt appear on your computer screen. Switch to the Internet Time tab.
  4. Next, click Change settings….
  5. In the next window, check the box presented before the option saying, “Synchronize with an Internet time server”.
  6. Click Server and select time.windows.com from the drop-down menu list.
  7. Click Update Now and then ok to proceed further.time.windows.com in the internet time server
  8. At last, click Apply and Ok to save recent changes.

Now, reboot your computer system and test the issue. If you still face the error that says, A Ubisoft service is currently unavailable please try again later, then try other solutions.

Also Read: How to Fix DNS_PROBE_FNISHED_BAD_CONFIG Error on Windows


Solution 4: Close Programs & Processes

Are you getting the error message while trying to login into Ubisoft Connect? If yes, then closing the background processes can help you fix the issue. Follow the steps below to uninstall programs in Windows 10, 11 that you no longer need.

  1. Quickly open the Task Manager by pressing the CTRL + SHIFT + Esc keys together.
  2. In the Task Manager window, scroll down to the Background processes under the Processes tab.
  3. Click right on the specific process and choose End Task to close the same task instantly.

After closing the unnecessary programs, invoke the Ubisoft Connect program again and re-try to log in. Proceed with another solution to fix the issue.


Solution 5: Update your Device Drivers

If you are using outdated, broken, or corrupted drivers, then it is viable to encounter numerous problems or errors like ‘A Ubisoft Service Is Currently Unavailable’. Therefore, in order to avoid such errors or glitches, you need to update the PC drivers from time to time.

To update drivers quickly without any hassles, you can use Bit Driver Updater. It is one of the best driver updater utility tools available in the market and is used by millions of users worldwide. The driver updater utility provides only WHQL tested drivers. Not only for updating the drivers, but it also works as a PC cleaner software and removes junk files to speed up the overall PC performance by up to 50%.

Bit Driver Updater automatically detects the Windows OS version that is currently running on your device. And, thereafter, find the correct drivers for it. To use this industry-standard driver updater, you just need to follow the simple steps below:

  1. First of all, download the Bit Driver Updater. You can do that for free by clicking on the button below.
    Windows Download Button
  2. Run the downloaded file and follow the installation instructions to complete the process.
  3. Open the driver updater and click on Scan from the left menu pane.Bit Driver Updater -scan your drivers
  4. Wait for the process to finish. Click on the Update Now button beside the driver you want to update. Alternatively, you can also click on Update All. By doing so, you can update all outdated PC drivers with just a single click.Update All the Driver - Bit Driver Updater

However, for this, you have to use the pro version of Bit Driver Updater as the free version doesn’t support one-click driver update functionality. Moreover, the full version comes with a complete money-back guarantee and 24*7 technical support.

After installing the required driver updates on your computer, open Ubisoft Connect to check if the issue is resolved.


Solution 6: Install Latest System Updates

The error may appear if you are using an old or buggy version of the Windows operating system. Therefore, keeping the Windows OS version is essential to avoid plenty of PC problems or errors. Below are the steps to do:

  1. Open Windows Settings and choose Update & Security.Click on Update and Security
  2. Just make sure Windows Update is selected from the navigation menu on the left.
  3. On the right side, click on Check For Updates.Check for Updates on windows settings

Sit back and wait for Windows to find, download and install the available updates & other system patches. Once it’s done, start your system and test the issue. If the error persists, execute the next troubleshooting tip.

Also Read: Fix: nvlddmkm.sys Failed Error on Windows


Solution 7: Perform SFC Scan

Last but not least, running an SFC (System File Checker) is also recommended. To do so easily, follow the steps outlined below:

  1. Run Command Prompt under Admins rights.
  2. Copy or paste the following command in the Command Prompt (Admin) window and press Enter.
    sfc /scannow Input SFC-Scannow and Hit Enter
  3. This may take a few minutes to complete the verification phase of the system scan.

Once done, then try to access your Ubisoft Connect account again to test the issue. Now, the error should get resolved.


Final Words

So, these were some of the effective and convenient ways to fix the A Ubisoft service is a currently unavailable error on Windows 11, 10, 8, 7 PC. Hopefully, the guide helps you in the best way possible. If we missed out on anything regarding the same, then feel free to tell us in the comments below.

For reading more useful articles related to technology, do subscribe to our Newsletter. In addition, you can also follow us on Facebook, Twitter, Instagram, or Pinterest.

1 Comment
    Bitdefender Internet Security Review 2021 says: Reply
    January 4th 2021, 10:41 am

    […] Read More: How To Setup & Use a VPN in Windows […]

Leave a Reply Cancel reply

Your email address will not be published. Required fields are marked *

Sidebar Image bit G ad1

Latest Posts

  • Anytime Astro: Best Website For Online Astrology Consultation
    Anytime Astro: Connect Now For Online Astrology Consultation
    by Somya Shrimal / March 13, 2026
  • Best-Ways-to-Combine-Images-Into-PDF-Files
    Best Ways to Combine Images Into PDF Files
    by Niharika / March 12, 2026
  • Best FREE VPS Hosting Providers
    7 Best FREE VPS Hosting Providers in 2026
    by Devesh / March 12, 2026
  • Best-McAfee-alternative-software-to-use-for-Virus-Protection
    Best McAfee Alternative Software to use for Virus Protection
    by adminuser / February 11, 2026
  • What-is-Flip-Flop-in-Circuite-and-it's-Types
    What is Flip Flop in Circuit and its Types
    by Meet / February 6, 2026

Categories

  • Cyber Security
  • Driver Updater
  • Entertainment
  • Fitness
  • Games
  • How To
  • laptop
  • OS
  • Reviews
  • Tech News
  • Tips & Tricks
  • Top 10
Sidebar Image bit G ad1
The Apple Watch Series 6 Could Get Touch ID & Sleep Tracking Support The Apple Watch Series 6 Could Get Touch ID & Sleep Tracking Supportby Prachi Dani / April 6, 2020
Facebook Messenger Desktop App Launched for Windows & macOSby Monil / April 7, 2020Facebook Messenger Desktop App Launched for Windows & macOS
TechPout Footer Logo

We at TechPout promise to put forth stories that help people to learn and simplify their digital life. Our purpose is to share the true essence of technology with our tech-loving community.

Useful Links

  • About Us
  • Contact us
  • Privacy Policy

Popular Posts

  • Best PC Optimizer Software
  • Best Mac Cleaner Apps
  • Best Driver Updater
  • Duplicate Photo Finder and Cleaner Software
  • Best Free Movie Download Sites
  • Best IPTV Players

Follow us

Copyright © 2026 www.techpout.com. All rights reserved
DMCA.com Protection Status