
Snipping Tool is a Windows screenshot application that lets you capture and share any part of your screen. It allows you to capture the whole screen, a window, or a specific section on the screen. In the latest version, you can even delay the screenshots, annotate snips, save snips in multiple formats, copy to clipboard, and edit the captured image with Paint. The Snipping Tool keyboard shortcuts make doing all this even quicker and easier, without you having to touch your mouse.
The Snipping Tool shortcut keys come in especially handy when you want to capture error messages, reports, or data tables quickly; save parts of online lectures, research materials, or digital textbooks; document bugs; share system configurations; or show troubleshooting actions; grab fast snapshots of your gameplay moments; or anytime you need a fast way to capture your screen.
This article walks you through all these helpful keyboard shortcuts for Snipping Tool. These shortcuts work anytime and anywhere you want to take a screenshot on a Windows PC or record your screen.
What Are Snipping Tool Keyboard Shortcuts
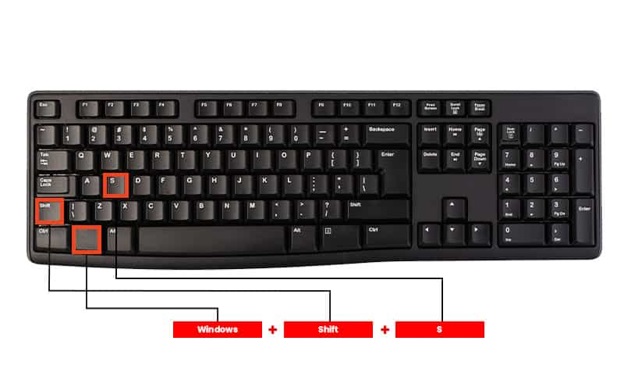
Win + Shift + S is the most important Snipping Tool shortcut in Windows, opening the snipping overlay instantly, letting you select a capture mode, and copying the screenshot to the clipboard. Below are all the shortcuts for Snipping Tool, listed and explained in detail.
Shortcut keys to open Snipping Tool
Win + Shift + S opens the Snipping Tool overlay. Below is how to use this shortcut.
- Press Win + Shift + S.
- Select a desired snip mode from Rectangular snip, Free-form snip, Window snip, and Full-screen snip. For Rectangular snip, press R; for Free-form snip, press F; for Window snip, press W; for Full-screen snip, press S.
The steps above are the same across all PC or laptop brands, whether you want to take a screenshot on a Dell laptop, a Toshiba laptop, or any other laptop/PC.
Shortcuts for Snipping Tool capture and workflow
- Create a new snip: Ctrl + N.
- Switch snip mode: Alt + M.
- Create a new snip in the last used mode: Alt + N.
- Select the entire image/snip in the editor: Ctrl + A.
- Set delay before capture: Alt + D. After pressing Alt + D, select the delay using the down arrow key.
- Cancel snipping:
- Copy snip to clipboard: Ctrl + C or Alt + C on Windows 11.
- Save the screenshot: Ctrl + S or Alt + S on Windows 11.
- Print the snip: Ctrl + P.
- Undo last action: Ctrl + Z.
- Redo action: Ctrl + Y.
- Select a snipping mode: Alt + O. Press Alt + O and then select a mode using the up/down arrow keys.
- Open a file: Ctrl + O.
- Print a snip: Ctrl + P.
- Select a rectangular snip area: Shift + arrow keys.
- Select highlighter: Alt + H.
- Select ballpoint pen: Alt + B.
- Select eraser: Alt + E.
- Select ruler: Alt + L.
- Select crop: Alt + I.
While Alt + M and Alt + N are the shortcuts to change the snip mode and create a new snip in the same mode, respectively, working with modes can be confusing. The following section explains it in detail.
How to use Snipping Tool shortcuts to change snip mode
When you are in a snip flow, or the Snipping Tool is open:
- Press Alt + M to select a snipping mode.
- Highlight Rectangular, Window, Full-screen, or Freeform mode using the arrow keys.
- Press Enter.
- Press Alt + N to start a new snip in the same mode as last.
In addition to capturing screenshots using the Snipping Tool keyboard shortcuts, you can also record the screen with shortcut keys.
Also know: How to Access Steam Screenshots on Windows 10
Snipping Tool shortcut keys for screen recording
Press Win + Shift + R to start screen recording directly. This shortcut for Snipping Tool allows you to select a recording area and save the recording automatically. Note that the screen recording feature is available only in the latest Windows 11 build. If you do not see this option, update Windows. To update Windows, press Win + I, go to Windows Update, click Check for Updates, click Download & Install, and then restart your PC.
To screen record on Windows 11:
- Press Win + Shift + R.
- Switch from Snip to Record.
- Click New.
- Drag to select the area you want to record; you can record the full display.
- Click Start to begin the recording.
- Click Stop when you are done recording. You can find the MP4 recording in Videos > Screen Recordings.
That’s all for the Snipping Tool shortcut keys. However, if you do not feel comfortable with the Win + Shift + S shortcut, you can change or customize the shortcut using the Print Screen key or reliable tools, such as Keyboard Manager in PowerToys.
How to Change or Customize Snipping Tool Shortcuts
You can use the Print Screen key or PowerToys Keyboard Manager to change or customize Snipping Tool shortcut keys. Here are both methods explained.
Method 1: Enable the Print Screen key to open Snipping Tool
To open Snipping Tool using the Print Screen key:
- Press Win + I.
- Click Accessibility.
- Click Keyboard.
- Find and toggle on Use the Print Screen button to open screen snipping.
- Press PrtSc to open the Snipping Tool overlay.
Method 2: Use PowerToys (Keyboard Manager)
To change the Snipping Tool shortcut using Microsoft PowerToys Keyboard Manager:
- Download Microsoft PowerToys.
- In Microsoft PowerToys, click and toggle Keyboard Manager on in the left sidebar.
- Click Remap a shortcut, and then click Add shortcut remapping.
- In the Select or Original Shortcut field, enter Win + Shift + S.
- In the Mapped To field, enter your desired Snipping Tool shortcut.
- Click OK to save the changes.
However, if you encounter issues such as the Snipping Tool shortcut keys not working, check the solutions below.
Also know: How to Take Screenshot on Chromebook
Troubleshoot Snipping Tool Keyboard Shortcuts Not Working
To fix issues such as Windows + Shift + S not working, try the following solutions.
- Press Ctrl + Shift + Esc to open Task Manager, right-click Snipping Tool, and click End Task. Then, try using the Snipping Tool shortcut keys again.
- Press Win + I, click Apps, click Snipping Tool, click Advanced Options, click Repair. If this does not work, click Reset.
- Quit your clipboard manager temporarily.
- Disconnect or close remote desktop software tools like AnyDesk, TeamViewer, or Windows Remote Desktop.
- If you have AutoHotkey or a hotkey app running, check the assigned shortcuts and remove the ones that use Win + Shift + S.
- Sign out and then sign in to Windows to refresh the Snipping Tool shortcuts.
Where Are Snipping Tool Screenshots in Windows 11
By default, Windows copies screenshots to the clipboard. If you save the screenshots manually, you can follow the path: Pictures > Screenshots to find them. For video recordings, follow the path Videos > Screen recordings.
Additionally, here are some pro tips to capture screenshots faster.
Expert Tips for Screenshots with Snipping Tool
- If you capture multiple snips, press Win + V to use Clipboard History.
- To access the Snipping Tool faster, pin it to the taskbar. To pin Snipping Tool to the taskbar, click the Start button, type Snipping Tool in the search bar, right-click the Snipping Tool app result, and then click Pin to taskbar.
- If you need to open any menu before capture, use Delay Snip.
- Save important snips instantly, as the clipboard can be overwritten.
- Confirm your display before full-screen capture on multi-monitor computers.
Below, we answer some commonly asked questions about the Snipping Tool keyboard shortcuts to clear persistent confusion.
Also know: How To Screenshot On Snapchat
Frequently Asked Questions
Q1. How to open the Snipping Tool with the keyboard?
Use the default Win + Shift + S shortcut to open the Snipping Tool with your keyboard.
Q2. How do I open the Snipping Tool with the PrtSc key?
To open the Snipping Tool using the PrtSc key, press Win + I, click Accessibility, click Keyboard, and then enable Use the Print Screen button to open screen snipping.
Q3. What are the keyboard shortcuts for the four Snipping Tool capture modes?
R is the keyboard shortcut for Rectangular Snip (create a rectangle); W is for Window Snip (click a window); S is for Full-screen Snip (capture everything); and F is for Free-form Snip (create any shape).
Q4. What is the Snipping Tool shortcut to save a snip?
On Windows 10, Ctrl + S is the shortcut to save a snip. On Windows 11, press Alt + S to save a snip.
Q5. Why is the Win + Shift + S shortcut not working?
Issues like another application using the Snipping Tool shortcut, issues with the clipboard manager, or interference from remote desktop software may be why Win + Shift + S is not working. Follow the solutions in the guide above to solve the problem.
Hopefully, this clears up the confusion about Snipping Tool keyboard shortcuts to capture screenshots and record the screen quickly and easily. If any doubt persists, leave us a comment.