
Whether you are using your laptop at your workspace or personal space like your home, it is important to lock your Windows PC automatically in Windows 11. It is mainly important because it might disclose your private space, or it might lead to accessing your files and private digital data. You can set the automatic lock according to your needs on your own, or you can also use a password manager to set up a stronger one.
This prevention measure will surely help you in a lot of cases if you are out using your laptop at some public places like coffee shops, restaurants, and other shopping stops. Here is a complete guide for you to understand all the ways to auto lock your Windows 11 and primary reasons for you to know why you must ensure this.
Why You Should Lock Your Windows PC
To lock your Windows PC automatically in Windows 11 is important because first characters around your workplace or personal space might sneak around on your system. Anyone can come and spy on your mails and browser or anything in your system.
There are possibilities that your pet or children around in the house might delete your important files or folders unwanted. To lock your Windows PC automatically in Windows 11 is not going to protect your laptop from physical stealing, but it will protect your personal data from leaking or stealing.
Methods to Lock your Windows PC automatically in Windows 11
There are various methods to lock your Windows PC automatically in Windows 11, and it also provides you with the device and access to your information about the time, date, and much more. And in this guide, you will understand all those methods that help you to Lock your Windows PC automatically in Windows 11 by yourself.
Dynamic Lock your Windows PC automatically in Windows 11
There are dynamic ways to Lock your Windows PC automatically in Windows 11, and you need multiple settings to evolve and capable system to work with those settings and enable the automatic lock for your device.
Method 1: Using Dynamic Lock
You can also lock your Windows PC automatically in Windows 11 using the dynamic lock, especially when you are in a space with very low space. It uses your Bluetooth device around your device with Windows 11. So, if you are using any Bluetooth device that is connected to your current system, you can also find it.
But at the same time, it becomes quite difficult for you to find the device when the range increases between the Bluetooth device and your system.
The following are the steps to use the dynamic lock with the Bluetooth device connected to your system:
Step 1: Pair a Bluetooth device with your system if you haven’t yet.
Step 2: Then go to the ‘Start’ option on the bottom left corner of the taskbar and open it.
Step 3: Open ‘Settings’ and go to the ‘Accounts’ option. And click on the ‘Sign-in’ options.
Step 4: And go to the Dynamic lock and click on the check box for ‘Windows to automatically lock your device when you are away’.
After this, whenever you will move away with your phone your system will automatically lock itself as the Bluetooth signal will get weaker.
Also know: How to Fix Browser Keeps Crashing on Windows PC
Method 2: Use Screen Saver Settings
Step 1: Press together ‘Windows + S’ and type and Screen save settings and open it from the drop-down menu.
Step 2: The next step is to configure the screen saver and for that set the wait time (even in minutes) and inactive it before you start the screen saver.
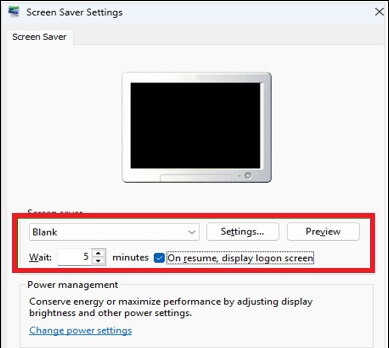
Step 3: Then click on the checkbox for ‘On resume, display logon screen’ and then click ‘OK’.
Method 3: Use Group Policy
This method is used for more advanced versions of Windows 11 for pro, enterprise, and education editions.
Step 1: Press Windows + R and type ‘gpedit.msc’ and then press ‘Enter’ and open the group policy editor.
Step 2: Then look up for the left panel, go to ‘Computer Configuration’ and then open ‘Windows Security’ and look up for ‘Security Settings’.
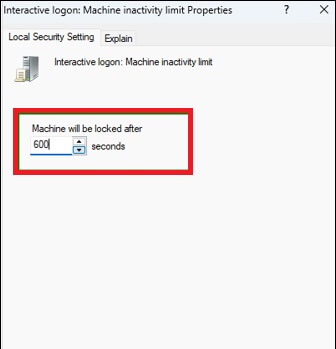
Step 3: And then open ‘Local Policies’ and click on ‘Security Options’ and click on the ‘Interactive Logon: Machine inactivity limit’ as shown below.
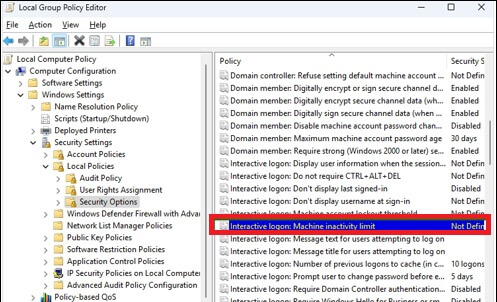
Step 4: A dialog box will open on the screen and lock the machine timing after the time you need it to shut down. And click ‘OK’.
Method 4: Use Registry Editor
After you access the editing Windows registry, it will enable the features to deeper customization for those who do not have access to the rest of policy settings.
Step 1: Press together the Windows + R keys on keyboard and press Enter and open the Registry Editor.
Step 2: Now, follow the given path ‘HKEY_LOCAL_MACHINE\SOFTWARE\Microsoft\Windows\CurrentVersion\Policies\System’ and navigate yourself to the system policies.
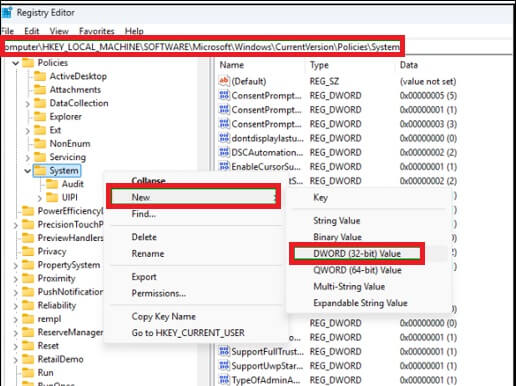
Step 3: Then right-click on the system to modify all the inactivity settings. And click on the ‘DWORD (32-bit) value.
Step 4: And then double-click on the new value we are adding.
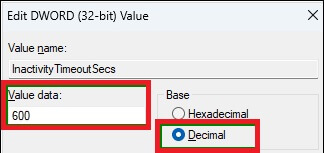
Step 5: And select the decimal option and select the timeout in seconds and click ‘OK’.
Also know: How to Get Help With File Explorer in Windows 11/10
Frequently Asked Questions (FAQs)
Q1. Why must you lock your Windows PC automatically in Windows 11?
Ans. There is a need for you to lock your Windows PC automatically in Windows 11 because first characters around your workplace or personal space might sneak around on your system. Anyone can come and spy on your mails and browser or anything in your system.
Q2. What is the shortcut key to lock your Windows PC automatically in Windows 11?
Ans. The short cut key to lock your Windows PC automatically in Windows 11 is to press ‘Windows + L.’ And you can also press ‘Ctrl + Alt + Delete’ on windows and ‘Ctrl + Cmd + Q’ on MacOS.
Q3. Can we set any time limit to lock the screen after the inactivity?
Ans. Yes, by configuring the wat time for the screen saver and even by adjusting the sleep time settings according to your choice.
When you make sure to lock your Windows PC automatically in Windows 11 is the smartest way to prevent your data from leaking in person. And pretty much we have covered in this article for you to understand the methods to do so. Because this holds a great chance to getting invaded your privacy while you share any public spaces.





![[Fixed] Lenovo Laptop Keyboard Not Working Issue In Windows 10](https://wpcontent.techpout.com/techpout/wp-content/uploads/2021/02/12133150/Fix-Lenovo-Laptop-Keyboard-Not-Working-Issue-in-Windows-10.jpg)