How to Hide or See File Extension in Windows 11
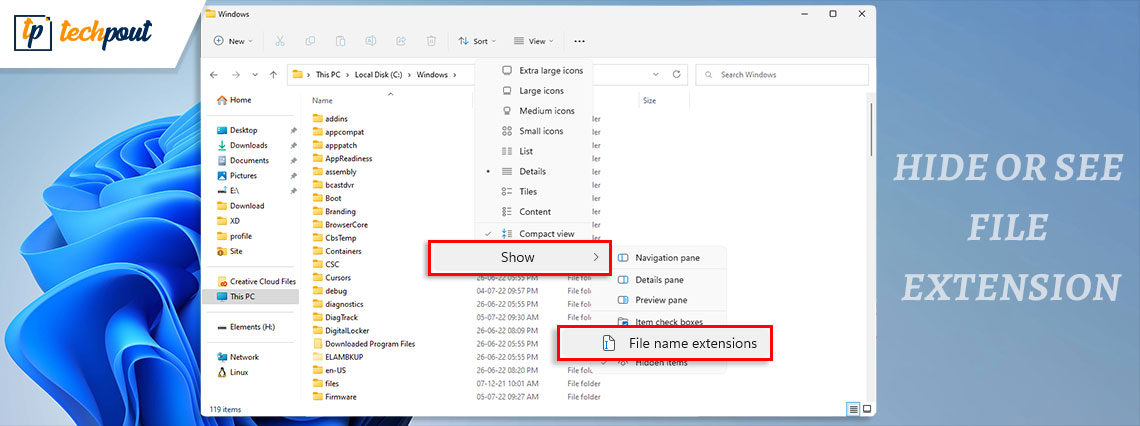
If you want to hide or see a file extension on Windows 11, then take the help of the methods listed in this guide for ease.
Windows is a versatile operating system offering a lot of features. One such feature of the OS is the file extensions mode. Generally, by default, the system hides the file extension on your device. This is done by the developers to ensure that the user, unknowingly, may not change the file extension and later face problems in launching the files. Hence, you will see that on all the files present on your system, no extension is available by default as may be seen in other operating systems.
But, sometimes, you may want your system to show a file extension on your device. You may want to see the extension to know about the extension, rename the file extension, or any other purpose. This demand is quite common and made by over thousands of users online. With the help of this guide, we will help you with the same. But before we go over the methods, let’s have a look at why should you show a file extension right below.
Why Should You Enable the File Name Extensions on Your Windows Device?
Different kinds of images, audio files, video files, and other documents use different extensions to show their identities. This extension helps a lot when you do not have a default app to open the file and want to run the file with ease.
You can simply have a look at the name of the extension after viewing file extensions. This will allow you to know what kind of document is it and run the file accordingly. Additionally, you can google the extension to know about it and then analyze which tool is required to run the same.
Lastly, the best benefit of viewing file extensions is that you can analyze whether the file is the one you were looking for or just a scam. Let’s understand this with the help of an example.
Suppose you have saved a PDF document on your computer’s storage named ‘driving license’. Now, scammers and ransom handlers may also add a file to your store with the same name. The Windows OS generally uses the .exe extension for app files. The fake driving license file will contain the .exe extension instead of PDF. Your icon image may also be that of a PDF but still, the file extension is different. When you run the file supposing it is the original driving license that you were looking for, your files will be exposed to the meddlers and hackers.
Hence, you should always enable the option to show a file extension on Windows for better protection.
In the upcoming sections of the article, you will find various methods to unhide and hide a file extension. You can use these to unlock and show the file extensions of various types of files on your Windows computer or laptop.
Methods to See a File Extension on Windows 11 PC With Ease
The next section of this simple guide will address how to see file extensions on Windows. Multiple methods are available for your ease. Hence, you are free to use any of these as required and proceed to show or hide a file extension.
Method 1: View the File Extension Once
If you want to see a file extension for one time only, then you can take the help of the below steps to do the same:
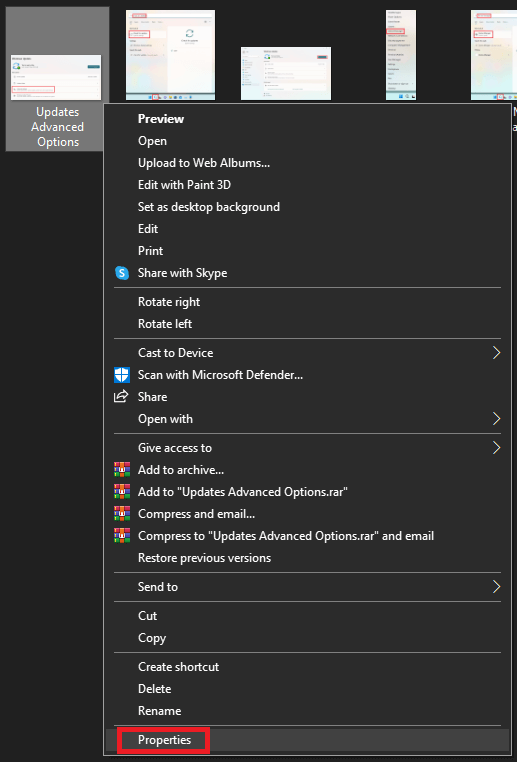
- Open the File Explorer and go to the location of the file.
- Right-click on the file you are looking for.
- Open the Properties file.
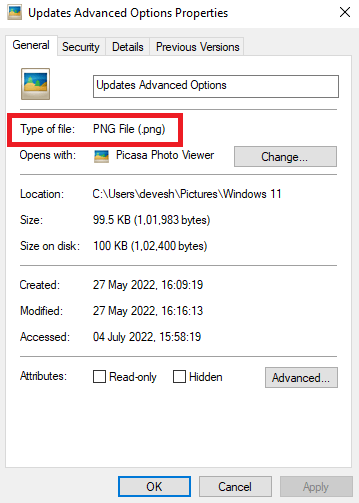
- From the file properties, have a look at the middle section of the General tab. You will find the file extension in front of the Type of file section.
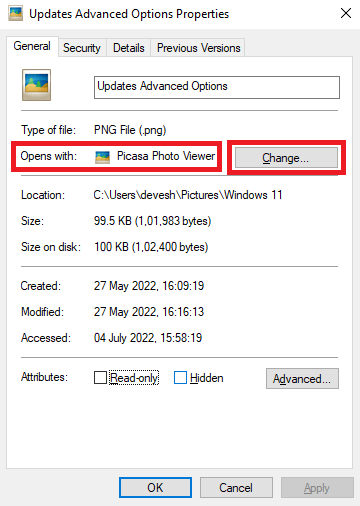
- You can also see the default tool to run such files across the Opens With section. You can change the tool if required.
If you want Windows to show file extensions permanently, follow the next methods.
Also Read: Best Free PDF Editing Software For Windows
Method 2: Windows 11 View File Extensions with File Explorer
If you want to hide or see a file extension on Windows 11, you can take the help of File Explorer. Below are the steps that can help you do the same:
- Open the File Explorer window.
- Take your cursor on the View option in the ribbon on the top of the window.
- Navigate to Show and click on File name extensions.
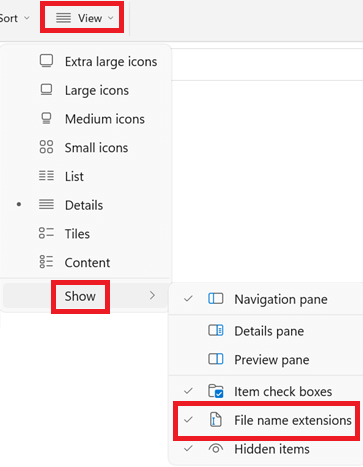
Now you can easily view the file extension on Windows 11. If you want to enable the extension options on other systems, try the next methods.
Method 3: How to Show a File Extension on Windows 10 and Windows 8?
The steps explained below will explain how to see a file extension on Windows 10. Use the set of steps precisely for ease:
- Open the File Explorer window.
- Click on the View option in the ribbon on the top of the window.

- Check the box of File name extensions.

The same method works for both Windows 10 and Windows 8 PCs. To know how to see file extensions on Windows 7, use the next method.
Also Read: Best Free PDF Split and Merge Software
Method 4: Windows 7-Show File Extension
If you want to know how to see a file extension on Windows 7 PC, then you can take the help of the below steps. Follow the exact procedure precisely to get quick and better results:
- Open the This PC/My Computer/File Explorer utility.
- Click on the Organize button at the top-left pane of the Windows.

- Now select the Folder and search options.
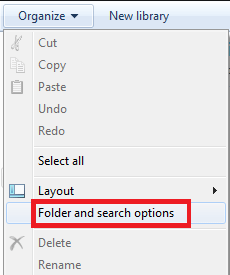
- Hit the View tab, look for the Hide extensions for known file types and uncheck the option.
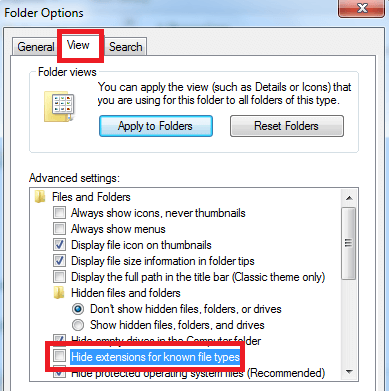
- Click on Apply to proceed.
So, this is how you can easily hide or show a file extension on Windows 7. For other methods to enable the extensions, you can use the below methods.
Method 5: Display Filename Extensions Using the Registry Editor App
File Explorer is one of the best and most commonly used methods to see a file extension. Alternatively, you can also take the help of the Windows Registry Editor App. Take the help of the steps provided below for ease:
- Press the Win+S keys on the keyboard, type Registry Editor, and press Enter.
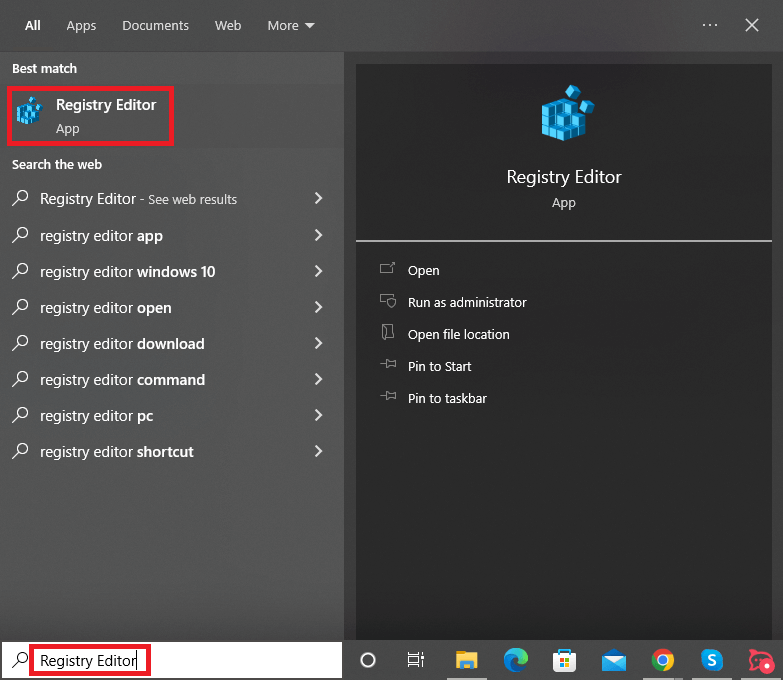
- Click Yes to proceed.
- Navigate the location provided below:
Computer\HKEY_CURRENT_USER\Software\Microsoft\Windows\CurrentVersion\Explorer\Advanced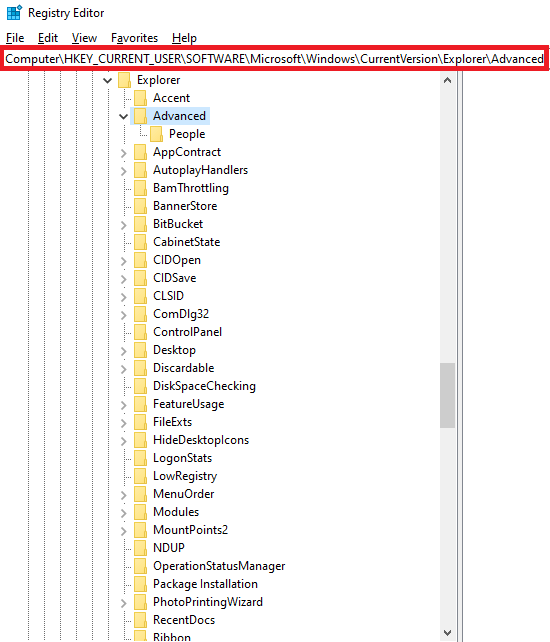
- Look for the file reading HideFileExt and double-click on it.
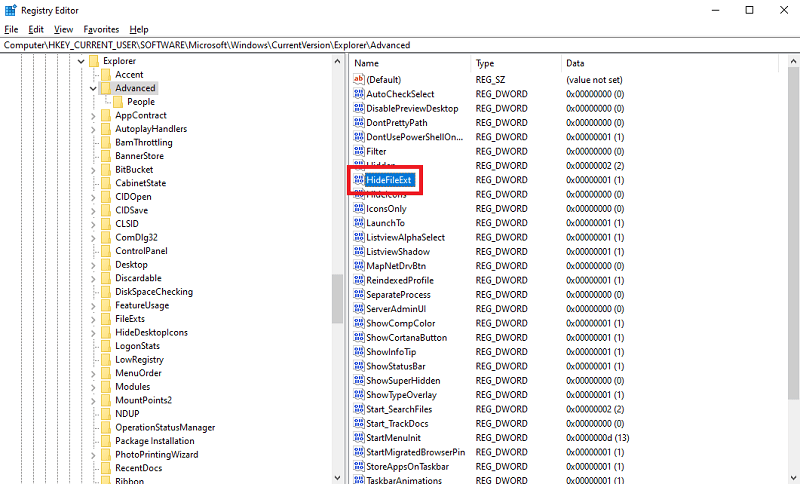
- Set the value from 1 to 0 and click on Ok.
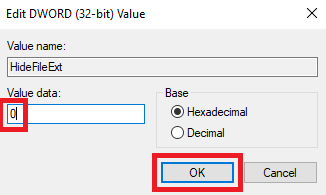
Now, you can easily process the viewing of file extensions. If you want another method, you can try the next one.
Also Read: How to Convert a PDF File into a Word Document
Method 6: Hide or See a File Extension with the Command Prompt
Command Prompt is a utility for Windows PC that allows you to edit the system files as required. Additionally, using the tool you can Window show a file extension with ease. This method works for all kinds of Windows OS. Follow the set of instructions shown below and execute the required tasks with ease:
- Press the Win+S keys, type Command Prompt, and click on Run as administrator.
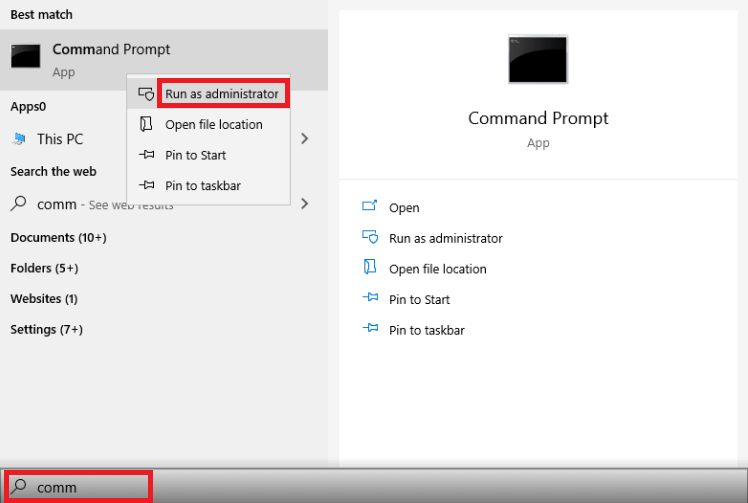
- Click on Yes to proceed.
- Enter the following command followed by the Enter key.
reg add HKCU\Software\Microsoft\Windows\CurrentVersion\Explorer\Advanced /v HideFileExt /t REG_DWORD /d 0 /f
- You will get a message stating The operation completed successfully.

- Alternatively, you can use the below command in the way described above to hide a file extension.
reg add HKCU\Software\Microsoft\Windows\CurrentVersion\Explorer\Advanced /v HideFileExt /t REG_DWORD /d 1 /f
So, this is how you can easily use the Command Prompt to see a file extension and otherwise. Follow the last method shown below for more.
Method 7: Enable Viewing of File Extensions with Group Policy Editor
Lastly, you can use the Group Policy Editor to see a file extension on Windows 11/10/lower. Just like its name, the utility allows you to manage the viewing policies for various group matters. You can take the help of the below steps for ease and help:
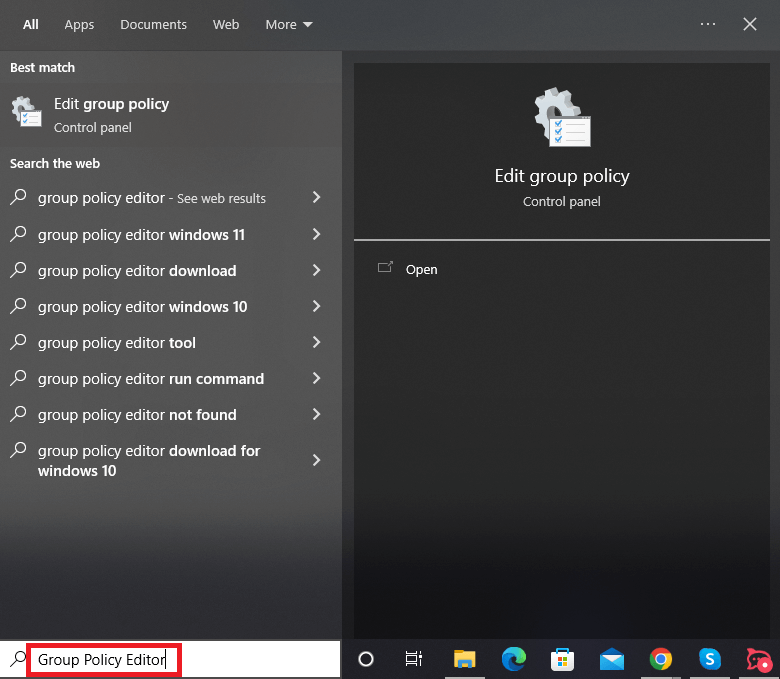
- Search for Group Policy Editor after pressing the Win+S keys and then hit Enter.
- Navigate to the following location
User Configuration > Preferences > Control Panel Settings > Folder Options - Under the Show hidden files and folders option, uncheck the box of Hiding extensions for known file types.
Also Read: How To Remove Password From PDF Files
Methods to See a File Extension on Windows 11/10/Lower: Explained
So, up till now, we had a look at different methods to hide or show a file extension on Windows. These methods are useful for all kinds of Windows operating systems, old and new. Hence, if you want to manage the extensions on your device, you can take the help of these methods very easily.
If you still face any problems while trying to see a file extension on Windows, write to us about the same. We are all ears via the comments section provided below. Explain your query and we will provide you with the best solutions for ease. Additionally, you can also present your suggestions and recommendations there. We would love to hear your review of the guide.


