
HYPERVISOR ERROR 0x20001 is a Blue Screen of Death (BSOD) error that indicates Windows cannot launch a VM (Virtual Machine), as the hypervisor has encountered a critical issue and can no longer function. The hypervisor supports virtualization technologies such as Hyper-V, VirtualBox, and VMware, managing how system hardware communicates with virtual environments. When the hypervisor stops working, Windows stops virtualization operations to avoid data corruption.
You can fix it through the solutions in this article, including restarting your PC and disconnecting external devices, enabling virtualization in BIOS/UEFI, disabling Hyper-V, updating device drivers, and running system scans. Before moving into the details, it is important to understand the error and its causes.
What Is HYPERVISOR ERROR 0x20001
HYPERVISOR ERROR 0x20001 is a fatal condition that prevents the hypervisor from functioning safely. The hypervisor, or virtual machine monitor, allows a single PC to host multiple operating systems. In Windows, Hyper-V manages this function, and when it runs into problems, you get the HYPERVISOR_ERROR (0x00020001).
What Causes HYPERVISOR ERROR 0x20001
Windows 10 or Windows 11 hypervisor errors typically occur if virtualization is incorrectly configured or disabled in BIOS/UEFI, if Hyper-V conflicts with third-party hypervisors such as VirtualBox or VMware, if critical device drivers are outdated, or if the CPU or memory has hardware instability.
Whatever the cause may be, you can follow the guide below to fix it.
How to Fix HYPERVISOR ERROR 0x20001
To fix BSOD HYPERVISOR_ERROR 0x20001, you can restart your PC and disconnect external devices, turn on virtualization in BIOS/UEFI, disable Hyper-V, update outdated device drivers, fix RAM issues, perform SFC and DISM system scans, update BIOS, check Hypervisor Boot Configuration, turn off overclocking, uninstall the recent Windows update, and clean boot your computer. Below are these solutions in detail; follow them sequentially until the error disappears.
Fix 1: Restart your PC and remove external devices
Restarting your computer and disconnecting unnecessary USB or other devices is the easiest thing you can do to fix the HYPERVISOR ERROR 0x20001. If this does not solve the problem, then move to the complex solutions below.
Fix 2: Check and enable virtualization in BIOS/UEFI
Modern CPUs have virtualization extensions like AMD-V (also known as SVM mode) or Intel VT-x. BIOS/UEFI must have these extensions enabled for Hyper-V to function correctly. Hence, follow the steps below to check and enable them.
- Restart your computer and press F2, Esc, or Del to enter BIOS/UEFI.
- Find settings such as AMD SVM Mode or Intel Virtualization Technology (VT-x).
- Configure these settings to Enabled.
- Lastly, save the changes and restart your PC.
Also know: How to Check Installed Apps on Your Windows Device
Fix 3: Disable Hyper-V if you don’t need it
Running Hyper-V alongside hypervisors like VirtualBox, Bluestacks, or VMware Workstation can cause resource contention. Due to hypervisor architecture differences between these tools, only one of them can manage CPU virtualization at a time. To disable Hyper-V:
- Press Win + R.
- Type cpl in the Run box and press Enter.
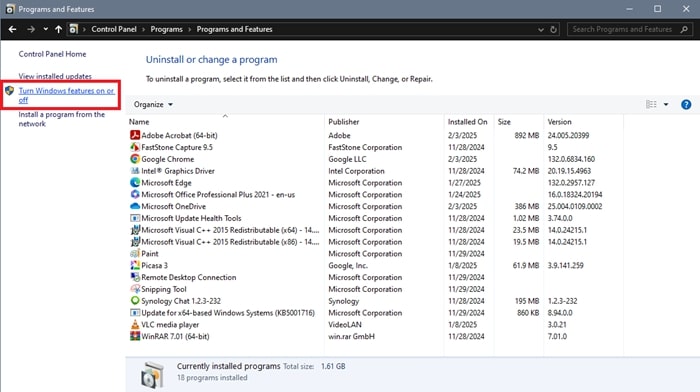
- Click Turn Windows features on or off in the left pane of the Programs and Features window.
- Click Hyper-V to expand it.
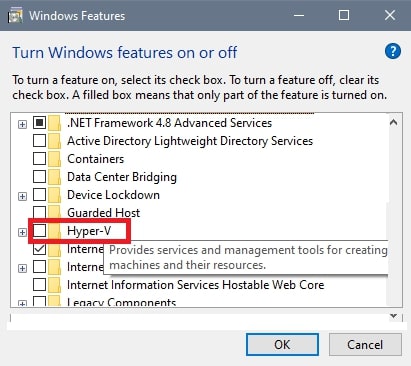
- Next, click Hyper-V Platform.
- Uncheck the Hyper-V Hypervisor
- Lastly, click OK to save the changes.
Fix 4: Update drivers
Outdated device drivers can cause many system conflicts and errors, such as BSOD HYPERVISOR_ERROR 0x20001. To solve this problem, follow the steps below to update drivers for hardware such as network adapters, system devices, and processors.
- Right-click the Start button.
- Click Device Manager.
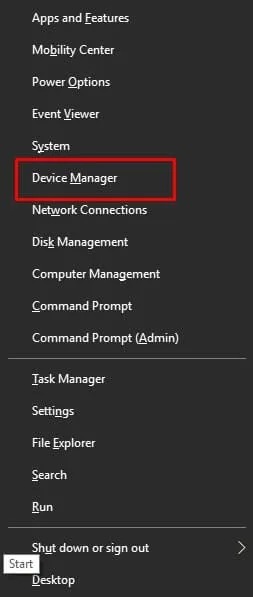
- In Device Manager, double-click categories like Processors, Network adapters, and System devices.
- Right-click the device with a yellow exclamation mark and click Update driver.
- Click Search automatically for drivers.
- Follow the instructions that appear.
- Lastly, restart your computer to complete the driver update process.
Fix 5: Solve RAM problems
Faulty RAM modules or voltage problems may be another reason you encounter hypervisor errors. Thus, fix RAM issues using the built-in Windows Memory Diagnostic. Here is how.
- Click the Start button.
- Type Windows Memory Diagnostic in the search bar and then click the matching search result.
- In the Windows Memory Diagnostic tool, click Restart now and check for problems (recommended).
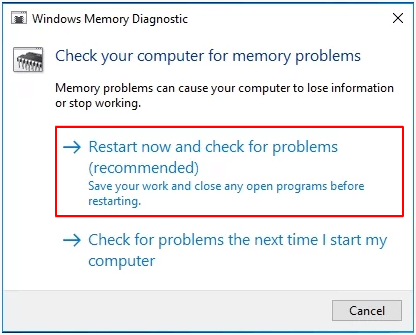
- Wait for the computer to restart and let the tool check for RAM problems.
Also know: How to Enable and Disable SMTP Authentication in Exchange Online
Fix 6: Run SFC and DISM scans
Missing or corrupt system files can cause virtualization errors, such as the Windows 11 hypervisor error. Hence, follow the steps below to run System File Checker (SFC) and DISM tools to repair system files.
- Click the Start button.
- Type cmd in the search bar.
- Right-click Command Prompt in the search results and then click Run as administrator.
- In the Administrator Command Prompt, copy and paste sfc /scannow.
- Press Enter.
- Next, copy and paste DISM /Online /Cleanup-Image /RestoreHealth.
- Press Enter.
- After the scanning is complete, restart your PC.
Fix 7: Update BIOS
BIOS is the first software that starts when you boot your PC. An outdated BIOS can cause problems like the one you are trying to solve. Thus, you can update the BIOS using one of the best BIOS update software programs, such as UEFI BIOS Updater, BIOSAgentPlus, and Biostar BIOS Update Utility.
Fix 8: Check Hypervisor Boot Configuration
Problems with hypervisor boot configuration can trigger the 0x20001 stop code. Hence, below is how to check and fix this issue.
- Click the Start button.
- Type cmd in the search bar, right-click the first result, and then click Run as administrator.
- In the Administrator Command Prompt, copy and paste bcdedit /enum and press Enter.
- Next, look for hypervisorlaunchtype.
- If your system supports Hyper-V, hypervisorlaunchtype will generally be configured as
- If Hyper-V is enabled but the hypervisor is not opening, Microsoft uses the following command to document it for troubleshooting.
bcdedit /set hypervisorlaunchtype auto
- Lastly, restart your computer to complete the process.
Fix 9: Disable overclocking
Overclocking the processors or making any changes to CPU multiplier, CPU voltage, RAM frequency, XMP/EXPO, Infinity Fabric settings, base clock, and GPU-related low-level settings can cause virtualization instability. Hence, disable overclocking or undervolting to solve the problem.
Fix 10: Uninstall recent Windows update
Windows updates can sometimes cause bugs or compatibility issues. If the HYPERVISOR ERROR 0x20001 occurred after updating Windows, the recent update may not be compatible with your hardware. Uninstalling the update can solve the problem. Below is how to solve this problem.
- Press Win + I.
- Click Windows Update.
- Next, click Update History.
- In this step, click Uninstall updates.
- Select the most recent Windows update and click Uninstall.
- Allow the uninstallation to complete, and then restart your PC.
Also know: How to Turn Windows Features On or Off in Windows 11/10
Fix 11: Clean boot your PC
A clean boot starts the computer with only necessary drivers and services. It isolates any service or background app that may interfere with virtualization so that you can fix the conflicting third-party apps. To clean boot Windows:
- Click the Start button.
- Type System Configuration in the search bar and click the matching result.
- Click Services in the System Configuration window.
- Check the Hide all Microsoft services box.
- Click Disable all.
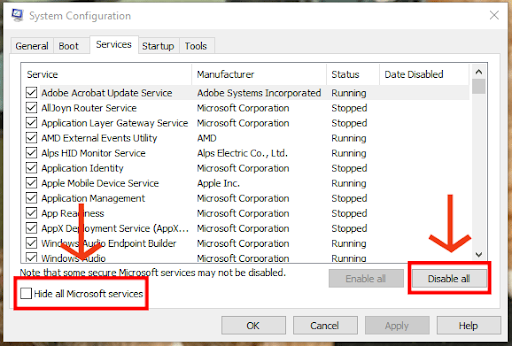
- Next, click the Startup tab.
- Click Open Task Manager.
- Right-click each app with Enabled in the Status column and then click Disable to prevent the apps from running automatically.
- Close Task Manager.
- Click Apply and OK in the System Configuration window.
- Lastly, restart your computer.
Hope this helps fix the HYPERVISOR_ERROR (0x00020001). Below are all common questions about it, answered to clear any persistent confusion.
Frequently Asked Questions
Q1. What does bug check code 0x00020001 mean?
Bug check code 0x00020001 is a HYPERVISOR_ERROR stop code that means the Windows hypervisor has encountered a critical issue and cannot continue functioning.
Q2. What are the symptoms of hypervisor error 0x20001?
A system experiencing HYPERVISOR_ERROR 0x20001 may suddenly reboot and display a blue screen with HYPERVISOR_ERROR or Stop Code: HYPERVISOR_ERROR. Other symptoms of this issue may include a sudden PC restart, BSOD during startup, crash during a virtual machine startup, crash when shutting down a virtual machine, BSOD right after Windows login, Hyper-V VM not starting, failing Windows Sandbox, WSL2 issues, crash during heavy CPU workloads, crash after you enable virtualization, crash after updating Windows, crash after a new driver installation, BSOD after BIOS/UEFI changes, and random PC freezes before the BSOD.
Q3. How do I fix hypervisor error 20001?
To fix the Windows 11 hypervisor error immediately, reboot your computer, enter the BIOS/UEFI settings, and turn on Intel VT-x or AMD-V. If Intel VT-x or AMD-V is already enabled, open Command Prompt as Administrator, run the bcdedit /set hypervisorlaunchtype auto command, and then restart your PC. For details and complete solutions, refer to the guide above.
Hope this clears up all your confusion about HYPERVISOR ERROR 0x20001 and how to fix it. To prevent its recurrence, update Windows regularly, keep BIOS/UEFI firmware updated, update drivers regularly, avoid unstable overclocking and low-level utilities, keep RAM and storage health in check, use only one virtualization platform; avoid mixing Hyper-V with VMware or other hypervisors. If problems persist, leave us a comment.