
SMBv1 in Windows 11, also called SMB1 or CIFS, is an outdated version of SMB, or Server Message Block. SMB is a key Windows networking protocol for sharing files and printers between network devices. Microsoft officially deprecated SMBv1 in 2014 and replaced it with the more stringent and better-performing SMB2 and SMB3 protocols. However, you can still enable or disable SMBv1 in Windows 11 for legacy NAS devices, printers, or other older devices.
This tutorial explains how to enable or disable SMBv1 through Windows Features, Command Prompt, and PowerShell. First, it is important to understand a few key things about this protocol.
What Is SMBv1 in Windows 11
SMBv1 is the original version of the SMB protocol, a network communication protocol in a Windows environment used to share printers, files, folders, and various other resources between different PCs on a network. Through this protocol, client devices can request access to resources on another PC or server. When SMB is active, you can perform tasks such as connecting to network storage devices (NAS) and sharing apps or data across systems.
Over time, Microsoft disabled SMBv1 in Windows, replacing it with SMB2 and SMB3 for improved performance, encryption, and advanced features. Moreover, SMBv1 is disabled because of poor security (it lacks essential features such as encryption), vulnerability to malware (malware like WannaCry ransomware exploits SMB1 loopholes), and SMB1 can reduce system performance (it creates unnecessary network traffic and slows file transfers).
Despite being an outdated and disabled protocol, you may need to enable SMBv1 in Windows 11 for tasks such as connecting to legacy NAS devices, using old scanners or printers, accessing shared folders on Windows XP or older systems, and running older enterprise programs that depend on SMB1. However, deactivate the protocol after performing the desired task to ensure system security.
How to Activate or Deactivate SMBv1 in Windows 11
You can enable or disable SMBv1 in Windows 11 using Windows Features, PowerShell, or Command Prompt. Windows Features is the easiest approach to activate SMBv1 or deactivate it; PowerShell offers a quick way to manage SMBv1 with a single command; Command Prompt is a method advanced users comfortable with command-line tools use to turn SMBv1 on using the DISM command. Note that Command Prompt only allows you to enable SMBv1 and not disable it. Below are all these methods in detail, step-by-step.
Method 1: Use Windows Features to activate SMBv1 in Windows 11 or deactivate it
- Click the Start button.
- Type Control Panel in the search bar and click the matching search result.
- Click Programs in the Control Panel.
- Next, click Programs and Features.
- In the left panel of the Programs and Features window, click Turn Windows features on or off.
- Scroll down the Windows Features list to find SMB 1.0/CIFS File Sharing Support.
- To enable SMB1, check SMB 1.0/CIFS File Sharing Support.
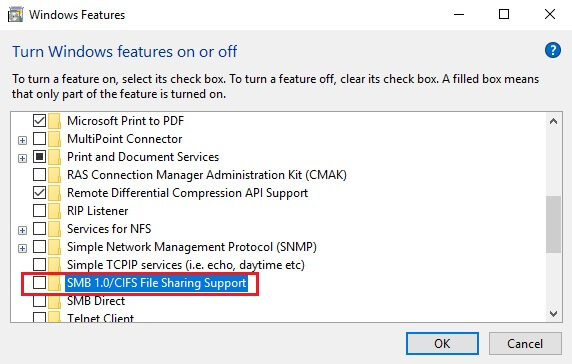
- Click OK to download the necessary components.
- Restart your computer to activate SMBv1 in Windows 11.
- To deactivate SMBv1 in Windows 11, navigate to Turn Windows features on or off, uncheck SMB 1.0/CIFS File Sharing Support, click OK, and restart your computer.
Also know: How to Turn Windows Features On or Off in Windows 11/10
Method 2: Enable or disable SMBv1 with PowerShell
- Right-click the Start button.
- Click Windows PowerShell (Admin).
- In the Administrator Command Prompt, copy and paste the command: Enable-WindowsOptionalFeature -Online -FeatureName SMB1Protocol -All -NoRestart.
- Press Enter to install the SMBv1 protocol feature.
- Restart your PC to activate SMBv1 in Windows 11.
- To deactivate SMBv1, copy and paste the command: Disable-WindowsOptionalFeature -Online -FeatureName SMB1Protocol. Then, press Enter and restart your computer.
Method 3: Use Command Prompt to activate SMBv1
- Click the Start button.
- Type Cmd or Command Prompt in the search bar.
- Right-click Command Prompt in the search results and then click Run as administrator.
- In the Administrator Command Prompt, copy and paste the command: dism /online /enable-feature /featurename:SMB1Protocol /all /norestart.
- Press Enter.
- Restart your computer to enable SMBv1 in Windows 11.
However, if SMBv1 does not work even after activating it, you can restart your computer, check Firewall settings to ensure file sharing is not blocked, and update Windows.
Below, we answer a few common questions about SMBv1 in Windows 11 to clear up any doubts you may have.
Also know: How to Get Rid of Activate Windows Watermark
Frequently Asked Questions
Q1. What is SMBv1 used for?
SMBv1, Server Message Block version 1, or SMB1, is a Windows networking protocol used to share files and printers between network devices.
Q2. How do I check if SMBv1 is enabled?
To check if SMBv1 is enabled on your system, right-click the Start button, click Windows PowerShell (Admin), and then run the Get-SmbServerConfiguration | Select EnableSMB1Protocol command to view the SMB1 protocol status.
Q3. Should SMBv1 be disabled?
Yes, you should disable SMBv1 in Windows 11 because Microsoft disabled it by default. Deactivate it unless you need it for legacy devices, to minimize your security risk and make sure your system uses up-to-date network protocols.
That’s all for how to manage the legacy protocol SMBv1 in Windows 11. Since this protocol is risky, you can consider alternatives with better security and performance, such as SMB2 or SMB3, FTP or SFTP, or cloud storage. For any questions or concerns, leave us a comment.




![Transfer Photos from Mac and Windows PC to iPhone or iPad [With and Without iTunes]](https://wpcontent.techpout.com/techpout/wp-content/uploads/2023/01/06101656/Transfer-Photos-from-Mac-and-Windows-PC-to-iPhone-or-iPad-With-and-Without-iTunes.jpg)