You may read this article to learn how to execute MacBook screen sharing without any cumbersome effort.
Collaboration with others is the key to success in many projects. You may need to share the screen on a Mac to collaborate with teammates on various tasks and complete them effectively.
Therefore, this article guides you through how to perform screen sharing on Mac. Let us proceed straight to the best methods to do it without wasting time beating around the bush.
You may implement the following methods for quick and easy Mac screen sharing.
Method 1: Use Mac’s screen sharing feature
Mac comes with an in-built feature to let you share the screen with anyone you want. Below is how to set up and use it for Mac screen sharing.
- Choose the Apple menu from the top-left corner of your Mac’s screen.
- Pick System Preferences from the options that appear.

- Select sharing from the available options.

- From the list of options on the left, choose screen sharing to share the screen on a Mac.

Now, you may permit or restrict users on your network from accessing the screen of your Mac. After that, the following are the steps you need to follow to begin screen sharing.
Steps to start screen sharing on MacBook
- Launch a Finder window on the Mac with which you wish to share the Mac’s screen.
- Go to the Locations, choose Network, and click on the MacBook you want to view.

- Select Share Screen from the on-screen options.
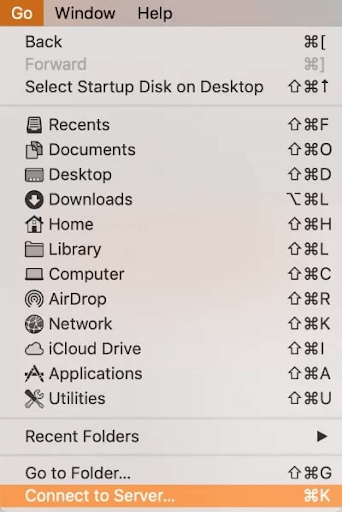
- Navigate to the Finder, choose Go from the top menu, and click on Connect to Server.
- Sign in using your credentials (username and password) if prompted to do so.
- Wait for the session to start. If both Macs are not using the same Apple ID account, you first need to input the username and password of the Mac whose screen you are trying to access.
Also Read: How to Map a Network Drive on a macOS
Method 2: Use iMessage for screen sharing on MacBook
iMessage also allows screen sharing on the MacBook. Below is how to use it to share the screen.
- Message the user with whom you wish to share your screen.
- Choose Details from the rightmost corner of the window.

- Click on the button to Share Screen.

- Now, you may either share the screen or invite the recipient so that they may view it. Alternatively, you may ask them to share the screen.
- After acceptance of the request or invitation, wait for the audio call to start and the Mac screen-sharing app to open.
Method 3: Use a third-party application
This method is especially useful if you wish to perform Mac screen sharing with non-Mac devices running Windows, iOS, Android, Linux, or iOS. The following are some of our top recommendations for the best MacBook screen-sharing applications.
1. Zoom

Zoom is among the most popular apps to share screens on a Mac. It comes with a bunch of privacy features, high-speed connectivity, and a lot more. All you need to do is click on the Share Screen button to start sharing the screen through Zoom.
2. TeamViewer

TeamViewer can be an excellent choice if you want a free screen-sharing app for MacBook. It is loaded with many features like real-time remote access and support. Moreover, it is quite easy to share the screen with TeamViewer. You simply need to share with the recipient the password and ID number TeamViewer creates for your screen-sharing session.
3. Skype

You may already know Microsoft-owned Skype as one of the best VoIP applications. What you may not know is it also lets you share the screen on a Mac with just a click on the screen share button while you are on a call.
4. Google Meet

Google Meet calls the screen sharing for MacBook “Presenting.” All it needs you to do is find and click on the “present now” button to share the screen on a Mac. Now, if you are wondering how to share the FaceTime screen on Mac, we share the same in the next section.
Also Read: How to Completely Uninstall Apps on macOS
You may use SharePlay for screen sharing on Mac if you want to watch TV shows, movies, or other content with friends on FaceTime. Below are the detailed steps to do it.
- Start your FaceTime call.
- Launch an app with SharePlay support.
- Select the show or movie you wish to watch, choose Play, and then Play for Everyone.
macOS makes use of the Virtual Network Computing (VNC) protocol for remote desktop sharing. Hence, you may use any application with VNC support for remote desktop screen sharing. One of the most recommended apps is VNC Viewer. However, you should comply with the following prerequisites before using it.
- Turn on screen sharing from System Preferences.
- Ensure either one of the two headings is ticked under the computer settings.
- Note the screen sharing and Mac’s IP address.
After ensuring that all the above requirements are fulfilled, you may follow the below directions for screen sharing on Mac.
- Launch the VNC Viewer application and choose the plus icon from the top right.
- Type your Mac’s WiFi or Ethernet address in the dialog box that comes up and enter a memorable name in the name field.
- Select Done and then choose the Connect option.
- Input the username and password of the Mac account you wish to log in to.
FaceTime Mac Screen Sharing
You may follow these directions to share your FaceTime MacBook screen.
- Start a FaceTime call or join it.
- Choose FaceTime from the menu bar to launch the Control Panel.
- Click on the Screen Share button.
- Choose whether you want to share the Window or Screen. You should choose the Window option if you wish to share an application with those on the other side of the call. Whereas, the Screen option is a better choice if you wish to share all things happening on your desktop.
- Once you are done sharing the screen, you may select the Stop Sharing button to exit.
Now, you may go through the following section if any doubts remain about how to share the screen on MacBook.
Also Read: New to Mac? Six Tricks macOS Beginners Should Know
Frequently Asked Questions
Following are some of the most common questions related to how to share the screen on a Mac along with their answers.
Screen sharing on Mac is safe unless you are doing it with the wrong person. You should give screen access to only trusted people.
Q2. How does Mac screen sharing work?
Screen sharing on a Mac is a simple process. Here, information packets from your Mac are sent to the recipient’s device to show them the happenings on your screen.
Yes, you may share your Mac’s screen on your iPhone using iMessage or some third-party applications like Zoom and Teamviewer.
Q4. Why won’t my Mac allow screen sharing?
Your Mac may not allow screen sharing if it is in sleep mode or you have not enabled the screen sharing feature from Mac’s system preferences.
Q5. How do I enable screen sharing on Mac?
You may follow the path Apple menu>System Preferences>Screen sharing to enable screen sharing on your Mac.
Q6. How do I enable screen sharing on my Mac for Zoom?
Enabling Zoom screen sharing on Mac is simple. You may simply choose the share screen button, click on “Desktop 1”, select share, and permit Zoom to share your screen under system preferences if asked to do so.
Mac may not be allowing screen sharing on Zoom if you have not permitted the application to do so through Mac’s system preferences. You may go to the privacy & security option under system preferences, choose the Privacy tab, select the screen recording option, and then click on Zoom to allow screen sharing.
Concluding the Mac Screen Sharing
Above was the detailed guide on how to share the screen on a Mac. You may follow it to collaborate with your friends/team without any hassles.
Moreover, our comment section is always open if you have any questions or suggestions in relation to this article.
We will get back to you soon with another helpful tech guide. Until then, you may stay connected with TechPout and read other posts to enhance your tech knowledge.


![[FIXED] Last Line No Longer Available on iPhone 11, 12, or 13](https://wpcontent.techpout.com/techpout/wp-content/uploads/2022/08/26233921/FIXED-Last-Line-No-Longer-Available-on-iPhone-11-12-or-13-150x150.jpg)