Main LogoLight Logo
  • Reviews
  • Top 10
  • How To
  • Tech News
  • OS
    • Windows
    • MAC
    • iOS
    • Android
  • Categories
    • Driver Updater
    • Cyber Security
    • Games
    • Fitness
    • Entertainment
    • Tips & Tricks
Top 10 Windows
by Snigdha

13 Best Free DVD Ripper Software for Windows 10

December 15, 2023
1

Looking for a decent DVD ripper for your Windows 10 PC? Ripping is the process of extracting certain parts or the whole digital content from a container. DVD rippers help to convert the extracted contents into a file that can be stored in the system easily. The extracted content in the destination format is called a rip.

A DVD ripper is a program that changes a DVD or Blu-ray movie into the ISO format file usually. This could aid in stocking up your favorite movies, TV or web series. You could also convert it into a suitable file format which would be supported by your smart device.

These kinds of applications are still in demand because they can be used to back up important files. Ripping a DVD can seem to be a mind-numbing and cumbersome task; however, it can be a cakewalk if you have a good DVD ripper software with you. What’s even better is that some of these tools can also be used as best DVD burner software.

Therefore, in this article, we have curated a list of best DVD rippers available in the market, which you can procure and utilize as per your needs. 

Table of Contents hide
Notable DVD Rippers For Windows 10:
1. WinX DVD Ripper Platinum
2. HandBrake
3. DVDFab
4. Freemake Video Converter
5. MakeMKV
6. WonderFox DVD Ripper Pro
7. VLC Player
8. Aimersoft DVD Ripper
9. Magic DVD Ripper
10. DVD Shrink
11. DVD Decrypter
12. Leawo DVD Ripper
13. Prism Video Converter
Frequently Asked Questions

Notable DVD Rippers For Windows 10:

DVD files are usually quite large that makes it a bit difficult to copy the content entirely, therefore a DVD ripping software is capable of re-encoding the content to fit them into smaller files. We will look at 13 best DVD rippers for Windows 10 in this post.

1. WinX DVD Ripper Platinum
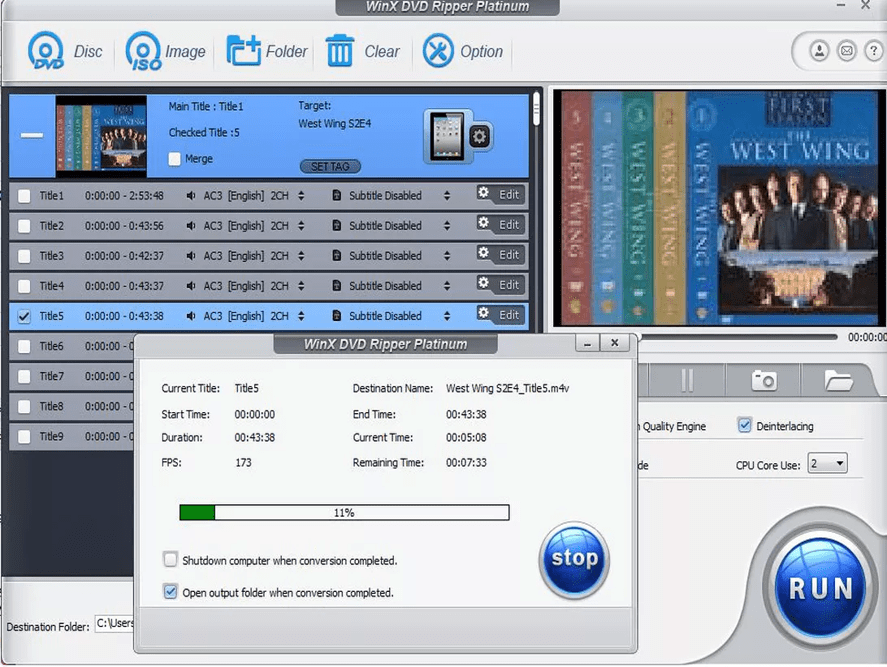
WinX DVD Ripper Platinum
Image Source: Winxdvd

Do you like to collect and keep favorite movies with you? Well, this ideal DVD ripper tool can assist you in converting your favorite movies into suitable file formats, so that you can always have them with you. 

Let us see what this application can do for you?

The type of input files that this best DVD copy software supports are DVDs, DVD folders, ISO files, and images. With a 30-day money-back guarantee, this ripper tool can backup and digitize DVDs into more than 350 output file formats for Apple, Microsoft, Android, Sony and several other platforms like Chromecast, Blackberry, Samsung and LG TV, etc.

It has advanced features facilitating modification of video resolution, trimming videos, and changing the frame rate. Further, it also helps to exclude titles, includes subtitles and supports various other customizations.

download

2. HandBrake

HandBrake - Free DVD Ripper Software
Image Source: HandBrake

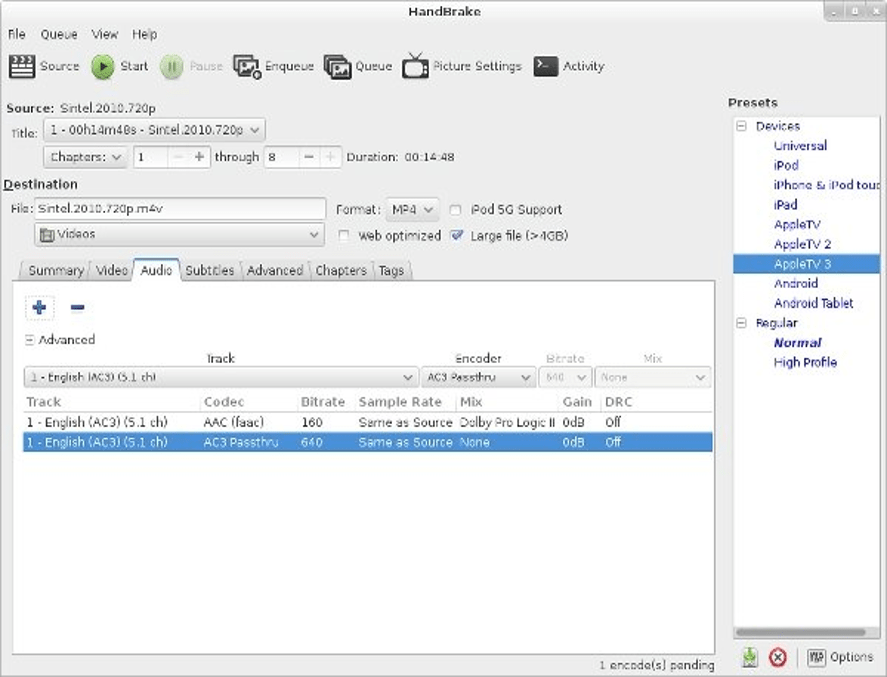
This is a top free DVD ripper tool as it is an open-source application. Alternatively known as video transcoder, this tool offers multiple presets to rip DVDs and extract video files. 

If you are looking for a program that can do multiple conversions, then you could pick this one up as it can simultaneously run a number of encoding tasks for ISO images or disc folders.

However, one limitation of this tool is that it cannot go past copyright protection. This best open source DVD ripper application is compatible with Windows, Linux, and Mac device platforms.

download

3. DVDFab 

DVDFab
Image Source: TechCommuters

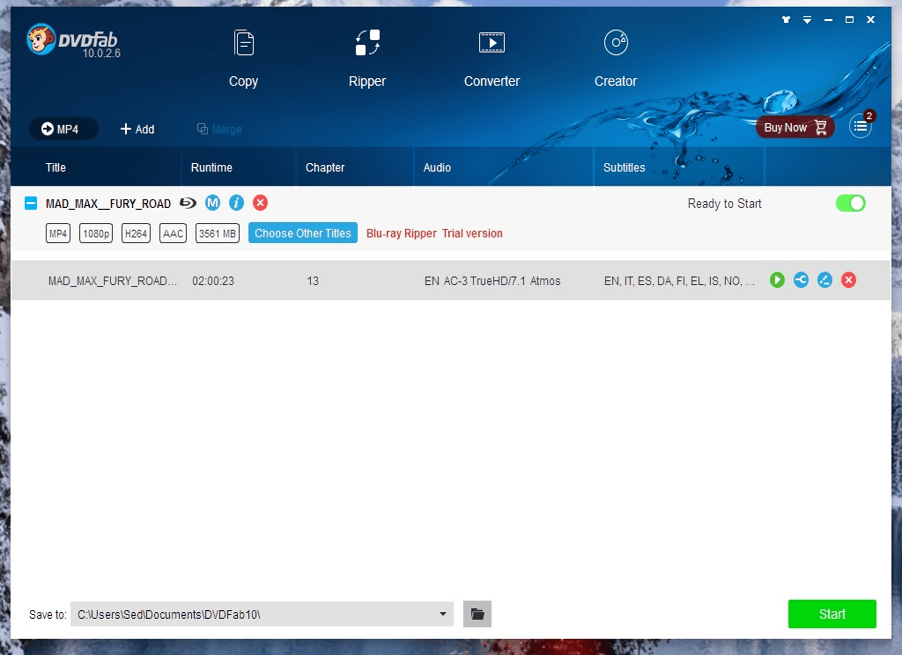
DVDFab undoubtedly offers another excellent choice in the category of DVD ripper applications for Windows 10, as it swiftly rips and converts a DVD into any sort of mainstream video as well as audio formats.

Read More: Best Data Recovery Software For Windows 2020

This best free DVD converter software is also available in a premium version thats offers top-notch features.. It supports Windows 10, 8.1, 8.7 as well as Mac platforms. There are multiple inputs as well as output formats that are supported by this application.

Another notable offering from this software maker is the DVDFab Enlarger AI. Although this is a separate program; however, when coupled with the DVDFab ripper software, it is capable of upscaling the output video quality from 480p to 1080p quality.

download

4. Freemake Video Converter

Freemake Video Converter
Image Source: Uptodown

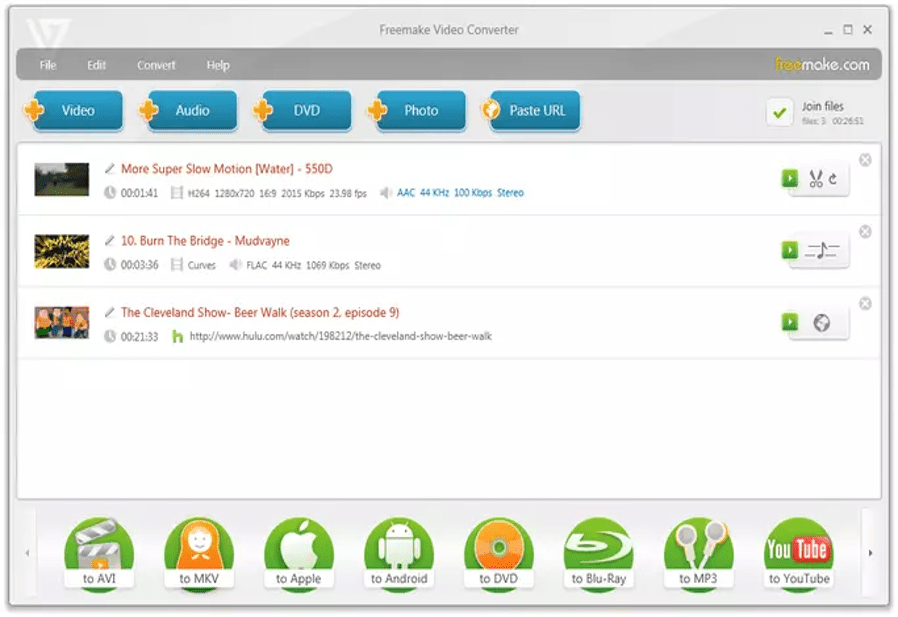
This tool is primarily a free video converter and ripper program. Freemake Video Converter can also burn and generate a disc. It lets you tweak the video content along with offering customizations like subtitle addition, editing a video, etc.

It also offers presets for Android, Blackberry, Apple, Xbox, and Sony devices. It supports more than 500 input formats.
Wondering what else it can do for you? This DVD ripper for Windows 10 lets you download and modify videos from online streaming sites like Dailymotion, YouTube, and Vimeo. You can also use this completely free DVD ripper tool to transform YouTube videos to any other file formats of your preference.

download

5. MakeMKV

MakeMKV
Image Source: Neowin

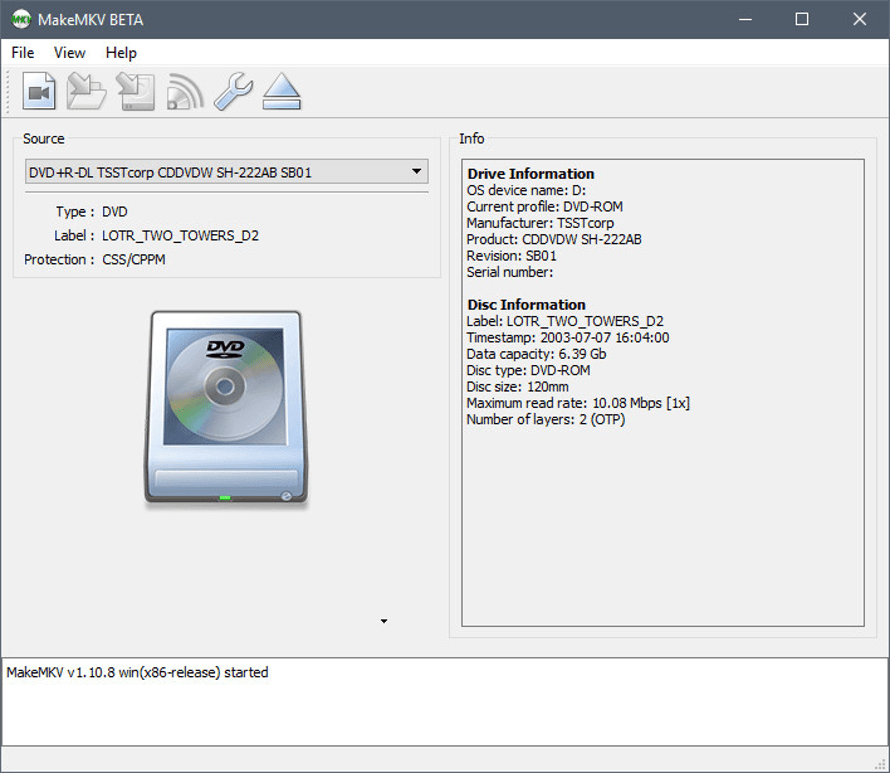
MakeMKV is the best freeware DVD ripper for Mac, Linux and Windows computers. It can read DVDs and Blu-ray discs. This tool is capable of preserving all videos and audio tracks. It is capable of fast conversions and preserves chapter wise information.

There is no need for any other software for decryption or performing conversions. The DVD opening function is a free feature. What’s more interesting is that all features including the Blu-ray decryption and processing are absolutely free in the BETA version.

download

6. WonderFox DVD Ripper Pro

WonderFox DVD Ripper Pro
Image Source: Softpedia

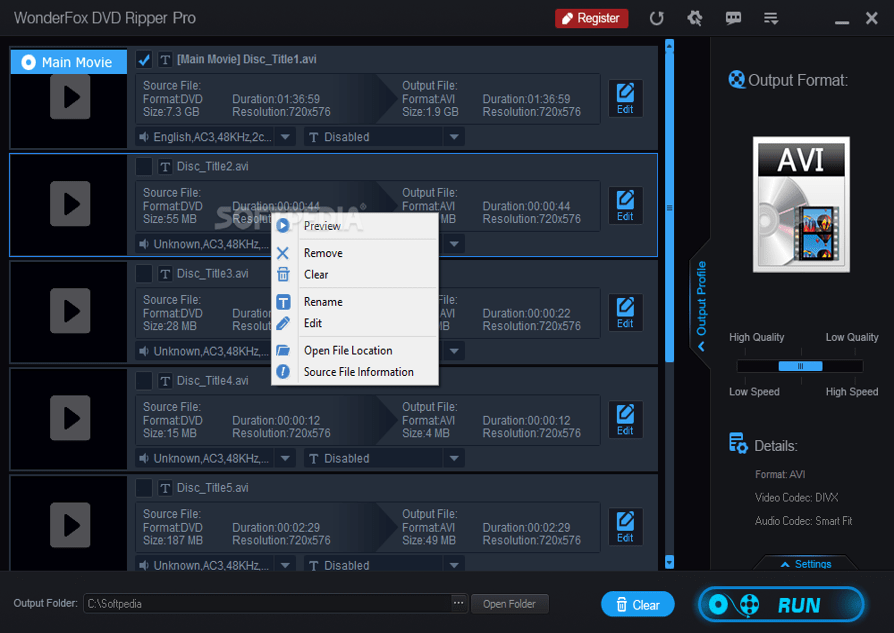
Use this DVD ripper application for Windows 10 to complete your DVD backup in just three simple steps. What makes this tool unique is that it maintains a perfect balance in compression ratio, file size and output quality. 

For instance, it compresses a DVD of 7.5 GB to a digital format of 0.5 to 1 Gb without compromising the video quality

Now swiftly rip your DVD in 20 minutes with this tool. The tool can also intelligently sort the main title of a DVD movie and TV show from a sea of various other videos. It also removes unwanted ads, trailers, video clips, etc. It works best for users who are looking for an all rounder DVD rip software for their windows 10 PC.

download

7. VLC Player

VLC Player
Image Source: Makeuseof

VLC Media Player is much more than a media player app as it can also be used as a DVD or Blu-ray ripper software

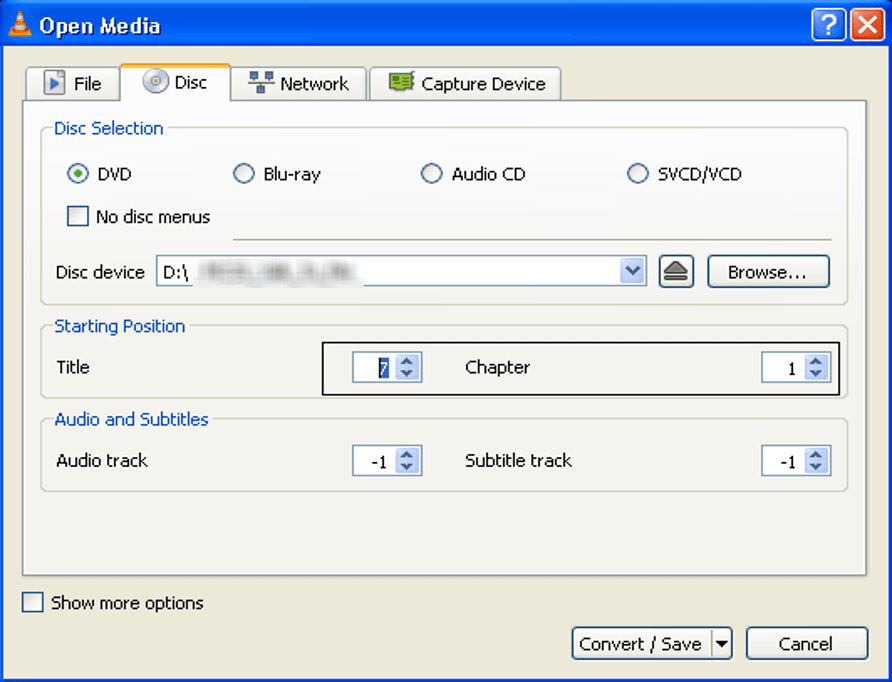
The app can rip a DVD if you go to the “Convert/Save” function under the Media tab.

Further, you can go to the Disc tab and select the DVD or Blu-ray that you wish to backup. Alternatively, you can also use the “No Disc menu” option if you want to skip the menus.

download

8. Aimersoft DVD Ripper

Aimersoft DVD Ripper
Image Source: Softpedia

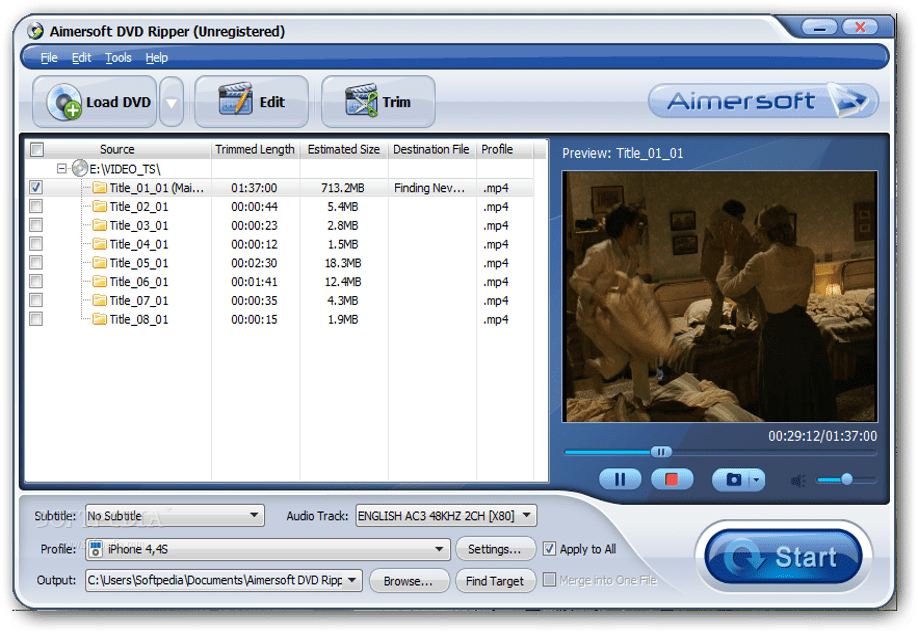
This is one of the best DVD Ripper that can convert more than 200 formats with a speed six times higher than the normal. The output quality of these DVD videos is optimum and very reliable.

Aimersoft can burn DVDs to the following formats like MPEG, MP4, H.264, WMV, MOV, AVI MKV, M4V, and also HD & 3D video formats. It is compatible with iPhones, Samsung Galaxy tab, iPad, Nokia, and other Android smartphone platforms.

The DVD can be changed to FLV, SWF, F4V and other video formats. Audio tracks can be extracted from DVD to M4A, MP3, AC3, WMA, and many more formats.

download

9. Magic DVD Ripper

Magic DVD Ripper
Image Source: Malavida

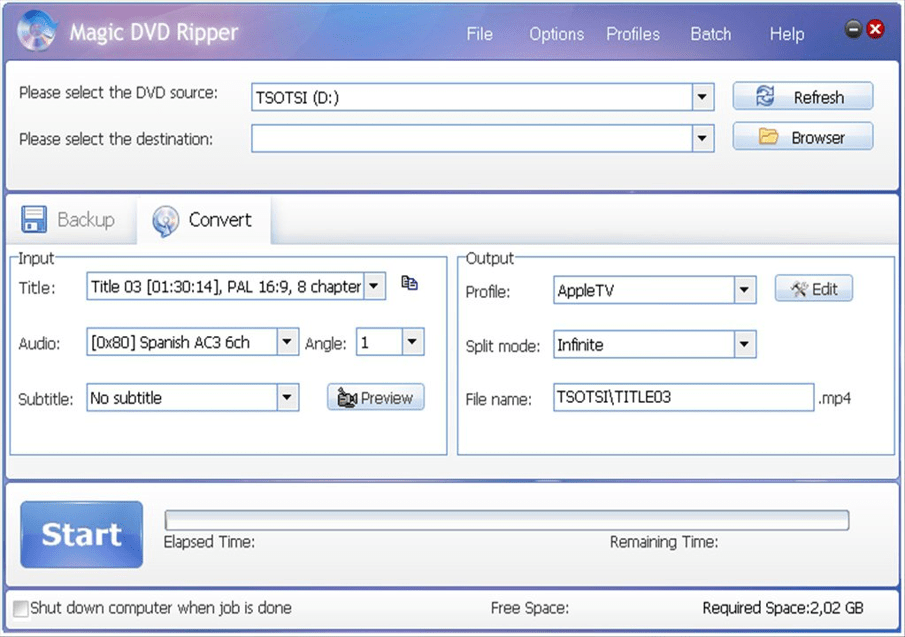
The Magic DVD Ripper can very easily burn the DVD to a blank DVD format or a CD with software format and is a good DVD Ripper Windows 10. You can definitely convert your DVD to AVI, SVCD, WMV, MP3, VCD and other formats. Read More: Best Safe ROM Sites To Download ROMs

There are several features supporting the Magic DVD players such as movies can be copied from DVD to hard drive without any major loss in quality.

Restrictions on DVD can be easily changed like those placed by a particular region, RCE, PuppetLock, etc. A 4.7 GB disk is enough to fit a compressed DVD.

download

10. DVD Shrink

DVD Shrink - best DVD Ripper
Image Source: DVD Shrink

It is an excellent cross-platform DVD ripper freeware. It comes with expert settings and a default compression algorithm to furnish standard quality of output.

The tool has a responsive interface. One limitation of this software is that it has to be used in conjunction with a DVD burning software to create a backup copy of the DVD.

download

11. DVD Decrypter

DVD Decrypter
Image Source: VideoHelp

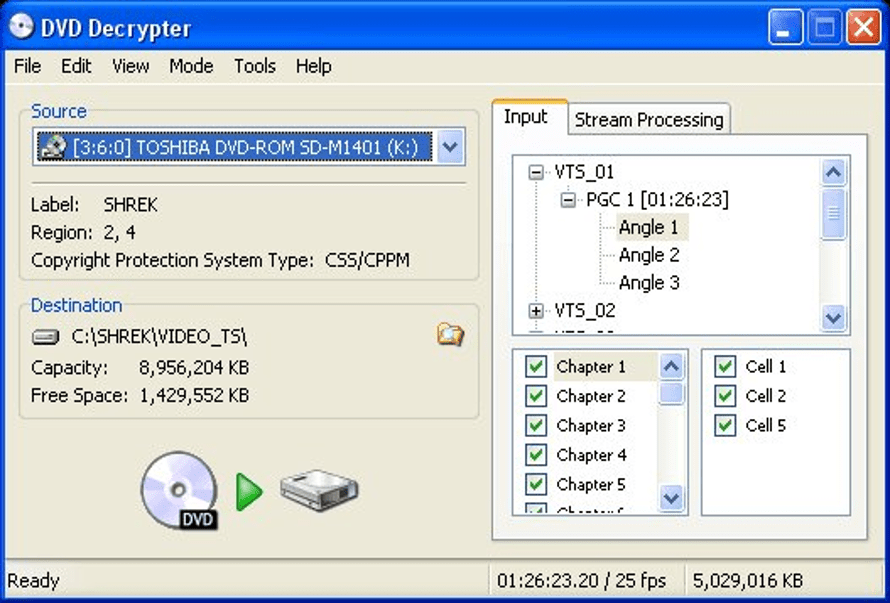
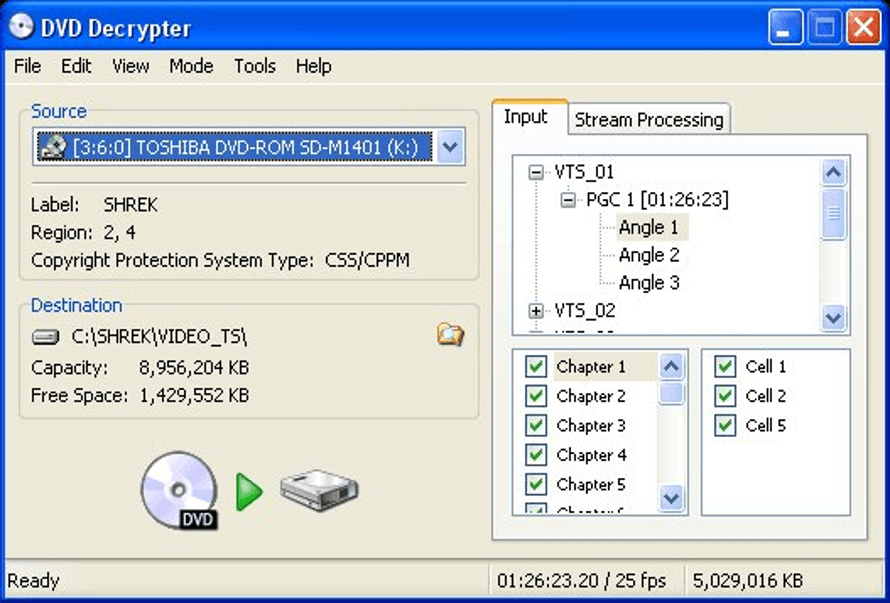
This is another free DVD ripper for Windows 10 and helps to rip a DVD into a single ISO file, VOB file or IFO files enclosed within a folder.

The website interface is simple and offers a lot of customization options. This free DVD decryption software also facilitates the splitting a ripped ISO file into 1 of the 17 available sizes, modifying the read speed apart from associating the tool with other file types.

download

12. Leawo DVD Ripper

Leawo DVD Ripper
Source: Leawo DVD Ripper

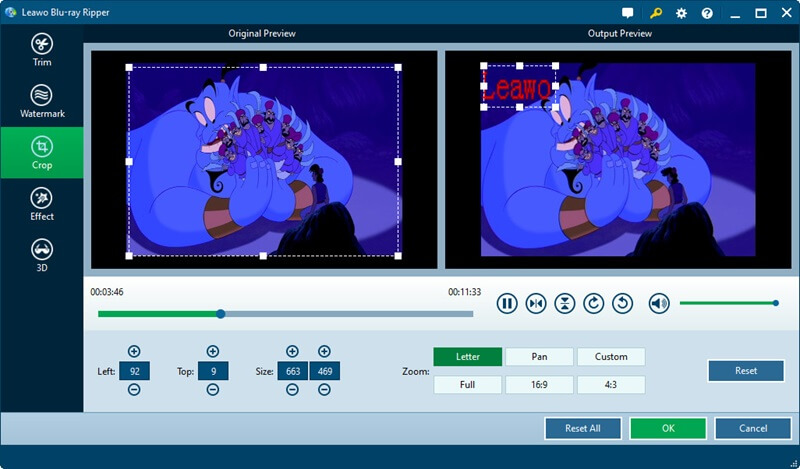
No list of the best DVD ripper software can be complete without Leawo DVD Ripper. You can use this software to convert video/audio in more than 180 popular formats, such as MP4, AVI, MKV, FLV, 3GP, F4V, AAC, etc.

Moreover, this software allows you to change a 2D video into a 3D video through various effects. Furthermore, Leawo DVD Ripper is well known for many other features, like disc restrictions removal, an in-built video editor, an in-built player, and an option to merge videos.

download

13. Prism Video Converter

Prism-Video-Converter
Source: Prism Video Converter

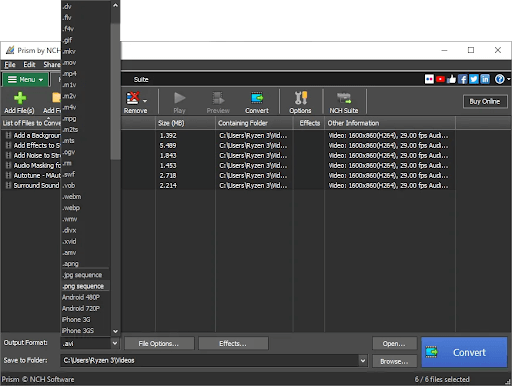
The next best free DVD ripper software in this list is Prism Video Converter. This is an easy-to-use software that allows you to convert the DVD video into other formats. The software supports AVI, MPG, WMV, MP4, VOB, ASF, AMV, and many other formats.
The software can also extract audio from the videos. This tool is an express ripper software that supports multiple formats and resolutions.

download

Frequently Asked Questions

Ques 1. What is the best DVD Rip for Windows 10?

Each of the tools mentioned above is unique in its own way and has a lot to offer. If you are looking for a comprehensive and intelligently designed DVD Ripper application we suggest you pick WinX DVD Ripper Platinum. It offers a simple and fast way to rid of DVDs and is backed with several advanced features. 

video trimming, alteration of frame rate, adjustments in video resolution, and customization are some of the prominent features of this GPU-accelerated DVDrip software for Windows 10 PC. 

Ques 2. Is a Free DVD Ripper program safe to use?

Yes in most of cases, free dvd decryption software is safe to use. However, we suggest you be a bit careful while making your final choice as a few of the tools try to install unwanted programs on your device and in some cases can plague your PC with annoying ads and malware.

Ques 3. What is the best open-source DVD ripper for Windows computers and laptops?

If you are searching for a dedicated open source DVD ripping program then try Handbrake. It is one great way to digitize, back up, and save your movie collection. This multi-platform and totally free DVD ripper tool can help you tweak picture quality, and compress video files and does not put any restrictions on the numbers and length of videos that you wish to rip.


Conclusion

DVDs are mostly encrypted, so it is essential to use a DVD ripper tool that is enabled with decryption ability. While ripping DVDs, you need to be aware of the copyright laws of the region in which you are located, especially if the content that is being ripped is not available on the public domain. Otherwise creating unauthorized copies might be treated as copyright infringement.

If you like creating copies and retaining collections of your favorite shows and movie series, then using a competent DVD ripper for Windows 10 is highly recommended. You could choose an ideal app mentioned in this post that can do the job for you easily.

Author

Snigdha

Snigdha is a technical content writer with expertise in the field of science & technology. Though she has a very diverse academic and professional profile yet she finds writing to be a creative form that she was unable to explore so far. When not writing, she can be found indulging in other forms of creativity like painting or travelling.

View all posts

Related Posts
How to Upgrade Windows 10 for Free

How to Upgrade Windows 10 for Free

November 20, 2019
1

The free download offer of Windows 10 had come to an end in 2016. However, it is only applicable to Windows C (ten) known as GWX. Besides the GWX tool, the other upgrade tools for Windows are still available for use and shall continue working in the near future. 

The free offer saw its end on 29th July 2016, and it was then that Microsoft had officially announced the end of the “Get Windows 10″ free upgrade program. 

Multiple users who have tried to upgrade their current Windows version to Windows 10 after the expiration date had encountered a message stating that “Windows 10 has failed to validate the product key”. But no need to get bogged down by this message, several users had received this message even when the scheme was live. 

If you still wish to upgrade to Windows 10, then you will have to pay now. 

But there are still ways to download the upgrade for free. Want to know how?

Then, follow the steps on “How to Upgrade from Windows 7 or 8 to Windows 10?”

Best Ways to Upgrade Windows 10 for Free

Way #1: Windows 10 Free Upgrade 2020

1) It’s always good to keep your product key handy. For those who have misplaced it, they can easily procure one by following the given steps.

Click on the start button > Settings > System > Click on the “About” button located on the left-hand panel. Your product key would be displayed there. 

2) Go to the official website of Microsoft to download Windows 10. Next, click on the “Download now“ tab to start the installation process.

3) Run the downloaded installation file in your system by authenticating the “Run” option.

4) On the first screen, select “Upgrade your PC now” and then click on the Next button.

5) Go through the instructions provided on the screen to complete the Windows 10 free upgrade. Windows connects back to the internet after Upgradation; it would ask you for a digital license. 

6) You need to click on the ‘Update & Security’ from the “Settings Menu” as well before you move to the Activation tab.

Point To Note: 

Every system has a specific digital license associated with it, which supports system formatting and disk reinstallation. It also assists in the clean installation of the Windows 10 version. Additionally, for users who have their digital license handy does not require the product key.

Read Also: Windows 10 November 2019 Update: Everything You Need To Know


Way #2: Windows 10 Free Upgrade 2020

Start with steps 1&2 from the method mentioned above to upgrade to Windows 10 for free.

3) While you run the installation media, instead of selecting “Upgrade this PC now,” you must select “Create Installation Media (USB Flash Drive, DVD or ISO File) for another PC.”

4) In the next step choose your “preferred language,” “Architecture,” and “Windows Edition.” Click on “Next.”

5) There would now be a choice to either Download Windows 10 program in a USB device to run the setup or to get the ISO file to burn on a DVD to run the data on your system.

6) Next, move on to the USB file. To start with insert the USB drive onto your system, then select it and download the data.

7) Insert the USB drive on the system which needs an upgrade and then restart it. To change the Boot priority, press the F2 button to enter the BIOS setup window. By doing this, you allow the USB flash drive to run before the system reboots to desktop- In the following step, choose USB Drive from the Boot Priority Order. Select F10 to save changes and exit.

8) By restarting your computer system, you would reach the install page of the Windows 10 free upgrade.

9) Enter the Product Key to proceed with the final upgrade process to Windows 10.

Once you have successfully updated to Windows 10 version, you should look for all available updates along with compatible drivers. 


You Can Look For Updated Drivers in Two Ways

Either choose to do a manual check for available drivers or leave the job on an excellent driver updater software.

The Driver update software is friendly and easy-to-use software that will scan for outdated drivers and device drivers whenever they release. Moreover, it also reduces the risk of installing a wrong or infected driver. 

This also means that you save a lot of time, which you may waste- manually looking for the correct driver updates. 

With a driver updater tool, you can enjoy advanced functionalities and benefits like: 

  • Round the clock support
  • Peak Performance of your system
  • Time Saver
  • One-Click Update.
  • Automatically updates all your broken and outdated drivers. 

Read More: Best Tips to Speed up Windows 10 Computer

An excellent driver updater tool ensures that we do not miss any essential updates, which thereby promises enhanced system performance. 

I hope our blog was of enough help to you and has also given a fair idea of “How to upgrade from Windows 7 or 8 to Windows 10”. Follow necessary and simple steps to keep your system running on the latest Windows version along with updated device drivers.

Miracast on Windows 10,11 PC- Download, Install, Update & Setup Guide

Miracast on Windows 10,11 PC: Download, Install, Update & Setup Guide 2024

May 19, 2023
0

If you want to download and install Miracast on Windows 10/11 then check out this thorough and simple guide listing and explaining some methods to do the same. 

The ability to use the TV as a laptop or desktop screen is like a blessing in disguise. This is something that Miracast can easily help you with. Using the technology, you can easily project your Windows laptop or desktop screen on your TV with a single click. However, to use Miracast on Windows 10/11, you need to enable the same on your system. In this tutorial, we will explain the methods to help you download Miracast on Windows and then use the same as required.

Recommended: Download and Update the Miracast Drivers for Ease

Generally, it has been seen that common problems related to connectivity and mirroring are faced by users while setting up Miracast. This happens because the supportive drivers for Miracast are not available on your system. Hence, before proceeding, you should download and install all the required drivers right away. For the same task, you can take the help of the Win Riser a Driver Update tool to automatic update all kinds of drivers with a single click. Download this tool now.

Windows-Download-Button

However, before moving on to the method to enable and use Miracast, let’s know more about the feature.

What is Miracast?

Miracast is an HDMI over WiFi feature that uses a WiFi connection to display the data on a screen rather than the HDMI cable. Using this technology, you can easily share the video from or to a TV or any other screen with Windows 10/11 device. Using the certification standard of Miracast, mirroring the screen becomes quite easy and possible.

Generally, in the new devices, Miracast is already integrated and enabled but in the older ones, you need to check whether your device supports Miracst on Windows 10/1 or not. Let’s see how.

Also Read: Update Wifi Driver on Windows 10


How to See If The Windows Device Supports Miracast or Not?

In the process to see whether Miracast is supported on your device or not, you need to take the help of your DirectX Graphics Diagnostic dialogue box. Follow the instructions below to know what you need to do:

  1. Press the combination of Win+R keys on your device.
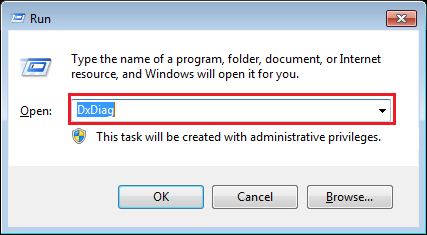
  2. Type dxdiag in the search bar and press Enter.type dxdiag in run utility
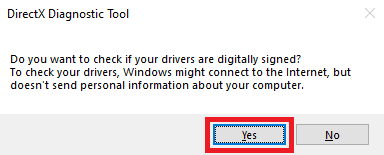
  3. Click on Yes to continue.DirectX Graphics Diagnostic dialogue box
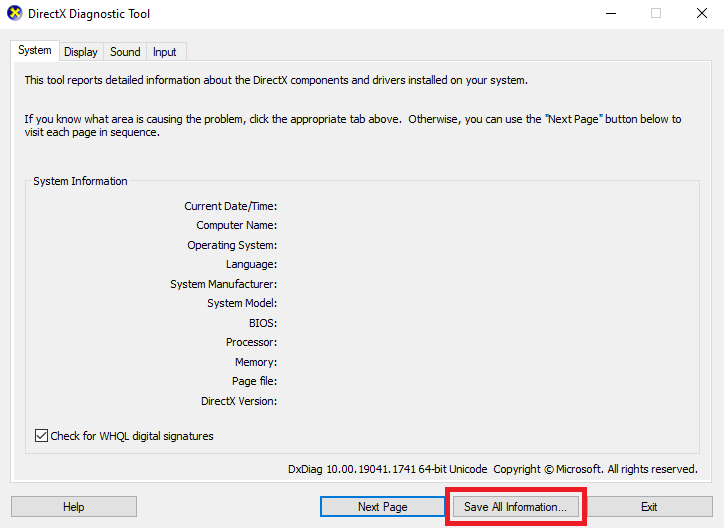
  4. The DirectX Graphics Diagnostic dialogue box will appear. Under the system category, click on the button named Save all Information to proceed.DirectX Graphics Diagnostic - Save all Information
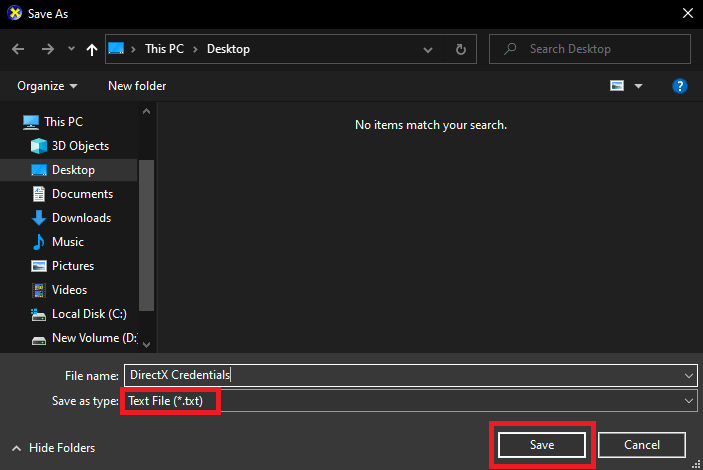
  5. Save the file under the .txt format.Save the file under the .txt format
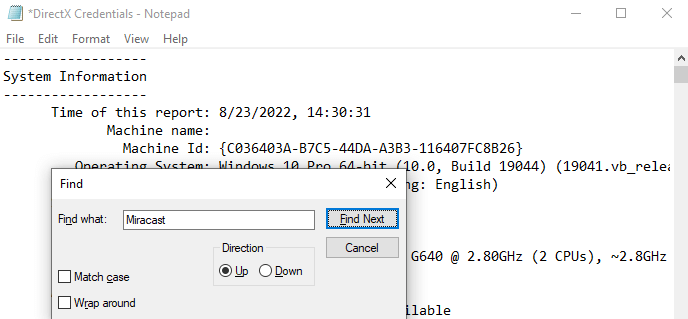
  6. Open the saved file and press Ctrl+S keys and search for Miracast.search for Miracast
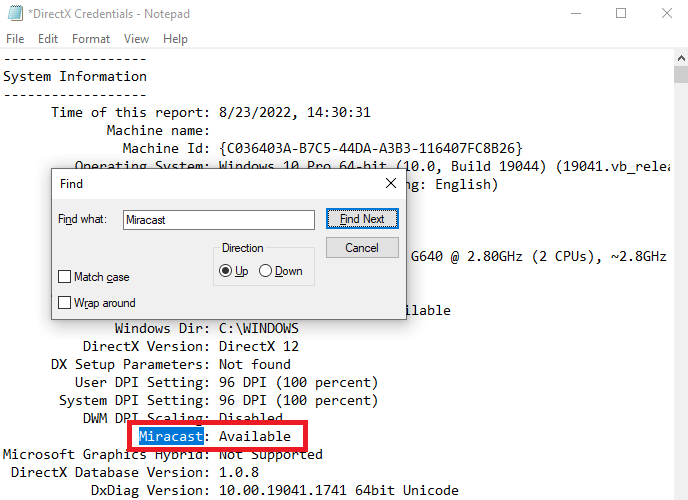
  7. If you find Miracast: Available then this means that your device supports Miracast.find Miracast- Available
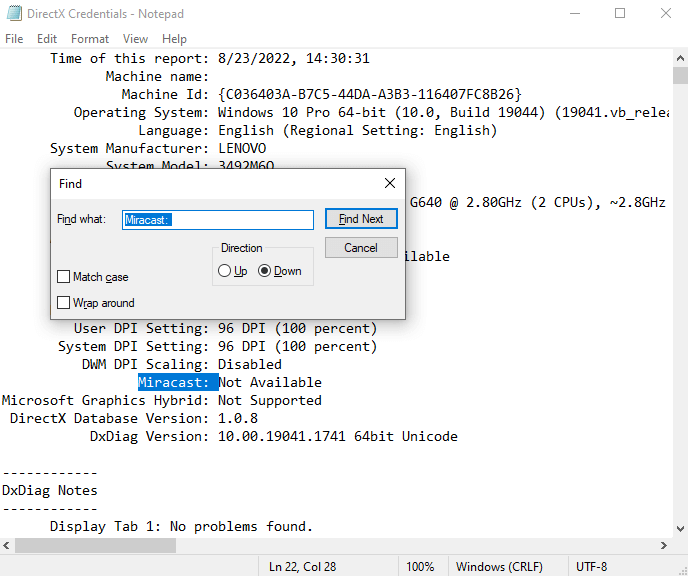
  8. Miracast: Not Available means that your system can’t run Miracast on its own.Miracast- Not Available means that your system can’t run Miracast

If you find out that Miracast is unavailable but want to use it, you need to make some changes to get Miracast for PC. For example, you can use an external device like the USB Transmitter or Screen Projector for ease.


How to Download, Update, and Install Miracast for Windows 10?

Miracast, just like any other device connected or integrated with the Windows system, works with the help of drivers. These drivers are the way for the system to communicate and connect with the device connected. Hence, if any driver is outdated or missing from the system, it can cause problems in running the device properly. The same goes for Miracast. For it to function without any interruptions, perform Miracast Windows 10 download for latest drivers.

To set up and use Miracast, you need to download or update Miracast or Windows 10/11. Here, the download means that you need to download the supportive drivers for Miracast. You can do this with ease using Bit Driver Updater. The tool is an expert in providing the best features to help you download, update and install all kinds of drivers.

Apart from this, the tool offers other features to you as well. Using Bit Driver Updater, you can easily update all types of drivers with a single click or even schedule the update if required. Additionally, the updater also provides some smart features to create a backup of drivers and restore them when required. The single-click Ignore Update feature is quite worthy as well.

All the drivers provided by the Bit Driver Updater are certified and trustworthy. This means that there is no threat of malware attack while using Bit Driver Updater. And that’s not all the software offers a lot of other features as well. You can find these out after downloading the tool.

For now, let’s know how to download and update Miracast on Windows 10 PC driver.

How to Use Bit Driver Updater to Get Miracast for PC?

Follow the steps shown below and use the Bit Driver Updater to install Miracast on Windows 10/11 very easily:

  1. Click on the Download button below and save the .exe file of Bit Driver Updater to your storage.Windows Download Button
  2. Install the software and run the same on your system.
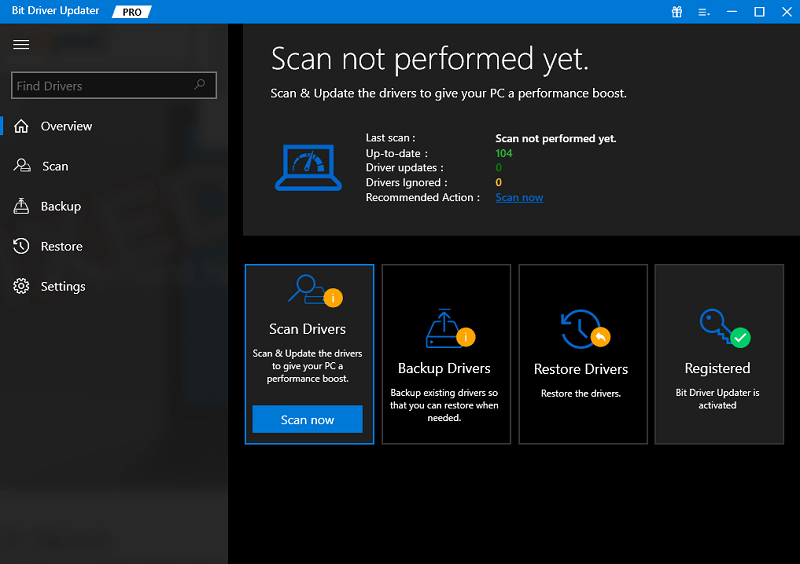
  3. Once the updater launches, it will automatically start scanning your system for outdated drivers. However, you may need to click on the Scan Drivers options to start the scanning.Bit Driver Updater - Scan all the outdated driver
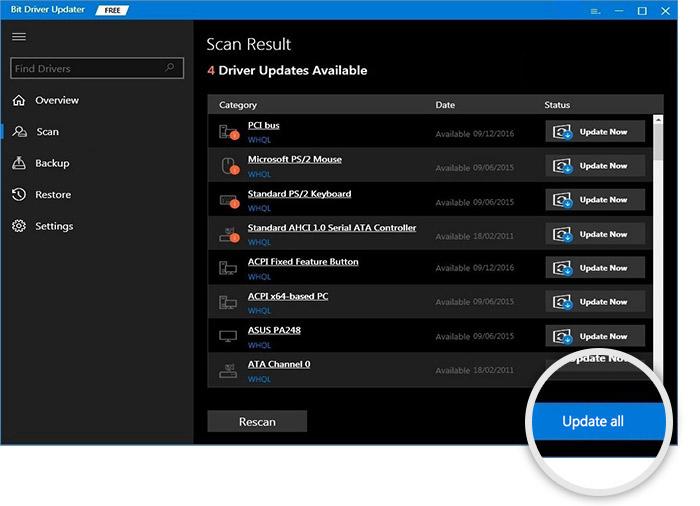
  4. Once the list of outdated drivers appears on your screen, click on the Update Now button(s) to update the required driver(s). Bit Driver Updater Pro users will also get an option to Update All drivers at once.Update all the driver through bit driver updater
  5. Once all the updates are installed, click on Restart the system to do the same.

So, this is how you can download and update Miracast on Windows 10. Now, let’s proceed with the procedure to set up Miracast on your PC.

Also Read: How to Update Drivers on Windows 11


How to Set Up and Connect Using Miracast on Windows 11/10?

Once your system gets the latest drivers for Miracast for PC, you can now set up and use the feature with ease. However, before you proceed with the steps to set up the mirroring feature, you need to see if your TV supports Miracast as well. For this, you can either check out the device properties provided online or visit the apps section to find an app named Miracast. Apart from this, the presence of Screen Casting or Wi-Fi Casting suggests the same.

Additionally, you also need to ensure that both your Windows device and the TV are connected to the same WiFi network. This will allow you to connect using Miracast and share the screen easily.

Use Miracast Via Windows Settings

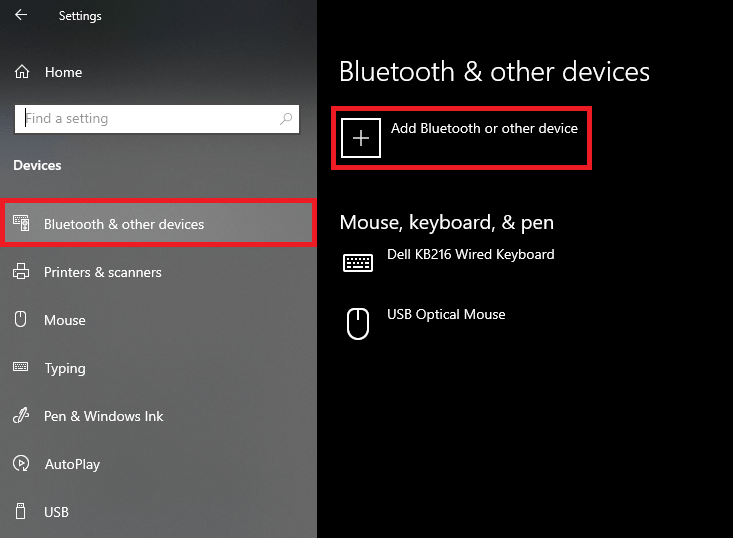
Windows Settings allow you to access and add any device you want. Hence, if your TV supports Miracast, then you can proceed to follow the below steps to use Miracast on Windows 10/11 via Settings:

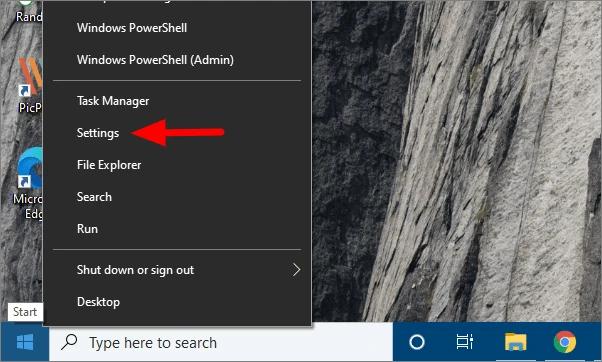
  1. Press Win+X keys on your device and open Settings.windows setting
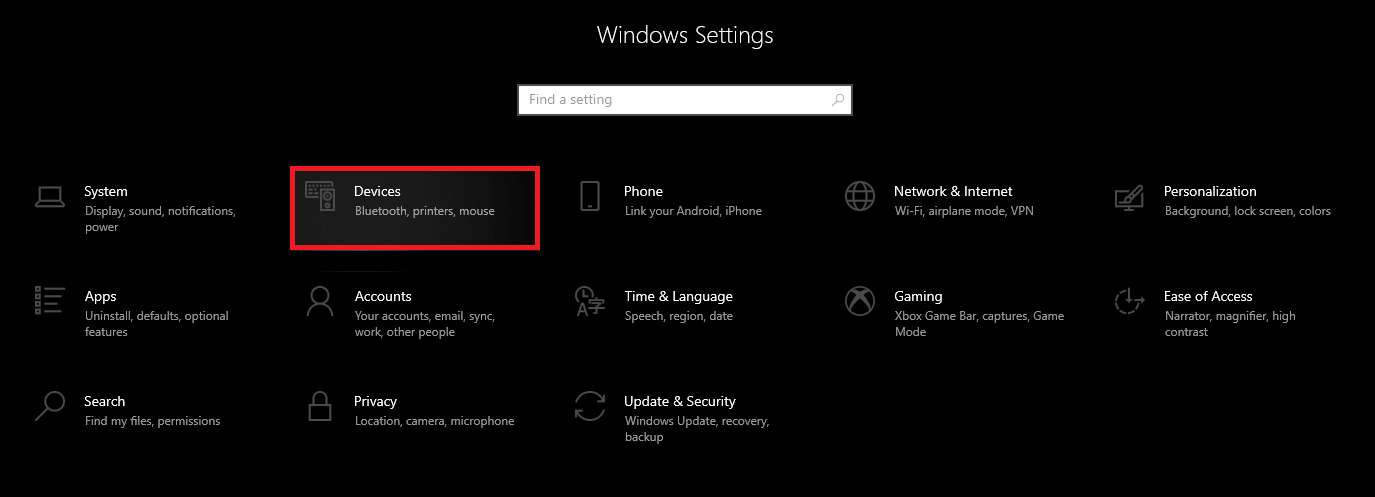
  2. Click on Devices to proceed.Windows Setting - Devices
  3. Under Bluetooth & other devices, click on Add Bluetooth or other device.Add Bluetooth or other device
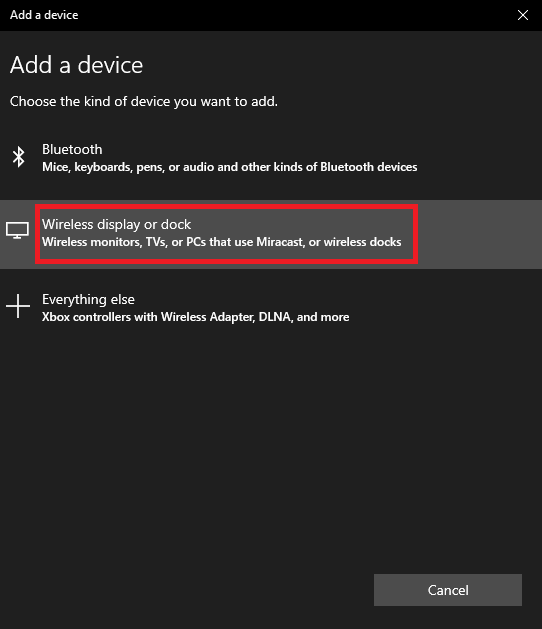
  4. Select Wireless display or dock from the service categories.Wireless display or dock
  5. From the list of devices, click on the TV name that you are using.

You may even try the alternate method to connect as well.

Use Projection Settings to Use Miracast on Windows 10/11

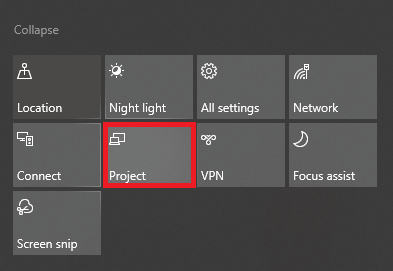
Apart from the system settings, you can also take the help of the Projection or Projector Settings on your device to use Miracast. For this, you can tackle the help of the steps provided below:

  1. Click on the Notifications button present on the right side of the Windows taskbar.Windows Taskbar - Notifications button
  2. Hit the Project button to proceed.Project button
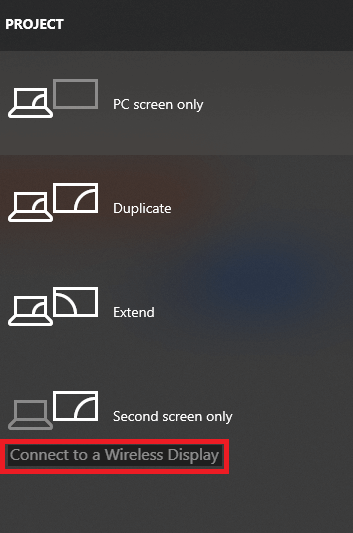
  3. Now, your system will show a variety of options for your display. Click on the button named Connect to a wireless display.Connect to a wireless display
  4. Now, you can click on the name of your TV and cast the screen using Miracast.

If somehow, your system fails to find the TV, then you can also specify the TV’s name manually. For this, click on the option named Where’s My Device and enter the name of the TV.Where is My Device

Now, you can easily mirror the screen on the specified device.


How to Disconnect Miracast on Windows 10/11?

When you are done using Miracast, you might need to disconnect the feature and stop sharing the screen. The process to do the same is quite easy to follow and is provided below for your ease:

  1. Click on the Notifications button present on the right side of the taskbar.Windows Taskbar - Notifications button
  2. Hit the Project button to proceed.Project button
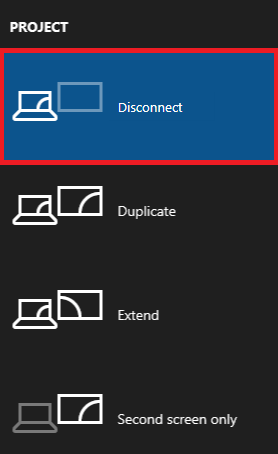
  3. Now, your system will show a variety of options for your display. Click on the first one allowing you to Disconnect the screen.one allowing you to Disconnect the screen

That’s it, your device will disconnect from the TV using this procedure.


What to Do If Miracast Stops Working?

Miracast for Windows 11/10 PC may also fail to work or stop working due to connection errors. If you face the same, you can easily fix the error by configuring the projection settings. Follow the steps below for precision:

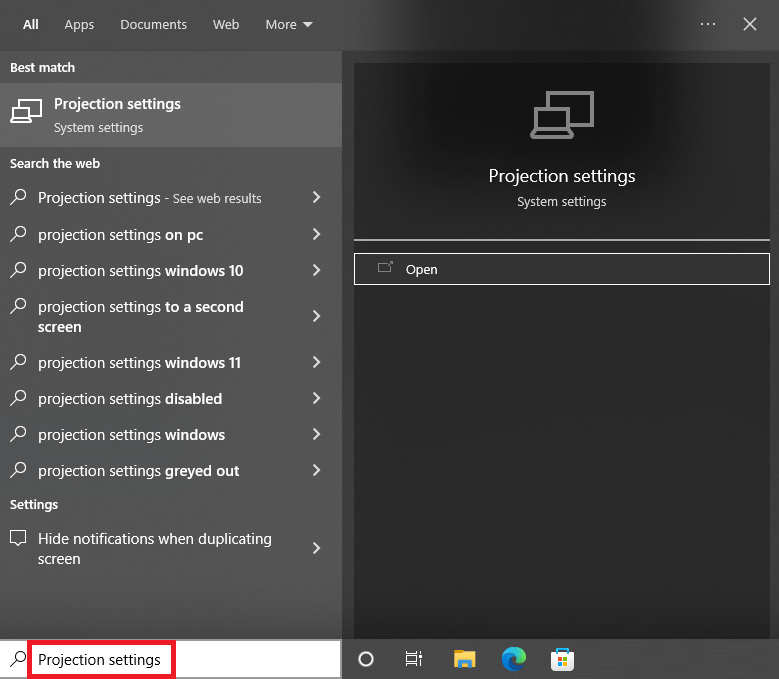
  1. Press the Win+S keys on your keyboard, type Projection Settings,  and hit Enter.Projection Settings
  2. Modify the Settings of the projector in the best way suited for your TV and Windows device.

After making the required changes, you will not face any problems in running Miracast.

Also Read: How to Set Up Google Chromecast on Your TV


Frequently Asked Questions (FAQs): Miracast Download for Windows 10, 11 PC

The following section answers some of the most commonly asked questions by users regarding Miracast Windows 10/11 download.

Q.1 Does my PC work with Miracast?

To check the compatibility of Miracast with your system apply the following steps:

Step 1: Open Windows Settings by using the shortcut keys Windows + I.

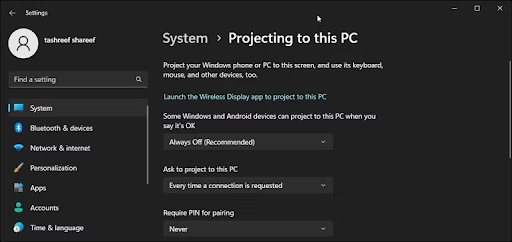
Step 2: Under the System Tab scroll to open Projecting to PC

Here the results displayed will be as follows. Also, this depends on the configuration of your PC.Projecting to this PC - Miracast

If the system is compatible with Miracast the options displayed will contain Wireless display.

For Add the Wireless Display option install Wireless dIsplay in order to allow Miracast.

Q.2 What if my PC doesn’t have Miracast?

If your PC doesn’t have Miracast support you can get a Miracast adapter. This adapter can be plugged into the HDMI port of your monitor. This Miracast Windows 10 adapter can help in communicating with your PC without any wired connections.

Q.3 Is there a free Miracast for Windows?

For users with Windows version 8 or higher, the MiraCast can be used. These devices have in built WiFi adapter. However, if your system is not equipped you need to purchase the dongle or adapter to connect Miracast wirelessly with your display device.


Download, Setup, and Use Miracast on Windows 11/10; Explained

We hope that the above-listed methods for how to download, update, and install Miracast on Windows 10/11 helped you. Using the further sections of the guide, you must have learned the process to set up and use the mirroring feature as well. The procedures are quite easy to follow as well as secure. These will not harm the integration of your system in any way.

If you face any type of problem while using or setting up Miracast on Windows 11/10, then you need to update the network and display drivers. For this, you can take the help of the Bit Driver Updater tool. The software is an expert in updating the drivers as well as fixing all the driver-related errors with ease.

If you loved this guide on everything related to Miracast for Windows 11/10, then show your love. Subscribe to the newsletter of the Techpout blog. This way you will get regular updates for all the new blogs.

For further assistance, you are free to use the comments section below. You can ask your queries related to Miracast on Windows 10 and provide suggestions as well. We will respond to your comments accordingly.

1 Comment
    6 Best Free DVD Player Software For Windows 10 In 2021 says: Reply
    December 28th 2020, 11:17 am

    […] Read More: Best Free DVD Ripper Software for Windows 10 […]

Leave a Reply Cancel reply

Your email address will not be published. Required fields are marked *

Sidebar Image bit G ad1

Latest Posts

  • Blox Fruits Codes for Devil Fruits
    Blox Fruits Codes for Devil Fruits – 2X Exp and Stat Reset 
    by Gunjita Sompura / October 14, 2026
  • How to Reset the PRAM and SMC on a Mac 
    How to Reset the PRAM and SMC on a Mac 
    by Niharika / October 13, 2026
  • How to start windows 11 in safe mode
    How to Start Windows 11 in Safe Mode 
    by Niharika / October 12, 2026
  • Epson L3150 Resetter Adjustment Program Free Download
    Epson L3150 Resetter Adjustment Program Free Download For Windows
    by Niharika / October 12, 2026
  • Epson L360 Resetter Tool Free Download | Epson Adjustment Program
    Epson L360 Resetter Tool Free Download for Windows 11
    by Monil / October 12, 2026

Categories

  • Cyber Security
  • Driver Updater
  • Entertainment
  • Fitness
  • Games
  • How To
  • laptop
  • OS
  • Reviews
  • Tech News
  • Tips & Tricks
  • Top 10
Sidebar Image bit G ad1
11 Best Automatic Mouse Mover Software for Windows in 2024 11 Best Automatic Mouse Mover Software for Windows in 2024by Akshara Parnami / December 15, 2023
8 Best Solitaire Games for the iPad and iPhone in 2024by Remy Thomas / December 15, 2023Best Solitaire Games for the iPad and iPhone
TechPout Footer Logo

We at TechPout promise to put forth stories that help people to learn and simplify their digital life. Our purpose is to share the true essence of technology with our tech-loving community.

Useful Links

  • About Us
  • Contact us
  • Privacy Policy

Popular Posts

  • Best PC Optimizer Software
  • Best Mac Cleaner Apps
  • Best Driver Updater
  • Duplicate Photo Finder and Cleaner Software
  • Best Free Movie Download Sites
  • Best IPTV Players

Follow us

Copyright © 2026 www.techpout.com. All rights reserved
DMCA.com Protection Status