
Autocorrect corrects misspelled words to their closest correct spelling. It saves time, but it can also be frustrating. You may learn how to disable autocorrect to prevent it from changing code, medical terms, names, or slang to a random dictionary word; sometimes it changes what you meant to something else altogether.
Hence, this article walks you through how to turn off autocorrect in Windows to stop it from altering your messages and causing unintended or embarrassing mistakes.
How to Disable Autocorrect on Windows
You can turn off autocorrect completely using Settings in Windows, Group Policy Editor, or the Registry. Most users should use the Settings method, as it is the easiest way to disable autocorrect at the operating system level for typing suggestions and touch keyboards, and it does not affect individual applications, such as Microsoft Word. Group Policy and Registry methods are best suited for advanced users or those in enterprise environments. Group Policy is available if you have Pro, Enterprise, or Education editions of Windows. The Registry is an advanced option that requires thorough computer knowledge and experience, especially without a Registry backup. Below are all these methods explained in detail.
Method 1: Use the Settings app to disable autocorrect
You can enable or disable autocorrect for misspelled words through the Settings application. Here is how.
- Press the Windows key + I to open Settings.
- Click Devices in the Settings menu.
- Click Typing in the left sidebar of the Devices window.
- Find and toggle off Autocorrect misspelled words. This setting automatically corrects words it detects as misspelled by replacing them without asking you. If this switch is already off and you are searching for how to enable autocorrect, toggle it on. You may also notice the option Highlight misspelled words, which only underlines words it thinks are misspelled without making any changes. Disabling this means misspelled words won’t be visually highlighted while you type.
- If you do not want misspelled words to be highlighted and distract you, toggle off Highlight misspelled words.
Also know: How to Show This PC on Desktop in Windows 11/10
Method 2: Turn off autocorrect using Group Policy
Users with Pro, Enterprise, or Education Windows editions, or those working in domain environments, can enable or disable autocorrect misspelled words via Group Policy Settings. Below is how to disable autocorrect or enable it using Group Policy.
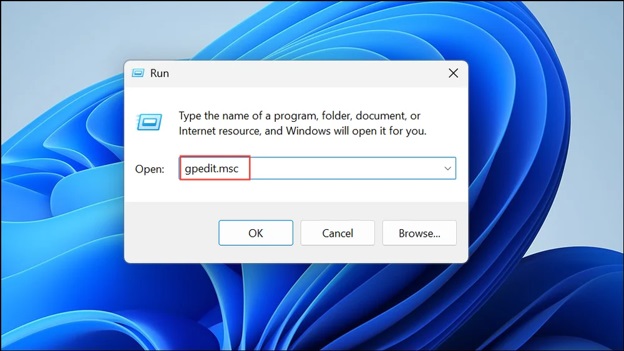
- Press Windows key + R to open the Run utility.
- In the Run box, type gpedit.msc and press Enter.
- In the Group Policy Editor, navigate to the path: User Configuration>Administrative Templates > Control Panel>Regional and Language Options.
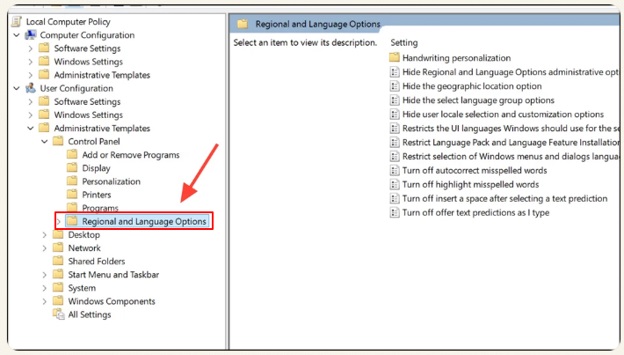
- Select Turn off autocorrect misspelled words.
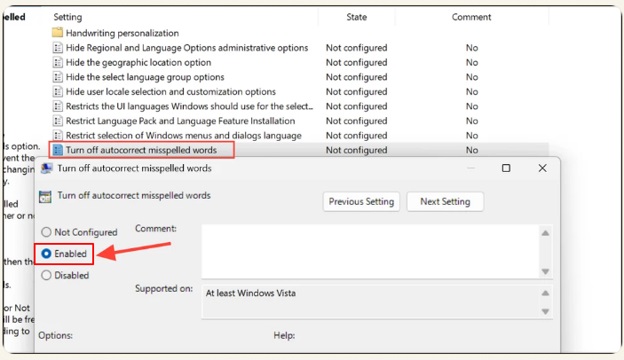
- Double-click Turn off autocorrect misspelled words.
- Select Enable to turn off autocorrect misspelled words; it disables autocorrect. If you want to enable autocorrect, select Disable.
- Click Apply and
- Double-click Turn off highlight misspelled words in the Group Policy Editor.
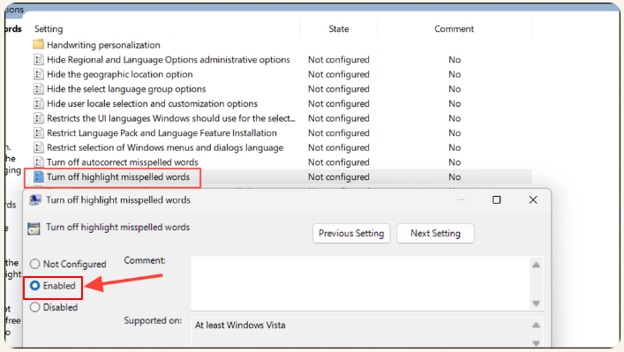
- Select Enable for Turn off highlight misspelled words; it prevents misspelled words from being highlighted. If you want the misspelled words to be highlighted, select Disable.
- Click Apply and OK to save the changes.
Method 3: Use the Registry to disable autocorrect
You can enable and disable autocorrect using the Registry. However, you must be sure of what you are doing, as an incorrect change in the Registry can cause system instability. Back up your Registry before proceeding with the steps below. To back up the Registry, click File in the Registry Editor, right-click HKEY_CURRENT_USER, click Export, and then save the backup. After creating a backup, here is how to turn off autocorrect using the Registry.
- Press the Windows key + R to open the Run utility.
- In the Run box, type regedit and press
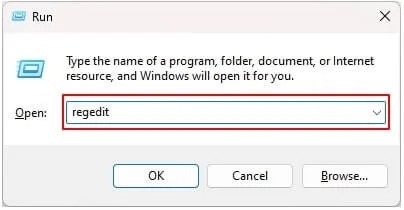
- When the User Account Control prompt appears, click Yes to grant administrator permission.
- In the Registry Editor, navigate to the path: HKEY_CURRENT_USER\Software\Microsoft.
- Right-click the Microsoft
- Select New Key from the context menu.
- Name the new key Control Panel.
- Right-click the recently created Control Panel.
- Select New Key from the available options.
- Name the new key
- Right-click the newly created International
- Click New in the available options.
- Click DWORD (32-bit) Value in the context menu.
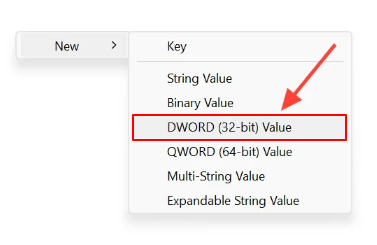
- Change the name to TurnOffAutocorrectMisspelledWords and
- Double-click TurnOffAutocorrectMisspelledWords and change its value data to 1 to turn off autocorrect. If you want to enable autocorrect, change it to 0.
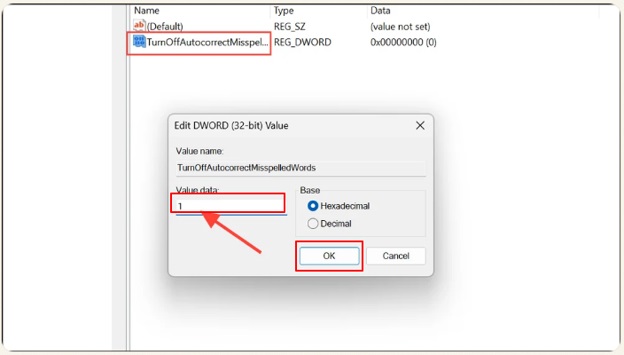
- Double-click TurnOffHighlightMisspelledWords and change its value data to 1 to turn off spellcheck. To enable spellcheck in Windows, change this value data to 0.
The above methods turn off autocorrect at the operating system level. However, disabling autocorrect while working in Microsoft Word requires a different approach.
Also know: Mac CPU Temperature Monitor Apps to Fix Macbook Overheating
How to Disable Autocorrect in Word
How to turn off autocorrect in Word depends on whether you are using Microsoft Word Online, Microsoft Word 2010 to Word 365, Microsoft Word 2007, or Microsoft Word 2003 and earlier. To check your version of Microsoft Word, open Word, click File, and then click Account to view your version details. Depending on your Microsoft Word version, below is how to disable auto-correct in Word.
Change Windows autocorrect settings on Microsoft Word Online
- Open the web version of the Microsoft Word application.
- In the Microsoft Word Online application, click the Review
- In Review Tools, click the Editor drop-down arrow.
- Click AutoCorrect Options in the Editor drop-down menu.
- In AutoCorrect Options, uncheck unwanted features, such as Replace text as you type and Capitalize the first letter of sentences. To disable autocorrect completely, uncheck all options.
- Click OK to save the changes.
Turn off autocorrect in Microsoft Word 2010 to Word 365
- Open the Microsoft Word application.
- In the Microsoft Word application, click the File
- Click Options in the menu.
- In Word Options, click
- Click the AutoCorrect
- In the AutoCorrect window, disable the features you do not like, such as Capitalize the first letter of sentences. Uncheck all options to disable AutoCorrect fully.
- If you want, remove words you do not wish to be automatically corrected or add new words for common mistypes to correct them automatically.
- Lastly, click OK to save the changes.
Disable autocorrect in Microsoft Word 2007
- Open the Microsoft Word application.
- Click Office in the upper-left corner.
- Click Options in the on-screen options.
- In Word Options, click
- Click AutoCorrect Options.
- In AutoCorrect Options, uncheck the unwanted features, such as the automatic capitalization of first letters of sentences, or uncheck all options to disable autocorrect altogether.
Turn off Windows autocorrect in Microsoft Word 2003 and earlier
- Launch Microsoft Word.
- Click Format and then click
- Click
- Next, click
- In the AutoCorrect window, disable the unwanted features, such as the automatic capitalization of first letters, or uncheck all the AutoCorrect options to disable it completely.
Below, we answer a few frequently asked questions about disabling AutoCorrect to clear up any persisting doubts.
Also know: How To Repair Apps and Programs in Windows 10
Frequently Asked Questions
Q1. How do I turn off auto-correction in Windows?
To turn off autocorrect in Windows, follow the path: Windows key + I > Devices > Typing > Toggle off Autocorrect misspelled words.
Q2. Does disabling device autocorrect change Microsoft Word autocorrect settings?
Microsoft Word has its own autocorrect settings. Hence, disabling autocorrect in Windows does not affect Microsoft Word.
Q3. What should I do if autocorrect does not turn off on Windows?
If autocorrect does not turn off using Windows autocorrect settings, you can disable autocorrect in the Registry, as explained in the guide above. Also, update Windows to fix the issue. To update Windows, search for Windows Update, click Check for updates, click Download & Install, and then restart your computer.
Q4. Does turning off autocorrect also disable spell check?
Disabling autocorrect in Windows does not automatically turn off spell check. You must disable it separately by toggling off both Autocorrect misspelled words and Highlight misspelled words.
Q5. Does autocorrect learn my writing style if I disable it?
Once you disable autocorrect, it cannot analyze and adjust itself to your typing patterns. Hence, it cannot learn your writing style if it is inactive.
Q6. How do I disable autocorrect for certain words?
You can follow the path: Windows key + I > Privacy & Security > Inking & typing personalization > Custom dictionary > Clear your custom dictionary to disable autocorrect for specific words.
Q7. Are autocorrect and predictive text the same?
No, autocorrect and predictive text are not the same. Autocorrect changes the word you have already typed. Predictive text displays suggestions for words you have not typed yet based on context and your habits.
That concludes how to disable autocorrect in Windows and Microsoft Word. However, if you want typos not to go unflagged, you can reset your keyboard dictionary, use text replacement for specific words, and add exceptions for words you want to keep unchanged. If you have any questions or concerns, you can leave us a comment.