How to Fix MSI Camera Not Working in Windows 10,11 PC
Fix MSI laptop camera not working in Windows 10,11 error with these easy but productive solutions. To know which one can work in your case, do read the entire write-up, till the end!
MSI is an abbreviation of Micro-Star International, a Taiwanese-based computer manufacturer. MSI is one of the well-known gaming hardware peripherals manufacturers. MSI’s mid to high-advanced laptops have earned the recognition of the overall gaming community. If you also acquired an all-new MSI laptop but unable to identify a way to make its webcam functioning properly for your gaming streaming platforms.
Then, no worries, you are not all alone, there are many users out there who have reported MSI laptop camera not working issue. So, particularly, we have created this document just to explain to you those easy tactics, which you can adopt in order to fix this annoying issue.
But, before we look forward, here is one of the most obvious reasons why your MSI laptop’s camera is not performing well. Outdated camera drivers are the core culprits behind this annoyance. So, we advised you to keep your camera drivers always updated. To do so, with much ease, you can try Bit Driver Updater, which is one of the best driver updater utilities that can update all the broken drivers in just a single click of the mouse. To get it downloaded and installed on your PC for free, click on the button provided below.
Quick Solutions to Fix MSI Camera Not Working in Windows 10,11 PC
Here at TechPout, we have mentioned the four possible strategies to resolve the MSI laptop camera not working issue in Windows PC. However, you are not required to try all of them, just keep working your way down until you get the one that does a miracle for you. Without any further ado, let’s get directly to it!
Solution 1: Make Sure the Camera is Enabled
First and foremost, you can check whether the MSI camera is turned off/ disabled by default or not. If you find it disabled then you need to enable it manually so that the camera can function normally as it is supposed to do.
For enabling the MSI camera, you simply need to hit the Fn and F6 keys from your keyboard simultaneously in order to trigger the camera on your MSI laptop. There you have enabled it effortlessly, now check to ensure if the MSI camera not working resolved. If the issue still remains the same as earlier, then don’t panic, here are more solutions below to fix the issue, just try them.
Also Read: Best Free Driver Updater for Windows
Solution 2: Grant Permission to your Camera
One of the major causes because of which you can encounter the MSI built-in camera not working issue and that’s when your system or Windows 10,11 fails in recognizing the camera. But, no need to worry, in this event you need to grant permission through the Windows privacy settings. Here are steps on how to grant permission to your camera:
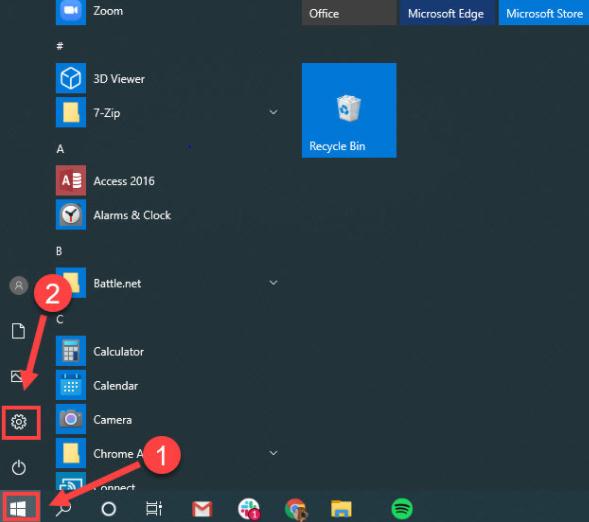
Step 1: Make a click on the Start button and then click on the gear icon (Settings) to trigger the Windows Settings on your PC.
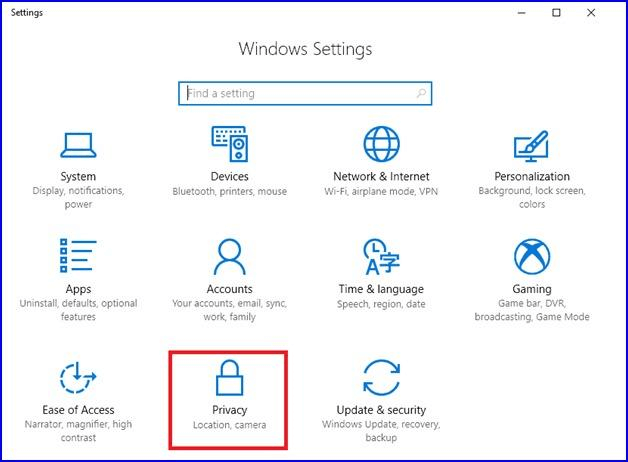
Step 2: Once the Windows Settings prompt, then locate and choose Privacy from the available options.
Step 3: After this, head to the Camera tab in the left pane, then make a click on the Change button and enable camera access for this system.
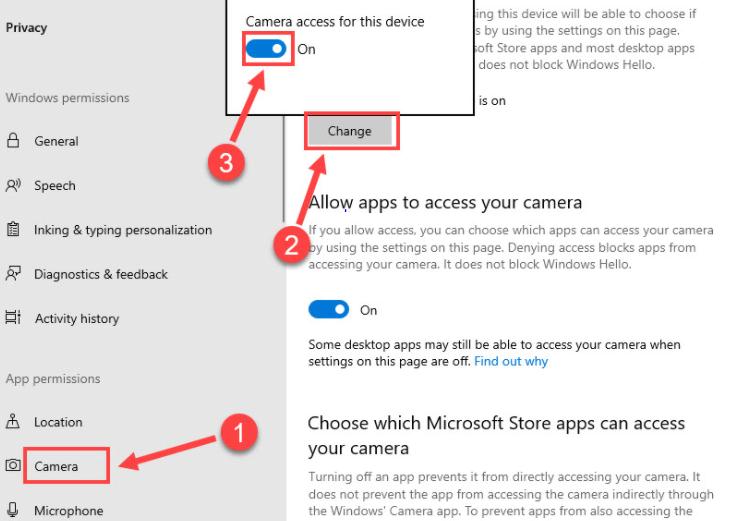
Step 4: Next, turn on the button under the Allow apps to access your camera.
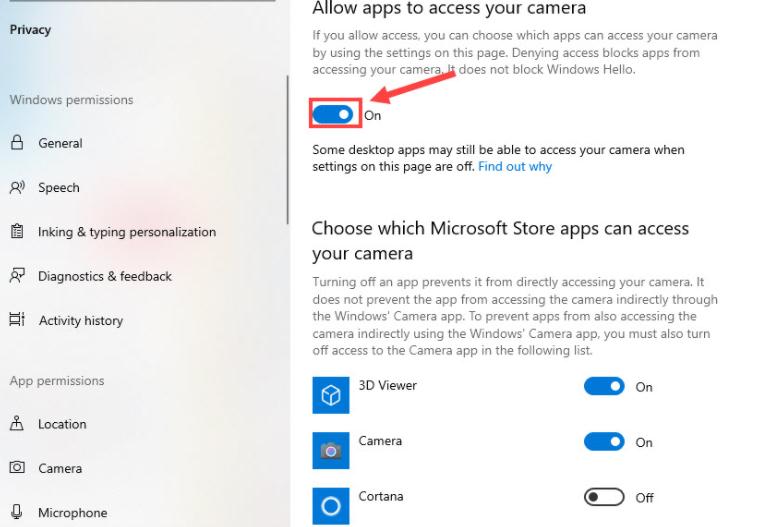
Now, try to access your MSI camera on your device just to ensure whether the issue is resolved or not.
Also Read: Troubleshoot Mouse Problems in Windows 10 – Fix Mouse Problems
Solution 3: Turn On WebCam On MSI Dragon Center
The next solution that worked for many users to fix the MSI camera not working on Windows 10,11 PC was enabling the webcam in the MSI Dragon Center. If you own an MSI gaming laptop, then you need to follow this procedure. The Dragon Center is a tool that allows you to get the best gaming experience on your laptop with ease. If the webcam is disabled in the settings of the tool, then you can not use the camera. Follow the steps below to know how to enable the camera:
- Run the MSI Dragon Center tool on your laptop.
- Open the tool Settings and navigate to General Settings.
- Lastly, toggle on the button across the WebCam to turn on the same.
Follow the next solution if this one fails to fix the MSI webcam not running error.
Solution 4: Update your Camera Driver
Even after giving access permission isn’t able to make the MSI camera working properly then it’s clear that there may be a driver-related issue. As we have explained above, outdated camera drivers could cause MSI camera not working in Windows 10, 11. So, to get it resolved, you must update the camera drivers to their most up-to-date version.
You can do this task via two approaches i.e, either manually or automatically. Talking about the manual approach, then either from the manufacturer’s official website or via seeking the help of the Windows in-built utility tool called Device Manager, you can get the latest camera drivers installed on your PC. But though they are manual methods hence it requires special technical skills as well as sufficient time.
Therefore, we recommend you adopt the automatic approach to install the latest camera drivers. For updating the driver automatically millions of users showed their trust upon Bit Driver Updater. Likewise, you can too trust Bit Driver Updater to ensure automatic driver updates. Be assured, with this utility you don’t need to search for the drivers manually, what you need to do is just install the utility on your system and leave it by clicking on the Scan button, after the click, Bit Driver Updater comes into the action and scans the overall PC for the faulty drivers. For better understanding, go through the steps provided below to know how swiftly Bit Driver Updater runs:
Step 1: Install the Bit Driver Updater from the button provided below.
Step 2: Thereafter, follow the wizard’s instructions to get it successfully installed on your PC.
Step 3: Launch the tool on your PC, then, find the Scan button in the left menu pane and click on it.
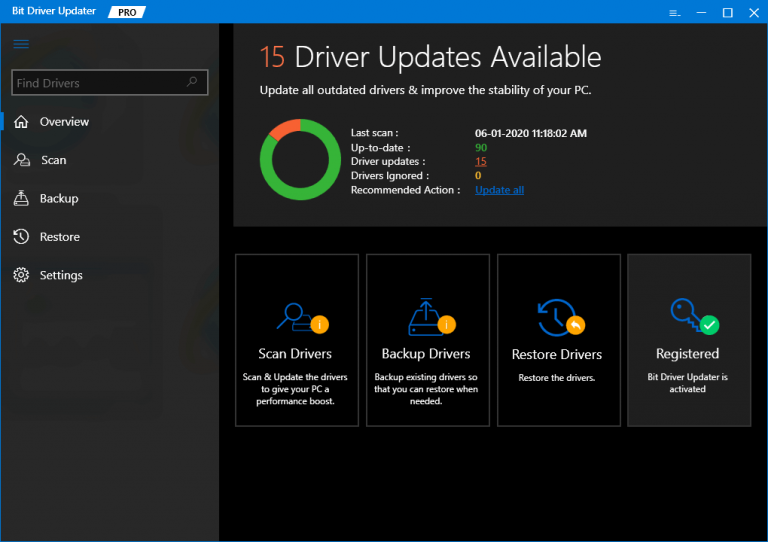
Step 4: After the click, Bit Driver Updater gets the command and starts scanning your PC for the drivers which need an update.
Step 5: Later on, when scanning is over, the tool provides you with a list of all the faulty or outdated drivers.
Step 6: Now, you need to see the list and find the camera drivers. Once you find the camera drivers, then click on the Update Now button which shows next to the driver.

Step 7: If you think to update other outdated drivers along with the camera driver then Bit Driver Updater allows you to do so as well. For this, you have to make a click on the Update All option instead of Update Now.

There Bit Driver Updater downloaded and installed the correct or genuine drivers on your PC quite easily & quickly. You can use the tool in two versions i.e, either free or pro. But, it is advisable to use the pro version, as it gives you access to use the high-end features of utility which consist of one-click driver update, built-in system optimizer, complete technical aid 24/7, backup & restore.
Also Read: How To Update Graphics Drivers In Windows 10 {Simple Guide}
Solution 5: Uninstall & Reinstall your Camera Driver
Due to some compatibility issues, if updating the outdated or missing camera drivers doesn’t fix the issue. Then, as a final bet, you have only one option left and that is uninstalling and then reinstalling the camera drivers. To uninstall the camera drivers you may use the Windows in-built utility tool named Device Manager. Below are the steps that your must follow in order to uninstall the camera drivers through Device Manager:
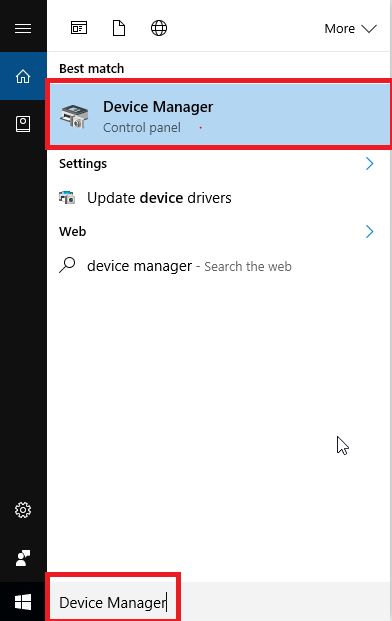
Step 1: To open Device Manager, you need to press the Windows logo key, then type the Device Manager in the search box, and choose the best-searched result of it.
Step 2: Next, when you land on the Device Manager window, locate and double click on the Imaging devices category to expand it.
Step 3: After this, click right on the Integrated Camera option to choose Uninstall device as an option.
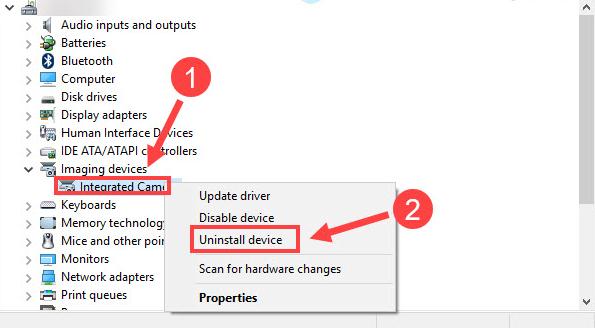
Step 4: To affirm the uninstallation click on the Ok option.
Thereafter, start your PC again, and now the MSI laptop camera not working in Windows 10 should be resolved. Plus, the camera drivers should be installed again automatically.
Also Read: How to Fix Windows 11 Camera Not Working – Quickly and Easily
Solution 6: Rollback Driver
If none of the previous method work to fix the error, you can try rolling back the drivers to the previous versions as well. It is possible that the new driver update is not compatible with your system and causing the MSI camera not working issue. Follow the below steps to know how to roll back the driver:
- Use the Device Manager to open the Properties of your MSI webcam as did in the previous method (Up to step 3 in method 5 above)
- Click on the Driver tab and select the option to Rollback the driver if available.
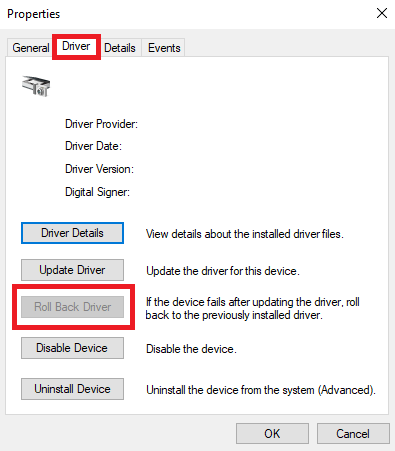
Follow the on-screen instructions to roll back the driver safely.
Solution 7: Run the Camera Troubleshooter
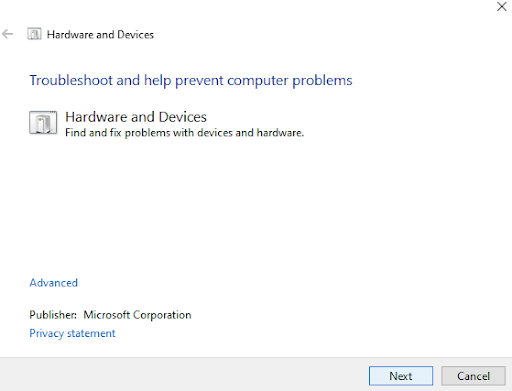
The next thing that you can do to fix the MSI webcam not working properly is to use the device troubleshooter. The option, just like its name, allows your system to troubleshoot all the problems related to hardware. Follow the steps below to know how to use the troubleshooting:
- Press Win+S keys, type Run, and press Enter.
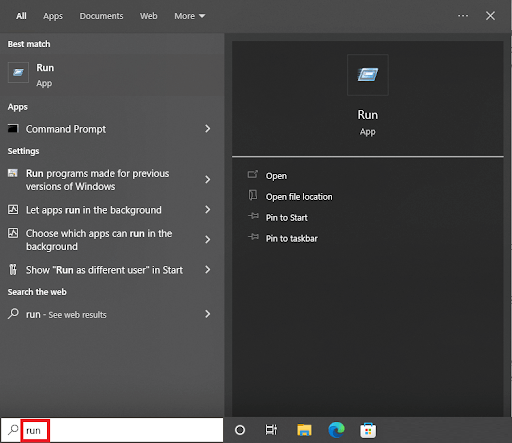
- Type the below command in the box and hit Enter.
msdt.exe -id DeviceDiagnostic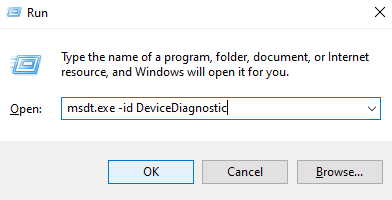
- Follow the on-screen instructions to run the troubleshooter and fix all the errors.
Also Read: Lenovo Laptop Camera Not Working on Windows
MSI Camera Not Working in Windows PC – FIXED
So, these were the troubleshooting solutions to fix the MSI camera not working on Windows 10,11 PC. Try any one of them which fits your case, and let us know which solution worked for you in the comment box below.
Plus, if you face any kind of difficulties while implementing the steps of the above solutions, then please share them with us in the comments below. We would try to assist you in the best way possible. Additionally, you may also seek the help of the MSI support center if the problem persists.
Additionally, if you have any suggestions then tell us about them through the box. For reading more troubleshooting and downloading guides, do subscribe to TechPout. We are looking forward to your feedback.


