FIXED: Windows 10 Slow Boot [2021 Complete Guide]
![FIXED: Windows 10 Slow Boot [2021 Complete Guide] FIXED: Windows 10 Slow Boot [2021 Complete Guide]](https://wpcontent.techpout.com/techpout/wp-content/uploads/2021/08/13181652/FIXED_Windows-10-Slow-Boot-2021-Complete-Guide.jpg)
A troubleshooting guide to fix Windows 10 slow boot issues, easily & quickly. Read the entire article for in-depth insights.
Windows 10 was designed to improve the PC and hardware performance. Well, it does so, a lot of PC users are satisfied with their Windows 10 PC performance. But, unfortunately, some PC users aren’t happy with their PC performance on Windows 10.
Many Windows 10 PC users have complained about the slow boot issues. Generally, Windows 10 takes a long while to boot when you upgrade your Windows 10 version. But, this issue could also occur due to faulty or out-of-date drivers, background running programs, software or hardware errors, and enabled fast startup feature. Well, whatever the reason is behind Windows 10 slow boot issues, it can be fixed easily too. In this tutorial, we have brought up numerous easy approaches to resolve this annoying issue.
All-In-One Solution to Fix Windows 10 Slow Boot Issue (Strongly Recommended)
Bit Driver Updater is the best way to deal with slow boot issues in Windows 10. The utility keeps all your Windows drivers in good working order that leads to enhanced PC performance. Additionally, the software also acts as a system optimizer in order to clean all junk from your PC. It has a few in-built tools that include a scan scheduler, auto backup & restore wizard, and many more. Click on the download button below to try Bit Driver Updater for Free.
A List of Easy Solutions to Fix Windows 10 Slow Boot Issue
Below, we have put together 6 convenient strategies to fix slow boot issues on Windows 10. Although, you do not need to attempt all of them, just work your way down until you find the one that works best for you. Now, let’s read them!
Solution 1: Use Windows Troubleshooter
Windows comes with an in-built troubleshooting tool that can help you detect and fix the issue. So, if you are encountering Windows 10 slow boot issues, then you can use the Windows Troubleshooter to find and fix the corrupted files on your system. Below are the steps to do so:
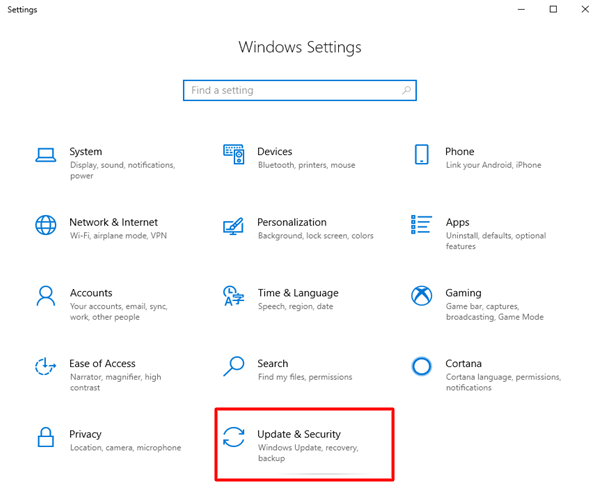
Step 1: Press Windows Logo + I keys to launch Windows Settings.
Step 2: Then, click on the Update & Security option to proceed further.
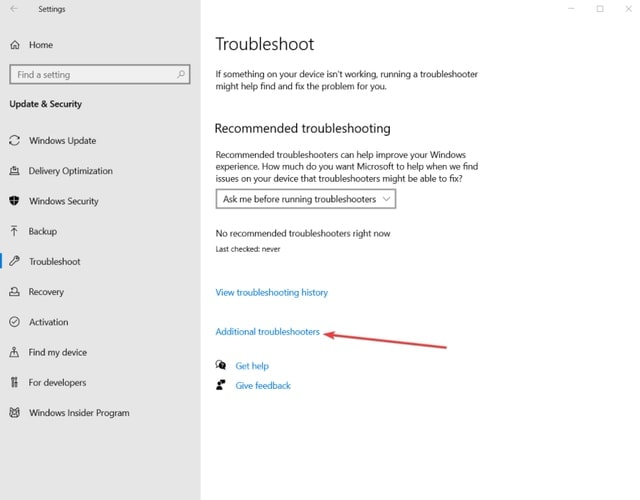
Step 3: In the next window, choose Troubleshoot from the left menu pane and then choose Additional Troubleshooters from the right pane.
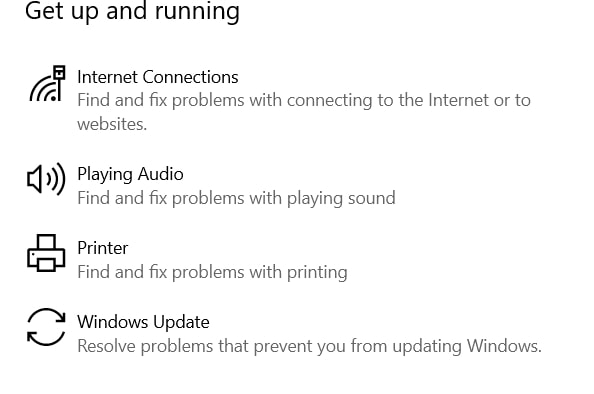
Step 4: Now, click on the Run The Troubleshooter option under the Windows Update category.
Hopefully, this tactic should fix Windows 10 slow boot issues, but if not, then try the other advanced solutions mentioned below.
Also Read: How to Fix Windows 10 Not Responding Error
Solution 2: Disable Fast Startup Feature
Another way to get rid of slow boot problems is by disabling the fast startup feature in Windows 10. The fast Startup feature reduces the start-up time by loading some information related to the boot before shutting down the PC. Also, the Fast Startup feature comes enabled by default in Windows 10. And, many users stated turning off Fast Startup resolves Windows 10 issues like slow boot. Follow the steps below to disable the Fast Startup in Windows 10:
Step 1: Again, press the Windows + I keyboard button at the same time to head over to the Windows Settings.
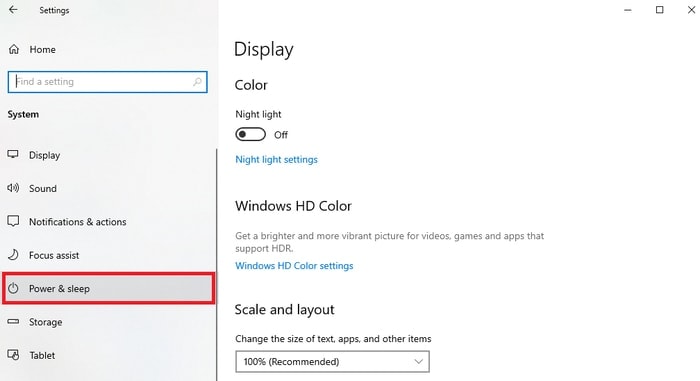
Step 2: Then, click on System.

Step 3: After this, on the left menu pane, select Power & Sleep.
Step 4: From the right side of the next window, scroll down to choose Additional Power Settings.
Step 5: This will take you to the Power Options window in the Control Panel.
Step 6: Now, click on the Choose What Power Buttons Do option from the left pane.
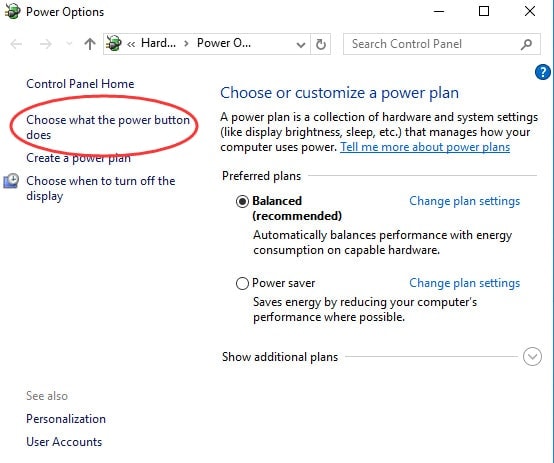
Step 7: Next, to alter the settings on this window, you have to give administrator permissions. For this, click on Change Settings that are Currently Unavailable.
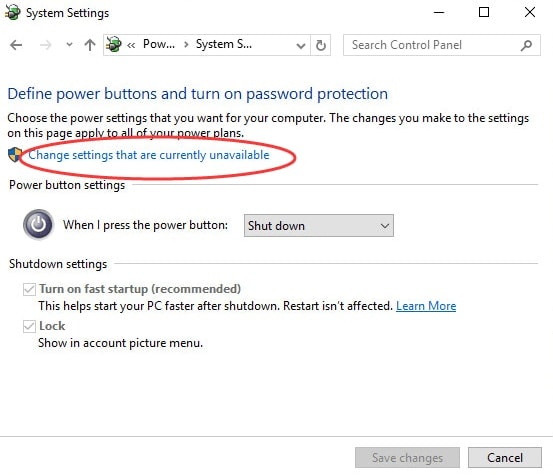
Step 8: You will see a box before the Turn on Fast Startup (Recommended) option, unmark that box.
Step 9: To validate the changes click on Save Changes.
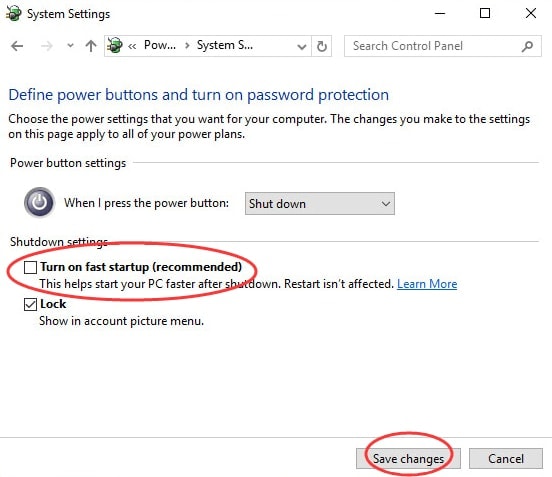
Once done, reboot your PC and test to see if Windows 10 slow boot issue is fixed. If the issue still remains the same, then move on to the next solution.
Also Read: How to Get Help in Windows 10 [Complete Guide]
Solution 3: Delete All the Files from WDI Directory
The user can fix Windows 10 slow startup by removing all the files from the WDI directory. Follow the simple steps below to fix Windows 10 takes long time to boot:
Step 1: First of all, open File Explorer on your PC.
Step 2: Then, navigate to the following directory:
C :/Windows/System32/
Step 3: Thereafter, go to the WDI directory.
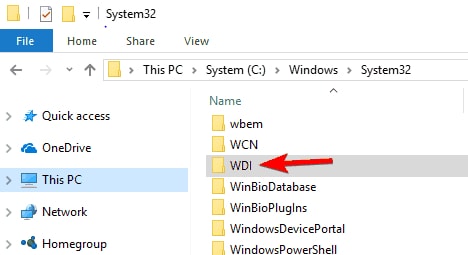
Step 4: Now, if a prompt appears for your permission to access the folder then click Continue.
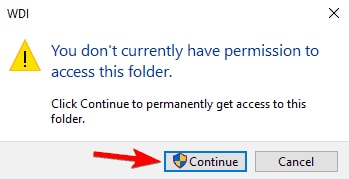
Step 5: Altogether press CTRL + A keyboard buttons to select all the files & folders in WDI Directory.
Step 6: Next, right-click to select the Delete option from the quick access menu list.
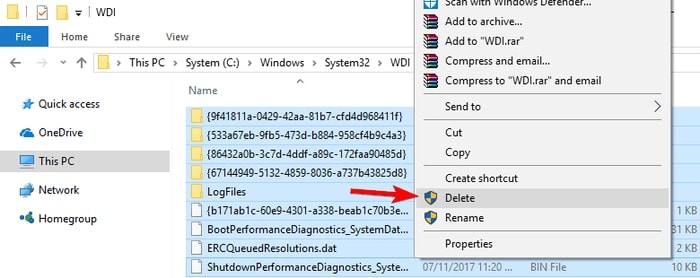
Once all the files in the WDI directory are deleted, then check to see whether the slow boot issue in Windows 10 is fixed or still persisting.
Also Read: How to Fix Windows 10 Taskbar Not Working
Solution 4: Upgrade your BIOS
If the above solution doesn’t work for you, then try to update your BIOS. But, as you know that updating the BIOS is a more challenging and advanced process so perform it at your own risk. In addition to this, if you already have the most recent version of BIOS installed on your system, then try to reinstall it. Once completed, then restart your computer and check if it makes any difference. If not, don’t worry, switch to the next solution.
Solution 5: Update your Device Drivers
If your Windows 10 is taking a long time to boot then it possibly occurs due to the outdated device drivers. Hence, to ensure smooth performance of your PC and connected hardware, you should keep your device drivers always up-to-date. You can update drivers either manually or automatically.
Manual Method: If you have a lot of time and expertise in the technical niche then you can update your device drivers from the PC’s official website. And, the users can also use Windows default functionality called Device Manager for performing driver updates.
Automatic Method: Installing the genuine and most recent version of device drivers manually is a bit tedious and time-consuming, And, if you are an amateur, then it can be error-prone for you. Hence, we advised you to use the Bit Driver Updater to download WHQL tested and certified drivers. The software takes only a few clicks of the mouse to update the old, broken, or faulty drivers. Follow the steps below to update device drivers via a one-stop solution, Bit Driver Updater.
Step 1: Firstly, download the Bit Driver Updater from the button shared below.
Step 2: Then, run the downloaded file and perform the wizard instructions to get the software installed on your computer.
Step 3: After installing the Bit Driver Updater, open it and let the driver updater scan your PC for outdated, broken, or faulty drivers.
Step 4: Check the scan results.
Step 5: And, click on the Update All button.

See how simple it is to install and update drivers through Bit Driver Updater. Bit Driver Updater automatically detects the Windows-related issues and fixes them too. Also, the tool offers 24.7 technical assistance to its users. And, if in case, you aren’t satisfied with the product then you can get your complete money back but within 60 days of purchase.
A Point to Remember: If you are updating the driver with the free version of Bit Driver Updater, then you are unable to use its one-click driver update functionality. The free version supports one-by-one driver updates. Whereas, with the pro version of it you can perform bulk driver downloads at once. So, choose wisely!
Also Read: How to Fix Windows Update Problems
Solution 6: Run a Clean Reset
If none of the above-mentioned solutions worked for you, then try to reset your PC. It is the last option you can try in order to fix Windows 10 slow boot issues. Here’s how to fix Windows 10 slow boot:
Step 1: Head over to the Windows Settings.
Step 2: Next, choose Update & Security.

Step 3: Click Recovery from the left pane and then choose Get Started under the Reset This PC option.
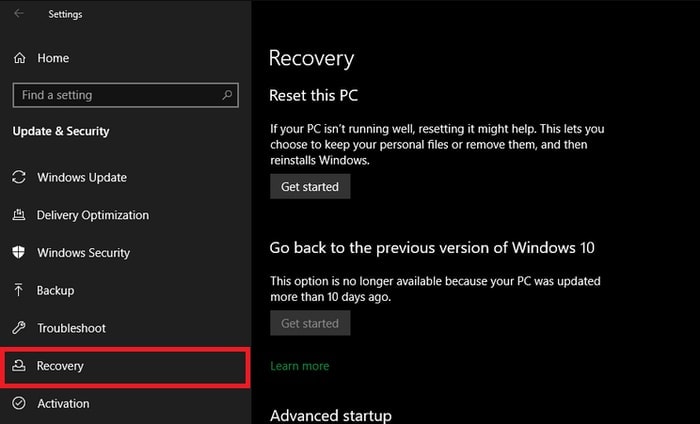
There you have it! This procedure will surely fix Windows 10 slow startup.
Also Read: Fix Windows 10 Computer Freezes Randomly Issue Easily
Slow Boot Issue on Windows 10: FIXED
That was all about how to fix Windows 10 slow boot issues. Hopefully, this troubleshooting guide helps you in the best possible manner.
Do let us know in the comments below which method worked for you. Also, comment down if you have any questions, tips, or further suggestions.
Before you go, don’t forget to subscribe to our Newsletter for reading more tech-related articles. Additionally, follow us on Instagram, Facebook, Twitter, or Pinterest.


