For all of those facing issues related to WiFi connected but no internet on Windows 10/11, then this guide will be a lifesaver for you. Try the solutions provided here and get rid of the issue within minutes.
We all use WiFi on our Windows laptops or desktops. For the connection, you may take the help of an integrated Wifi adapter (generally for laptops) or the external one (generally for desktops). However, at times you face some problems with the network connection, even if the adapter is working perfectly. This is because even though the adapter is able to receive and read the connectivity, the system may fail to share the same with other parts or servers of your system.
In such cases, it’s quite common to face errors like WiFi connected but no internet. You can identify the error when you try to use the Wifi or connection section of your device and it shows No Internet beneath the connected network.
What is the Reason Behind The WiFi Connected Without Internet Error?
The Wi-Fi connected but no internet connectivity problem can appear on your system due to any reason. Generally, the common reasons behind such a problem are
- Outdated network adapter driver
- Faulty or damaged adapter
- Faulty or damaged router
- Improper IP address
- Problems from the internet service provider
- Software issues
- DNS server and cache problems, etc.
At times, even one or more of these reasons may sum up can cause the WiFi connected but no internet error on your device. The best way to get rid of such problems and use the internet smoothly and consistently is to address all the potential reasons.
With the help of this article, we will share some of the most effective and working solutions to fix the error of network connected but no internet access on Windows 10. So, let’s have a look at these solutions right away and get rid of the annoying and repetitive problem in a single shot.
Methods to Fix WiFi Connected But No Internet Windows 10,11 Error
Below are some of the top solutions that will allow you to get rid of the WiFi connected no internet error on your Windows 10,11 device with ease. To get rid of the error quickly and effectively, we suggest you undergo all the solutions chronologically. One or more of these solutions will surely get rid of the error for you.
Note: However, before diving into the solutions, we suggest that you check the modem light to see if there is a problem with the connection. If the light is working fine, then the error is with the system.
So, dive into the guide and the Wi-Fi connected but no internet solutions right away to get rid of the error.
Fix 1: Turn Off the System and Router
One of the most common and quite obvious solutions to this problem is turning off the device and the router. After turning it off, wait for some time (normally, 2-3 mins) and restart the devices again. This is the easiest fix for the WiFi connected but no internet error.
This will allow your system and the router/modem to get a fresh start and provide internet connectivity to others. You must be able to surf and use the internet on your device now. However, if the problem is still present, then try the next solution.
Also Read: How To Fix WiFi Not Working in Windows
Fix 2: Find Out if the ISP Is at Fault
Another common reason behind the error of WiFi connected but no internet on Windows 11, 10 is the problem from the Internet Service Provider. Sometimes, the network from your ISP may be down due to maintenance or regular servicing. In such a case, look on the official website of your ISP to see if the server is down in your area.
You can also connect support for such information. Alternatively, you may wait for some time to get the connection back on. However, we suggest that you use the Wifi connection on another device to rule out the error from the ISP.
Fix 3: Switch to 4Ghz from 5Ghz
The next solution that you may try to fix the error is to switch the frequency of the network to 4Ghz. But this solution only works if your device is using a 5Ghz connection and facing the error of Wifi connected but no internet access on Windows 10. For this, you can take the help of the following steps:
- Click on the Wifi logo present on the taskbar of Windows.
- Select the 4Ghz network, enter the network credentials, and click on Connect.
- Forget the 5Ghz network so that your system does not switch to this network automatically.
Try the next solution if switching the networks does not work to fix the error.
Fix 4: Disable the Internet Security Software or Antivirus
If you are using antivirus software or Internet security software, then this tool may also interrupt the connectivity and present problems related to WiFi connected but no internet on Windows 10, 11.
The best solution if this is the case, is to disable the protection and security software. This will allow your system to surpass the interruptions posed by the software and use the internet freely. However, if the antivirus software is not responsible for the issue and it persists, then try the next solution.
Also Read: Best software for PC
Fix 5: Turn Off the VPN
If the above solutions didn’t work, then this one might. If you are using a VPN tool on your device to access the internet, then you may face the problem of a WiFi connected but no internet Windows 11. This is because the job of the VPN tool is to interfere with the network, and sometimes, this interference can affect connectivity. So, the obvious solution is to close or turn off the VPN connection. This will allow your system to access a generic and un-modified connection.
If you are not using a VPN but face these problems, then follow the next solution for ease.
Fix 6: Update the Network Adapter Driver to Fix WiFi Connected but no Internet
Another viable solution to fix the errors related to the no internet access but a connected error on Windows 11/10 is to update the network driver. As you may know, you need a network adapter to use the internet on your device. This adapter works in harmony with your system only if its drivers are up to date. The driver is a set of system files that define the usage, performance, and connectivity of any device with the system.
Hence, it’s quite crucial to update the drivers regularly. There are both manual and automatic methods that can update the driver and fix the WiFi connected but no internet. As the manual methods are a bit complicated, we suggest you use the automatic one. The automatic method states that you should use one of the best driver updaters for this task. Our loved and trusted one is the Bit Driver Updater.
This is an amazing tool that allows you to update the drivers for all kinds of devices with a single click and thus fix Wi-Fi connected but no internet. Apart from this, some of the outstanding features and benefits of using the Bit Driver Updater are:
- Instant and shouldered driver updates
- WHQL-certified drivers
- Options to backup and restore drivers
- Ignore driver updates for any device
- Deep yet quick scanning of the entire system.
However, these are only a few of the features offered by the Bit Driver Updater. For now, let’s see how this tool allows you to fix a WiFi connected but no internet Windows 10 with ease:
Procedure to Use the Bit Driver Updater for Driver Updates
- Click on the button below and download the Bit Driver Updater setup.
- Install the software and run it to start the scanning of your system. You may need to press the Scan Driver button if the scanning does not start automatically.

- Wait while the updates appear. Click on the Update Now button to get the latest updates for the network adapter. Alternatively, if you have the Pro version of the software, you can take the help of the Update All button to get the updates for all drivers; network and otherwise.

- Restart your system when the driver updates are complete.

If the problem with Wifi connectivity persists, then follow the next solution for ease.
Also Read: Update Wifi Driver on Windows
Fix 7: Take the Help of Windows Troubleshooting
Another way that you can opt for to fix the WiFi connected but no internet Windows 10 problem is to use the troubleshooter. The Windows Troubleshooter is an integrated utility that looks for issues seated deeply in your system, and then finds and fixes them. You can also use this tool to fix all kinds of internet problems, including the ones involving the Wifi connection. Follow the steps below to know how to fix the problem:
- Press the combination of Win+S keys, type Troubleshoot Settings, and hit the Enter key.

- On the troubleshooting page, click on Additional Troubleshooters.

- On the next window, click on Internet Connections and then select Run the Troubleshooter.

- Wait while the troubleshooter looks for the problem with the network. Follow the on-screen instructions that appear (if any).
- Similarly, you need to run the troubleshooter for the Network Adapter as well.

The above method will be able to fix the WiFi connected without internet error if the root lies within the system. If the problem persists, follow the next solution.
Fix 8: Retrieve the DNS And IP Automatically for IPv4 and IPv6
Another solution that may work to fix the WiFi connected but no internet error on Windows 10/11 is to obtain the DNS and IP Address of the server automatically. This will allow your system to get the network credentials according to its requirements. To allow the same, follow the steps below:
- Press the combination of Win+S keys, type Network and sharing center, and hit the Enter key.

- Within the network settings, click on Change Adapter Options.

- Right-click on the specific Wifi network and open its Properties.

- Under the scrolling menu, select the Internet Protocol Version 4(TCP/IPv4) settings, and open its Properties.

- Select the options reading Obtain DNS Server address automatically and Obtain an IP address automatically.

- Introduce the changes by clicking on Ok.
- Repeat the same process for Internet Protocol Version 6(TCP/IPv6) settings as well.

If changing the settings to the automatic method does not work for your device, revert the changes. Follow the next solution to fix the error of connected but no internet access on Windows 10.
Fix 9: Try Flushing the DNS
Command Prompt allows you to flush and renew the entire DNS of your system. This allows your DNS to get a bug-free and fresh start. Hence, doing the same can also help you fix the WiFi connected but no internet Windows 11 error. Follow the steps below to flush the DNS entirely:
- Press the combination of Win+S keys, type Command Prompt, and run it as Administrator.

- Click on Yes to proceed.
- In the Command Prompt window, type the following commands followed by the Enter key.
ipconfig /flushdns
ipconfig /release
ipconfig /renew

- Close the window when the process is complete.
If the system still shows WiFi connected no internet on Windows 10, then follow the next solution.
Also Read: How To Solve DNS_PROBE_FINISHED_NXDOMAIN Issue
Fix 10: Edit the Date and Time Settings
Another great solution to fix the WiFi connected but no internet Windows 10 error is to configure the date and time. This may look like a bizarre solution but works like a charm. A lot of things get involved when any browser or website is accessing the internet. Date and time are two such factors.
Both the internet, as well as your system, have a specific date and time. When the date and time of both these attributes are the same, the internet will work perfectly on your system. Whereas, if there is any discrepancy between the date and time settings of the two, then you may face problems related to the internet connectivity. So, to skip such errors, you should follow the below steps to ensure the data and time settings are perfect to run the internet smoothly without worrying about a Wi-Fi connected but no internet:
- Press the combination of Win+S keys, type Date and Time settings, and hit the Enter key.

- Toggle on the settings for Set the time zone automatically and Set the time automatically.

- Once you change the settings, click on Sync Now.
Now run the internet and see if it works perfectly. If the error of WiFi connected no internet persists, then follow the next solution below.
Fix 11: Reset Your Network and Fix WiFi Connected But No Internet
Another viable solution that works in most cases is to reset the network settings. Resetting allows your network and the system to get a fresh start and run properly. For the same, you can follow the steps right below and fix the no internet access but connected error:
- Press the combination of Win+S keys, type Network Status, and hit the Enter key.
- Scroll down the network settings and click on Network Reset.
- Click on the button stating Reset Now.
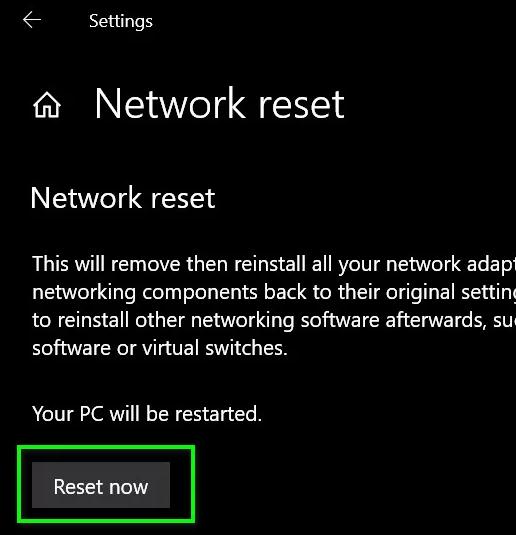
So, this is the solution that will allow your network to connect and then reconnect to your system just like a new device. Follow the next solution if somehow this one fails to get rid of the network-related errors.
Fix 12: Turn Off the Fast Startup Settings
Fast startup settings of your device may interfere with the working and performance of the device. In such a case, you may need to turn off the Fast Startup and fix the WiFi connected but no internet error instantly. For ease of access and surety, follow the steps below and disable the feature:
- Press the combination of Win+S keys, type Control Panel, and hit the Enter key.

- Click on System and Security.

- Open the Power Options to proceed.

- From the left pane of the window, click on the option stating Choose what the power button do.

- Click on the option to Change settings that are currently unavailable.

- Look for Shutdown settings and unmark the box stating Fast Startup & reboot PC.

- Click on Save Changes and close everything.
If no solution yet has helped you in getting rid of the wifi error, then take the help of the last one below that will surely help.
Fix 13: Check the Router Permissions
You may not know this, but you can modify the settings of your router and ensure that a system or device can access the internet or not. If the wrong device has been disabled from using the Internet, you may face a problem related to the WiFi connected but no internet Windows 10. To ensure proper router settings, follow the below steps:
- Press the combination of Win+S keys, type Command Prompt, and run it as Administrator.

- Click on Yes to proceed.
- Enter the following command in the tool and press Enter.
ipconfig
- Copy the number that appears on the screen, paste the same on the web browser’s search bar, and press Enter. (192.X.X.X.)
- Enter your network console credentials and log in to your account.
- Surf around the console settings to look for the MAC address filtering options. Disable this feature if it is enabled. Also, enable access to any device that you may have disabled.
Fix 14: Reset the Router
The next solution that you can use in case the problem of WiFi connected but no internet Windows 10 persists, is to reset the router. It’s very easy to reset a router. However, you should proceed with caution while resetting the router. Resetting means that your router’s password will also be removed. If you are comfortable with the same, you can proceed ahead.
To reset the router, look for a tiny hole around the body of the device. You may see that it states Reset under the hole. It looks something like this:
To reset the router, you need to insert a pin in the hole and push it. Once the router resets, run the internet on your device and see if the problem fixes.
Also Read: Fix: Ethernet Doesn’t Have a Valid IP Configuration [Windows 11/10]
Summing Up: What to Do When the WiFi Connected But No Internet Error Appears
So, we hope you will be able to fix the problems related to your WiFi connected no internet error on Windows 11/10. If you face any problems in solving the problem or if the issue persists, take the help of the comments section below and seek assistance.
Support our page by subscribing to the newsletter from our blog. This will allow you to get more interesting updates about new blogs and news additions. Do let us know your review and feedback related to this guide.