Main LogoLight Logo
  • Reviews
  • Top 10
  • How To
  • Tech News
  • OS
    • Windows
    • MAC
    • iOS
    • Android
  • Categories
    • Driver Updater
    • Cyber Security
    • Games
    • Fitness
    • Entertainment
    • Tips & Tricks
How To Tips & Tricks
by Prachi Dani

How to Use Google Authenticator For Your Facebook Account

May 20, 2020
1

Every minute a new Facebook account is hacked, if you don’t want to be the next victim then use 2-Step Verification on your Facebook account. 

From bank accounts to email accounts and from social media accounts to your browsing history nothing is hidden from the eyes of Cybercriminals. A standard level of authentication can expose your device to digital attacks and identity theft, thus to safeguard your confidential information it is imperative to use two-factor authentication. 

What Happens When You Activate 2-Step Verification on your Facebook Account?

Setting up the 2FA on your Facebook account prevents any unauthorized access to it: 

  • Any attempt to login to your account which is done from an unidentified mobile device or computer system will be declined until and unless a special 6 digit code is entered along with the password.
  • Apart from this, if anyone else besides the account holder tries to log in to the account, the account holder will receive an alert message that a login attempt has been made.

If you wish to set up two-factor verification for your account, there are two methods that you can use. 

  1. SMS based security message.
  2. A dedicated app based code generator method. Google Authenticator is one such app that you can utilize in such scenarios.

Experts recommend that the use of Google Authenticator is a more secure method than the SMS based message.

What is Google Authenticator?

Google Authenticator is a dedicated mobile security app. Its working is based on the 2 step verification and is used to check the authenticity of the user before granting them access to the account.

Table of Contents hide
How to Use an Authentication App for Two-Factor Authentication on Facebook?
How to Enable Two-Factor From The Web?
How to Enable Two-Factor From Your Phone?
Final Words

How to Use an Authentication App for Two-Factor Authentication on Facebook?

Now, that you are aware of the basic information about two-factor verification and Google Authenticator. Let’s have a quick look at the process to set it up on the web and mobile phones. 

  • How to enable two-factor from the web?
  • How to enable two-factor from your phone?

How to Enable Two-Factor From The Web? 

Follow these simple steps to activate Two-factor verification from Web:

1. To start with Login into your Facebook Account. 

2. Click on the Settings button from the upper right corner of your Facebook page.

3. Now click on the “Settings and Login” tab.

4. From the displayed window choose the Two-factor authentication section and click on the Edit button.

Choose the Two-factor authentication section and click on the Edit button

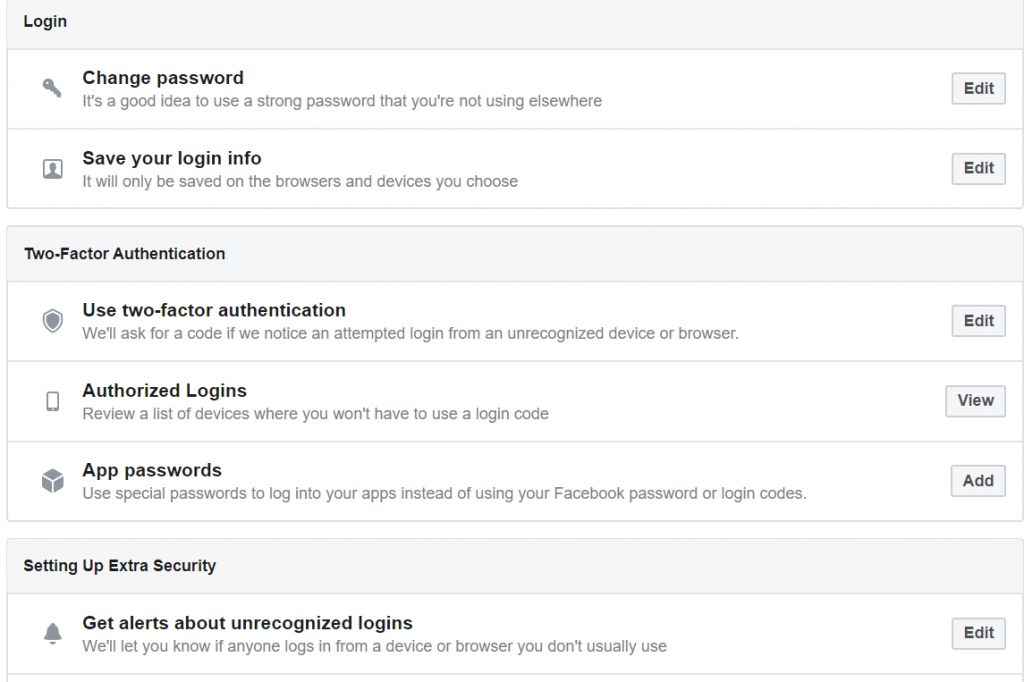
5. Here you can choose from the Text Message or the Authentication app.

Choose from the Text Message or the Authentication app

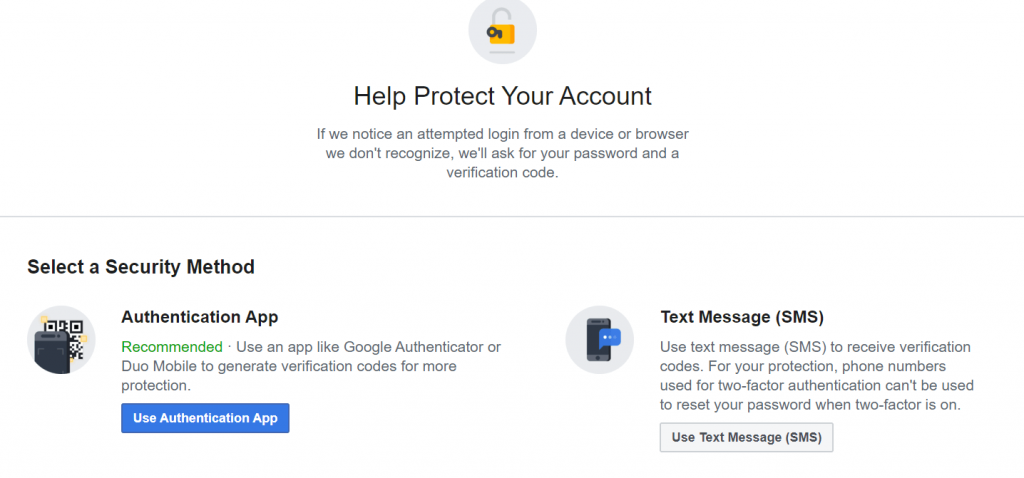
6. To pick the SMS code option, click on Use text message, select your phone number and then enter the verification code sent on your number.

Enter the verification code sent on your number.

7. You can alternatively choose to use the Authentication app. 

8. A new window will appear on your screen with a QR code displayed on it. Here you can either scan the QR code or enter the code in your Google authentication app. 

Scan the QR code or enter the code in your Google authentication app

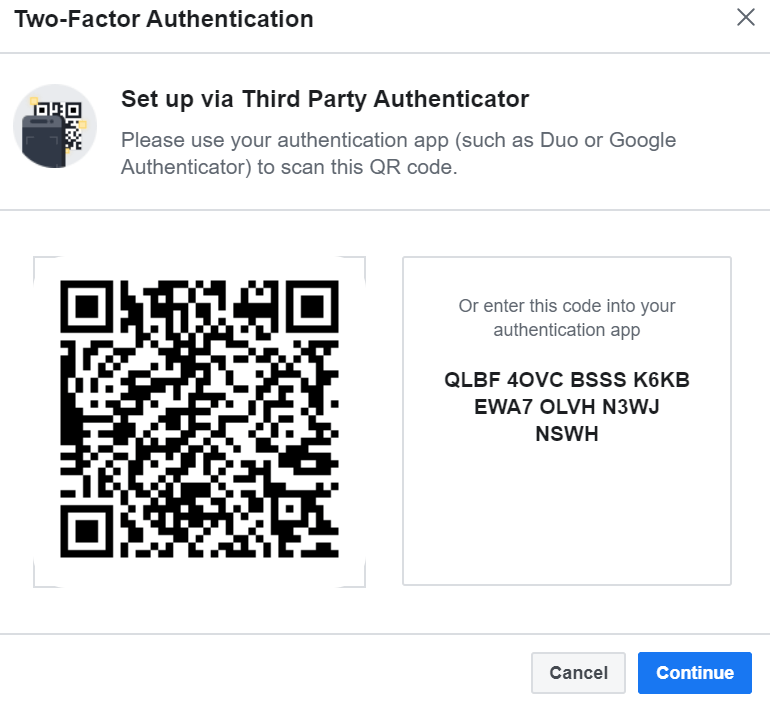
9. Following the above mentioned steps will activate and enable two-factor from the web. Once done you will need to enter a unique code every time you try to login into your account from an unauthorized device. 

Read More: How To Wave On Facebook (Facebook App & Facebook Messenger)

How to Enable Two-Factor From Your Phone?

Follow our step-by-step guide to enable and activate two-factor authentication on your Facebook account from your mobile device:

1. Login into your Facebook account from your mobile device. 

2. From the rightmost side of the navigation bar open the Menu tab.

3. In the next step, open the Setting and Privacy option.

4. Now choose the Settings button.

5. From the Settings menu, opt for Security and Login option.

Enable Two-Factor From Your Phone

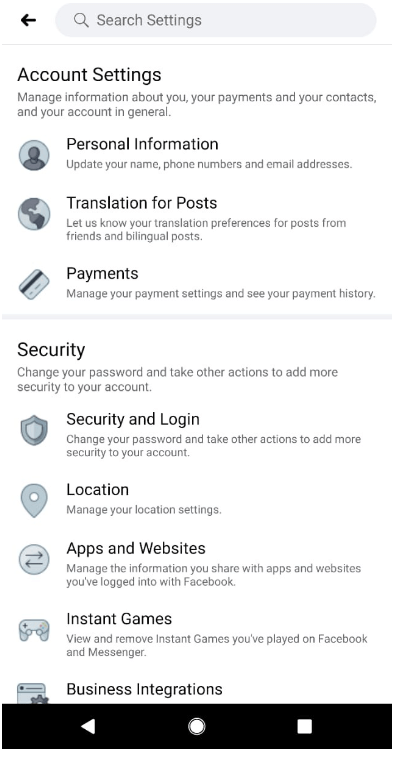
6. Now click on the Two-Factor authentication tab.

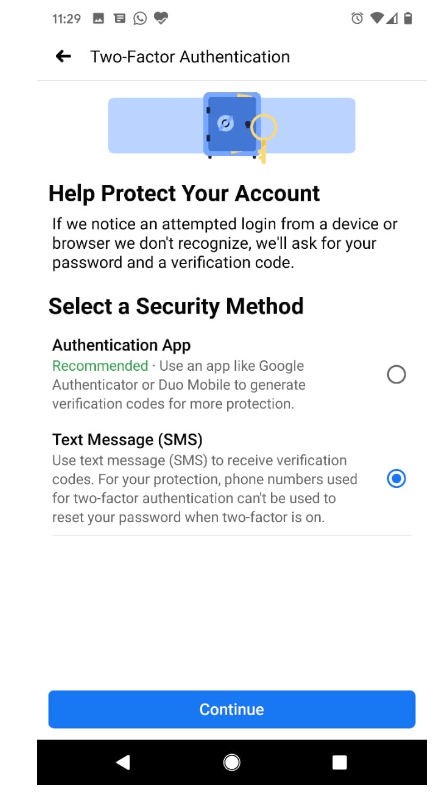
7. From here you can either choose to use the Text message or the Authentication app.

Choose to use the Text message or the Authentication app

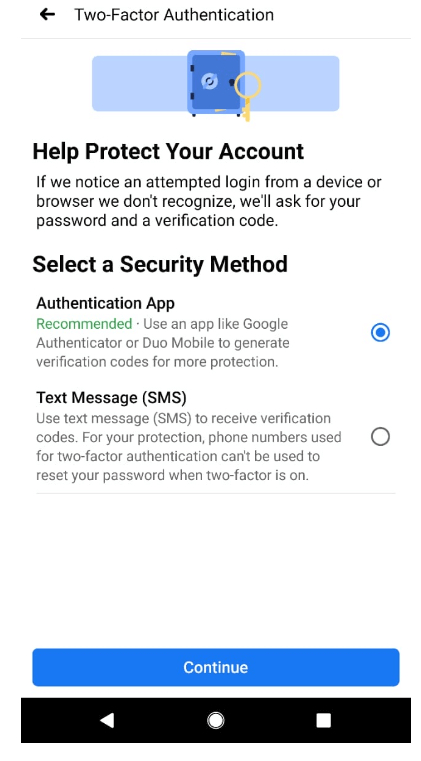
8. If you choose the Text message option, a unique code will be sent to your registered mobile number to confirm your identity.

Confirm Registered Mobile Number
unique code will be sent to your registered mobile number

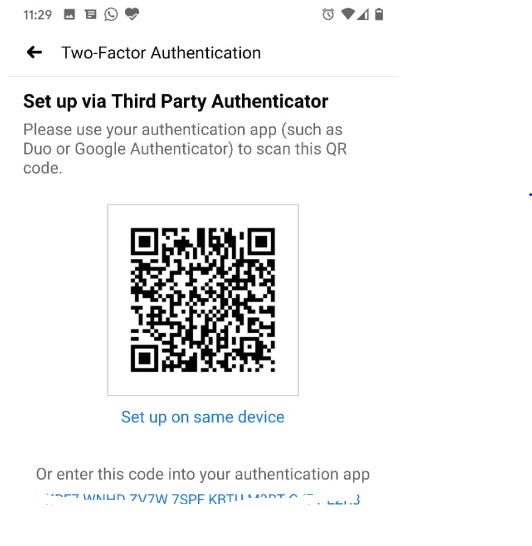
9. Alternatively you can choose to use the Authentication app. Here you will be provided with a QR code. Scan the QR to validate your identity, if you are unable to do so, you can manually enter the secret code to confirm your identity.

Choose to use the Authentication app

On successful completion of the above mentioned steps, you will see a confirmation message stating that the Two-factor authentication has been successfully enabled on your Facebook account.

Read More: How to Use Multiple Facebook Accounts on Android Smartphones

Final Words

We hope that our blog has given you enough insight about the importance of two factor authentication and how to set up Google Authenticator to generate the security code. 

Follow the steps as mentioned above to safeguard your Facebook account from unauthorized access.

Author

Prachi Dani

Prachi Dani is a technical content writer who specializes in areas of science and technology. She is highly up to date with technological transitions and transformations. Writing is not her passion but the only thing that carries satisfaction in life. If not writing, you may find her engrossed playing action games on her treasured smartphone.

View all posts

Related Posts
how-to-make-your-chromebook-touchscreen

How to Make Your Chromebook Touchscreen

January 3, 2025
0

If you want to know how to make your Chromebook touchscreen, you can take the help of the solutions listed and explained in this guide.

As you may already know, Chromebooks are fairly newer additions to the world of operating systems and computers. Chromebooks are quite different from the traditional definition of a laptop. You can consider Chromebooks as inexpensive laptops that do not run Windows or Mac instead use a ChromeOS to operate. A Chromebook can also be considered a professional and next-level tablet as it allows touchscreen operations, unlike traditional laptops.

The touchscreen feature of a Chromebook makes it easy to use and helps the user make the most out of the device. The device even allows you the option to switch the touchscreen feature on or off. This allows the user a better feasibility to use this device as a tablet or a laptop. So, if you are someone who owns a Chromebook and wondering how to enable a touch screens on a Chromebook, this is the perfect guide for you.

How to Turn on the Touch Screen on a Chromebook?

You have the ability to switch the touchscreen on and off on Chromebooks, which gives you the choice to use it in the same manner as a regular laptop. It is possible that you or your kid may have mistakenly altered this option, which may result in the touchscreen being inoperable until you turn it back on. You may activate the touchscreen by pressing the Search+Shift+T keys simultaneously and then attempting to use it further.

This is a simple method that will enable a touch screen on a Chromebook. However, if the Chromebook’s touch is not working properly, you can use some troubleshooting methods to fix this issue.

What to Do if the Touchscreen is Not Working On the Chromebook?

When you activate the touchscreen on the Chromebook, you could discover that your laptop does not react to your taps and swipes. This might happen even after you have enabled the touchscreen. One of the possible causes of this problem is:

  • Problems with the Hardware: It is possible that there is an issue with the touchscreen digitizer or even with other components of the hardware.
  • Inadvertently Changing Settings: There are situations when the touchscreen may be switched off by accident. This is something that can be easily fixed by turning it back on.
  • The Screen is Dirty: In the event that the screen is filthy, it is possible that it may not react appropriately. Not only that but if your hands are unclean or moist, this may also occur.
  • Software Problems: Restarting your device or conducting a factory reset are two methods that may be used to resolve a wide variety of software issues.

If you are also having trouble using the touchscreen on your Chromebook, there are a few different approaches that you may take to resolve any issues that may be causing this problem. These include the following:

Method 1: Reset the Chromebook Setting

By doing this step, your device will be returned to its initial configuration; but, in contrast to a factory reset, you will not be in danger of losing any of your personal data. So, to turn on the touch screen on a Chromebook and make it work, this is the right path to proceed with. To reset your Chromebook, see the following steps:

  • The Chromebook should be turned off.
  • Push the Power button while simultaneously pressing and holding the Refresh key.
  • As soon as the Chromebook starts up, you should let go of the refresh key.

Also know: Free Games to Play on Chromebook


Method 2: Update ChromeOS

With software upgrades, engineers are able to fix any problems that may be occurring with the operating system on your device. It is possible that a software update is just what your Chromebook needs if you have been meaning to make your Chromebook touchscreen. Please follow these steps to download and install the latest OS updates:

  • Launch the app of the Settings.
  • Go to the About ChromeOS menu.
  • Click the Check for updates button.

Google chrome os check for updates

There will be a popup asking you to restart your device once the update has been downloaded automatically by your computer. This will allow the software to be installed and enable a touch screen on the Chromebook.


Method 3: Reset your Chromebook to Factory Settings

A device that has been reset to factory settings will lose all of the information that makes it uniquely yours, including photographs, applications, and data. This is the last step in troubleshooting that you should do before you seek assistance from a Chromebook repair service.

Chromebooks are quite excellent at automatically backing up your data when they are connected to the internet; nonetheless, it is never a bad idea to check the settings for which your data is synchronized. First, make sure that everything is synchronized to the cloud by following these steps before you attempt to do a factory reset and make your Chromebook touchscreen.

  • When you are using the Chrome browser, go to the upper-right corner of the window and click the menu button, which is represented by three dots that are aligned vertically.
  • Determine the settings.
  • Then, click the Sync & Google services button after selecting You & Google.
  • Make your selections for the data you want to synchronize by selecting Manage what you sync. Select the Sync Everything option to synchronize all of your data.

Also know: How to Use Emojis on Chromebook


Make Your Chromebook Touchscreen: Summing Up

So, that’s all that we had to share with you regarding how to make your Chromebook touchscreen. The guide covers the solution to enable touchscreen as well as fix the common issues faced while using it. If you wish to avoid or fix any problems appearing in the future, you can come back to this guide.

But in all honesty, how often do you wipe the screen of your laptop? Not to worry, we are also forgetful. To clarify, cleaning your screen is not only about removing germs or improving the appearance of your laptop; it also has the potential to disrupt the sensitive sensors that are included in your touchscreens, making it more difficult for your

Chromebook to recognize your taps and swipes. So, utilise a microfiber cloth to ensure that your gadget receives a thorough cleaning. After spraying it with a mix of water and alcohol that is half and half, wipe your screen off in a gentle manner. Now, check to see whether it functions more effectively.

That’s all folks. Allow us to conclude this guide on how to make your Chromebook touchscreen. If you still have any questions related to the guide, ask them in the comments section below. Also, before you part ways, subscribe to our newsletter for daily updates.

Epson l3160 (Printer & Scanner) Driver Free Download

Epson L3160 (Printer & Scanner) Driver Free Download

March 23, 2023
0

Are you facing issues with your printer? If yes, then problems with the printer can easily be resolved just by updating its printer driver. Especially, when you use multi-function printers like Epson L3160. Epson L3160 is an all-in-one printer that uses ink tank technology to make sure that its users get good-quality prints at very low costs. This inkjet printer supports Wi-Fi Direct, Wi-Fi, and USB connectivity, which ensures that you can easily connect this printer to almost any wireless or wired computing device. However, this excellent printer is equipped with many advanced features, but in order to access all those features a correct and up-to-date version of the Epson L3160 driver is required.

In this driver download guide, you will learn exactly how to find the latest version of the driver for the Epson L3160 printer.

3 Methods to Download, Install & Update Epson L3160 Printer Driver on Windows 10/11

Listed below are some non-cumbersome methods for performing Epson L3160 driver download for Windows. Without further ado, let’s get started!

Method 1: Manually Download Epson L3160 Printer Driver from Manufacturer

Epson provides the latest drivers on a regular basis for their own products like printers, scanners, and more. So, if you have good technical knowledge and a lot of time, then you can search for the Epson L3160 drivers online and manually install them. To do so, follow the steps below:

Step 1: Visit Epson’s official website.

Step 2: Hover over the Support tab and choose Printers from the drop-down menu.Head to the Support tab and select Printer

Step 3: In the search box, enter your product name or printer model i.e., Epson L3160, and choose the name from the searched results.

Step 4: Choose your Windows OS version if it is not selected automatically.

Step 5: Next, scroll down to the Drivers section and click the Download option available next to the driver you want to download.

Step 6: Once downloaded, double-click on the Epson L3150 driver installer and follow the instructions on your screen to successfully install the drivers on your Windows PC.

Once everything is done, reboot your computer to apply the new drivers.

The manual driver download is a bit time-consuming and error-prone, especially for newbies. So, if you find this method daunting, then proceed with the next method mentioned below.

Also Read: Epson L3150 Driver Download, Install and Update on Windows


Method 2: Use Driver Updating Tool To Automatically Install Epson L3160 Driver (Recommended)

If you don’t have time, patience, or a certain level of computer knowledge to manually update outdated drivers, then you can automatically do it using the best driver updating software like Bit Driver Updater.

Bit Driver Updater is a globally recognized software that quickly replaces all outdated, missing or problematic drivers with just a few clicks of the mouse. This dedicated software only provides WHQL-tested and certified drivers. The driver updater utility is available in both a free version and the pro version. The pro version has the ability to update all outdated drivers in one click. Also, the pro version offers full technical support and a 60-day money-back guarantee. Whereas, the free version allows you to update one driver at a time.

Now have a look at the steps below to update the Epson L3160 driver via Bit Driver Updater:

Step 1: Click on the button provided below to download and install Bit Driver Updater.

Windows Download Button

Step 2: After installing, launch the utility on your PC and click on Scan from the left menu pane.Scan outdated driver of your windows pc

Step 3: Wait for scanning to finish.

Step 4: After that, check the scan results and click on the Update All button. This will install the latest version of all PC drivers including the Epson L3160 driver. But, if you’re using the free version, then you need to click on the Update Now button available next to the driver you wish to update.bit driver updater- update all

See how simple it is to update outdated drivers on Windows PC using this excellent driver updater. Once the latest driver updates are installed, restart your PC.

Also Read: Epson L3210 (Printer & Scanner) Driver Free Download


Method 3: Update Epson L3160 Printer Driver in Device Manager

Last but not least, you can also use Device Manager to download the latest drivers for the Epson L3160 printer. Here is how to do that:

Step 1: Press Windows + X keys together from your keyboard.

Step 2: Choose Device Manager from the available options.Open Device manager

Step 3: In the Device Manager window, find the Print Queues category and double-click on it.

Step 4: Next, right-click on your Epson L3160 printer and select Update Driver Software.Update driver software

Step 5: Lastly, click on Search Automatically for Updated Driver Software.Search Automatically for Updated Driver Software

Now, wait until Windows finds and installs the available drivers for your Epson L3160 printer. Once done, reboot your system to save new changes.

Also Read: How to Download Epson Printer Drivers For Windows 10/8/7


How to Download & Update Epson L3160 Driver on Windows 10/11: Explained

That’s all! So, the above-mentioned are a few easiest ways that you can consider to find the most compatible drivers for your Epson printer.

Hopefully, the write-up helped you in downloading and installing the latest Epson L3160 driver on Windows 11, and 10. Please feel free to drop your queries or further tips in the comments section below.

Additionally, you can subscribe to our Newsletter and follow us on Social Media so you never miss any tech updates.

1 Comment
    Thomas says: Reply
    May 20th 2020, 11:51 pm

    Hi Prachi
    I have not yet tried the Google Authenticator app, but I know how those app works and there is not doubt that it is the best way to protect your online accounts. Password is simply not enough anymore.

Leave a Reply Cancel reply

Your email address will not be published. Required fields are marked *

Sidebar Image bit G ad1

Latest Posts

  • WUXGA
    What is WUXGA Resolution and How it Works: Complete Guide 
    by Gunjita Sompura / June 10, 2026
  • Gitlab vs Bit bucket vs Git hub
    Gitlab vs Bitbucket vs GitHub: Complete Comparison 
    by Dikshika Singh / June 5, 2026
  • elastic search alternative
    Best Elasticsearch Alternatives to Use in 2026 
    by Gunjita Sompura / June 3, 2026
  • best logstash alternative
    Best Logstash Alternative to Use in 2026 
    by Gunjita Sompura / May 27, 2026
  • Best messagin apps for kinds without number
    Best Messaging App for Kids without Phone Number
    by Dikshika Singh / May 21, 2026

Categories

  • Cyber Security
  • Driver Updater
  • Entertainment
  • Fitness
  • Games
  • How To
  • laptop
  • OS
  • Reviews
  • Tech News
  • Tips & Tricks
  • Top 10
Sidebar Image bit G ad1
How To Take a Screenshot on Windows HP Laptop? How To Take a Screenshot on Windows HP Laptop?by Snigdha / May 20, 2020
Microsoft 365 Login Pages May Hide Phishing Attackby Prachi Dani / May 22, 2020Microsoft 365 Login Pages May Hide Phishing Attack
TechPout Footer Logo

We at TechPout promise to put forth stories that help people to learn and simplify their digital life. Our purpose is to share the true essence of technology with our tech-loving community.

Useful Links

  • About Us
  • Contact us
  • Privacy Policy

Popular Posts

  • Best PC Optimizer Software
  • Best Mac Cleaner Apps
  • Best Driver Updater
  • Duplicate Photo Finder and Cleaner Software
  • Best Free Movie Download Sites
  • Best IPTV Players

Follow us

Copyright © 2026 www.techpout.com. All rights reserved
DMCA.com Protection Status