If your Windows PC suddenly becomes slow or unresponsive, and you open the Task Manager to find a process called Wsappx using a lot of CPU, memory, or even disk resources. This might be frustrating, but you are not the only one facing this issue. Many users around the world have experienced high resource usage caused by the Wsappx process, especially while installing or updating apps from the Microsoft Store.
The wsappx high CPU and wsappx high memory issues can occur on all modern versions of Windows, including Windows 10 and Windows 11. Although Wsappx is a legitimate system process, it can sometimes consume more system resources than it should, leading to system slowdown and frustration
In this blog, we will explain what Wsappx is, why it uses so many resources, and provide you with a complete list of easy and effective solutions to fix the problem.
What Is Wsappx?
Before we move on to the solutions, let’s first understand what the Wsappx process is and what role it plays in the Windows operating system.
Wsappx is a background process that runs on Windows 11, Windows 10, and even Windows 8/8.1. It is mainly responsible for managing the apps that come from the Microsoft Store. This process includes important services that help with installing, updating, licensing, and even uninstalling Store apps. When these apps are being used or updated in the background, Wsappx becomes active and uses system resources like CPU, memory, and disk.
Wsappx includes the following sub-services:
- AppX Deployment Service (AppXSVC) – This service is used whenever you install, update, or remove Microsoft Store apps. If you notice AppX Deployment Service high memory or CPU usage, this service is likely the reason.
- Client License Service (ClipSVC) – This handles app licensing and ensures that only properly licensed Store apps run on your PC. It also provides protection for Microsoft Store apps.
- Windows Store Service (WSService) (Only on Windows 8/8.1) – This service was used in older versions of Windows to support Store functionality. It has been replaced in newer versions.
These services are legitimate and are a part of Windows itself. However, sometimes they can misbehave and cause performance issues like wsappx high CPU or wsappx high memory usage.
Now that we understand what Wsappx does, let’s take a look at why it might be causing problems on your PC.
Why Does Wsappx Cause High Resource Usage?
The Wsappx process usually stays in the background and does not interfere with your daily tasks. But there are times when it starts using a large amount of CPU or memory, leading to noticeable slowdowns on your PC. Below are the most common reasons why wsappx high CPU or wsappx high memory usage occurs:
Installing or Updating Microsoft Store Apps
When you install or update apps from the Microsoft Store, the system uses a background service to handle the task. This is normal, but sometimes the service keeps running longer than it should.
Automatic App Updates by Windows Store
The Store updates apps automatically, even if you are not using them. These background updates can cause Wsappx to become active and use more system resources.
Background Maintenance Tasks
Windows sometimes runs background tasks like app updates or license checks. If these happen while you are working, you might see higher resource usage from Wsappx.
Corrupted App or Store Cache
If an app update fails or the Store’s cache is damaged, the system may keep trying to fix it in the background. This can lead to constant resource usage until the issue is resolved.
Now that you know what is causing the issue, let’s walk through some easy and effective solutions to fix Wsappx high CPU and high memory usage in Windows.
How To Fix Wsappx High CPU and Memory Usage in Windows
We have compiled a list of troubleshooting methods that can help fix the high CPU, disk, or memory issues caused by the Wsappx process. These fixes are easy to follow and can be done by any Windows user, no advanced technical skills required.
Fix 1 – Restart Your PC to Clear Temporary Glitches
One of the easiest ways to fix minor system issues is to simply restart your computer. A quick reboot can clear temporary files and background processes, refresh system memory, and end any stuck services related to Wsappx or the Microsoft Store.
Fix 2 – Update Windows to the Latest Version
Updating Windows is one of the most effective ways to fix performance-related issues, including wsappx high CPU and wsappx high memory usage. Microsoft regularly releases updates that fix bugs, improve system performance, and optimize services like AppXSVC and ClipSVC.
If your system is not up to date, Wsappx might behave abnormally or use more resources than expected.
Steps to Update Windows:
- Press Win + I on your keyboard to open the Settings window.
- Click on the Windows Update tab from the left sidebar.
- On the right side, click the Check for Updates button.
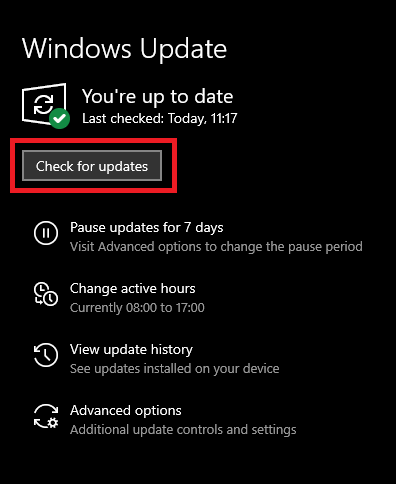
- Wait while Windows checks for any available updates.
- If updates are found, click Download and Install.
- Once updates are installed, restart your PC.
- Go back and check for updates again to make sure no pending updates remain.
- Click on Advanced Options > Optional Updates, and install any updates listed there as well.
After completing all updates, open the Task Manager again to check if the Wsappx process has settled down. If the issue is still present, move on to the next solution.
Also know: How to Fix Windows 0x80071AC3 Error: ‘Volume is Dirty’
Fix 3 – Update Drivers Using Device Manager
Outdated or incompatible hardware drivers can sometimes interfere with background services like AppX Deployment Service (AppXSVC), leading to issues such as wsappx high CPU or high memory usage. By updating your system drivers, you can improve overall performance and reduce unnecessary resource usage.
Steps to Update Drivers:
- Press Win + X and select Device Manager from the menu.
- In Device Manager, look through each category and check for any drivers with a yellow warning icon.
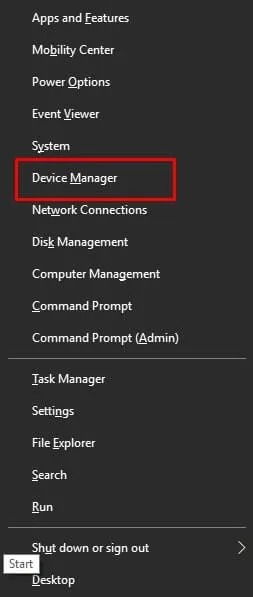
- Expand the section, right-click the device, and choose Update driver.
- Select Search automatically for drivers.
- Follow the prompts if Windows finds and installs a newer version.
After updating all the necessary drivers, restart your PC and check if the wsappx high memory or CPU usage issue is resolved.
Fix 4 – Disable Microsoft Store Temporarily
If updating Windows and drivers did not reduce wsappx high CPU usage, the next step is to temporarily disable the Microsoft Store. Since the Wsappx process is closely linked to Store activities, turning off the Store can prevent it from running in the background and using up system resources.
Steps to Disable Microsoft Store via Group Policy:
- Press Win + R to open the Run dialog box.
- Type gpedit.msc and press Enter to open the Local Group Policy Editor.

- Navigate to the following path:
Computer Configuration > Administrative Templates > Windows Components > Store
- In the right-hand pane, double-click on Turn off the Store application.
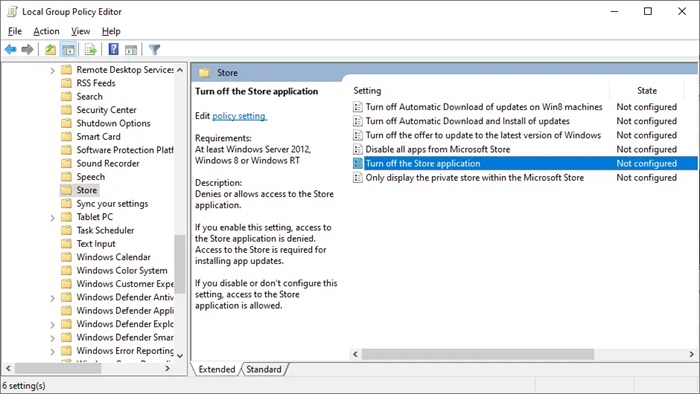
- Select Enabled, then click OK.
- Close the Group Policy Editor and restart your PC.
After this, the Microsoft Store and its background processes will stop running, which should reduce Wsappx’s CPU and memory usage.
Fix 5 – Restart Windows Update and App Deployment Services
Sometimes, background services related to system and app updates can get stuck or behave abnormally. Restarting these services can help refresh their state and reduce unnecessary resource usage.
Steps to Restart the Services:
- Press Win + R to open the Run box.
- Type services.msc and press Enter.
- In the Services window, scroll down and look for Windows Update.
- Right-click on it and choose Restart.
- Next, scroll to find AppX Deployment Service (if available).
- Right-click on it and click Restart as well.
Once you have restarted both services, close the window and monitor your system’s performance. You can open Task Manager again to check if the issue has improved.
Fix 6 – Turn Off Automatic App Updates in the Store
By default, the Microsoft Store is set to automatically update all installed apps in the background. While this helps keep your apps up to date, it can also trigger background services that use extra CPU and memory, especially if updates fail or get stuck. Turning off automatic updates can prevent these background tasks from running when you are not using the Store.
Steps to Turn Off Auto-Updates:
- Open the Microsoft Store from the Start menu.
- Click the three-dot menu (or your profile icon) in the top-right corner.
- Select Settings from the dropdown.
- Under App updates, find the toggle that says Update apps automatically.
- Turn this option off.
You can still manually update your apps from the Store when needed, but this will stop it from doing it silently in the background and potentially using system resources.
Also know: How to Delete Temporary Files Safely in Windows
Conclusion
Wsappx is a necessary Windows process, but sometimes it can use more CPU or memory than expected, causing your PC to slow down. In most cases, the issue is related to app updates, background tasks, or minor system glitches.
The fixes shared above are easy to follow and should help reduce unnecessary resource usage. Start with the simple steps like restarting your PC or updating Windows, and move to the advanced ones if needed.