Main LogoLight Logo
  • Reviews
  • Top 10
  • How To
  • Tech News
  • OS
    • Windows
    • MAC
    • iOS
    • Android
  • Categories
    • Driver Updater
    • Cyber Security
    • Games
    • Fitness
    • Entertainment
    • Tips & Tricks
Driver Updater How To Windows
by Snigdha

Xbox One Controller Driver Download and Update for Windows 10, 11

January 6, 2023
1

This post shares the quick and easy ways to download, install, and update Xbox One Controller driver on Windows 10, 8 and 7. Read on to know more.

Xbox One controller is the ultimate game controller that you could lay your hands upon to play the most interactive virtual games on your computer. But when you connect the controller to your PC and discover that you are not able to play your favourite games with the controller, then it might be disheartening for you.

If you are wondering what could be the reason, then there is a high possibility that the Windows 10 Xbox One controller driver is not installed on your computer. Yes, you read that right!

Though drivers automatically install in the Windows PC as soon as the controller is connected to it yet at times it may not install on its own. So, this blog is going to help you learn how to download Microsoft Xbox controller driver for Windows 10 and install it step by step.

Highly Recommended Method to Download & Update Xbox One Controller Driver

Win Riser a Driver Update tool is the ultimate experts-recommended solution to perform the Xbox Controller driver download task in just a matter of moments. It not only helps update outdated drivers but also accelerates the performance of your whole system. Additionally, you can even create a backup of the drivers and use them to restore an earlier version if the need ever arises. Get this magnificent tool for free, by clicking on the below download tab!

Windows-Download-Button

Table of Contents show
How to Download and Install Xbox One Controller Driver for Windows 10, 8, 7
Way 1: Get Microsoft Xbox One Controller Driver Using The Driver CD/DVD
Way 2: Get Microsoft Xbox Controller Driver With Windows Update
Way 3: Get Microsoft Xbox One Controller Driver Using Device Manager
Way 4: Download & Update Xbox One Controller Drivers Automatically With Bit Driver Updater (Experts-Recommended)
Way 5: Download the Xbox Controller Driver via Microsoft Update Catalog Site
Way 6: Update the Xbox Controller’s Firmware Using the Using Xbox Accessories App
Way 7: Update the Xbox One Controller Driver Using a USB Cable
Frequently Asked Questions (FAQs)

How to Download and Install Xbox One Controller Driver for Windows 10, 8, 7

In the below segment, let us focus on the ways to download, install, and update the Xbox One controller PC driver.

Way 1: Get Microsoft Xbox One Controller Driver Using The Driver CD/DVD

Although an ancient method, yet sometimes it might come as a handy option for downloading and installing the Xbox controller driver for Windows 7. If you have the driver CD or DVD for the controller, then you can utilize the below steps to install it:

  • Open the computer’s CD drive and insert the Xbox One controller driver CD/DVD in it.
  • Launch “My Computer” on your Windows 7 PC.
  • Double-click on the new CD drive to run it for installation. If it fails to launch, then double-click the “.exe extension” file from the CD directory.
  • Keep navigating through the on-screen instructions to complete the installation of the Xbox One controller driver for Windows 7.

Way 2: Get Microsoft Xbox Controller Driver With Windows Update

Another way of installing and updating drivers on your computer is offered by Microsoft itself.

As Windows constantly checks for the latest available updates of various drivers and Microsoft applications, therefore you can conveniently utilize this method to get the right drivers for your PC. You can follow the below steps to download Xbox One controller driver and install it using the Windows built-in update functionality.

  • You have to first go to the Settings app of your Windows 10 PC.
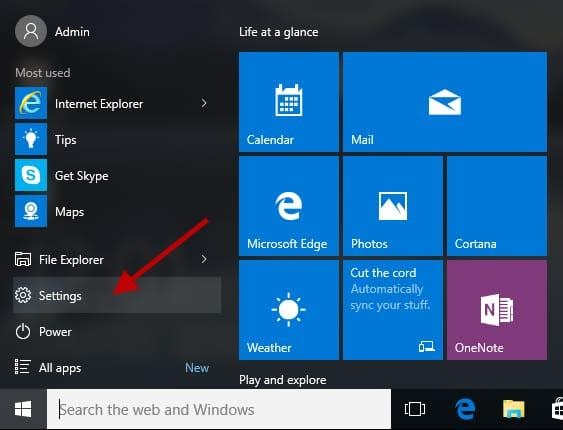
    Select The Settings Option
  • In the Settings window, we will find a number of options in front of us from which you have to click on Update & Security.
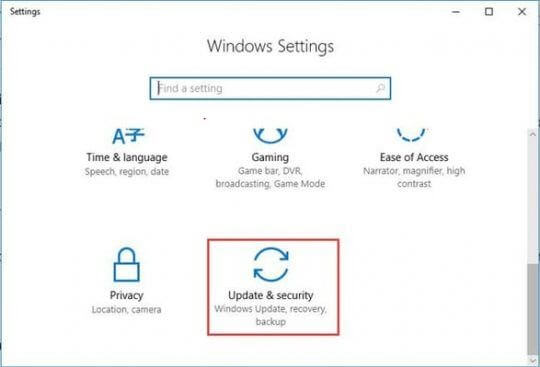
    Click On The Update & Security Option
  • Next, tap on Windows Update located on the side panel.
  • On the main window, hit the Check for Updates button.
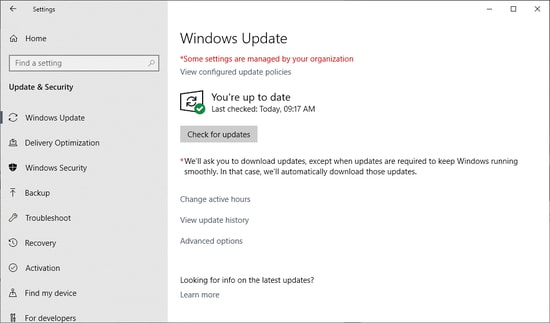
tap on Windows Update

  • Wait till the installation process of the Xbox controller driver gets over and then reboot the computer.

Read Also: Best Game Booster for Windows PC


Way 3: Get Microsoft Xbox One Controller Driver Using Device Manager

You can also make use of the Control Panel applet named Device Manager to manually download Xbox controller driver and install it on your Windows laptop or desktop computer. You can follow the below steps for the same.

  • Type device manager in the Windows search box near the Start button and select the Best match result.
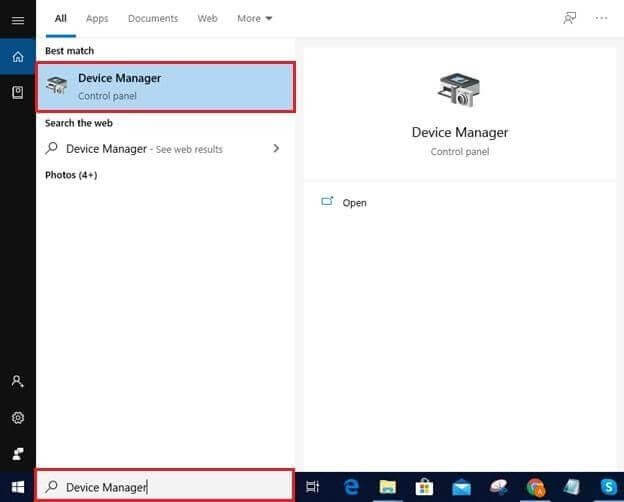
    Type Device Manager In Search Box Near Start Button
  • After the Device Manager opens, expand the “Microsoft Xbox One Controller” category by clicking on it.
  • Right-click on the device and choose the “Update Driver Software” option from the context menu.
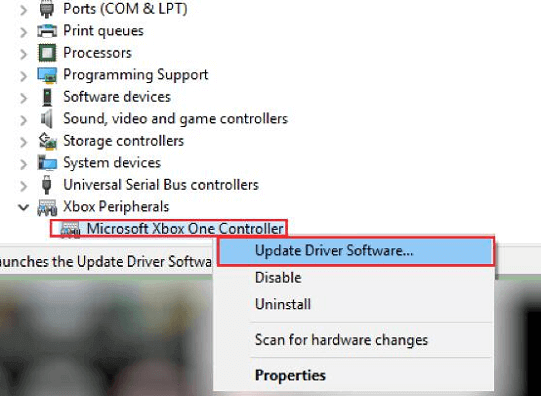
    Choose Update Driver Software From The Menu List
  • Then, choose the “Search automatically for updated driver software” option.
  • Now, wait for Windows to find and install the latest version of Xbox controller driver for your device.
  • After the completion of the installation process, restart your computer.

Also Read: Solve Xbox One Controller Keeps Disconnecting Issue


Way 4: Download & Update Xbox One Controller Drivers Automatically With Bit Driver Updater (Experts-Recommended)

Are you looking for a robust, timesaving, and reliable method to download and install Windows 10 Xbox controller driver?

If so, then get the Bit Driver Updater tool to download Xbox One controller driver and install it on your computer so that you can enjoy smooth and hassle-free gameplay, always. The important steps for the same have been outlined below:
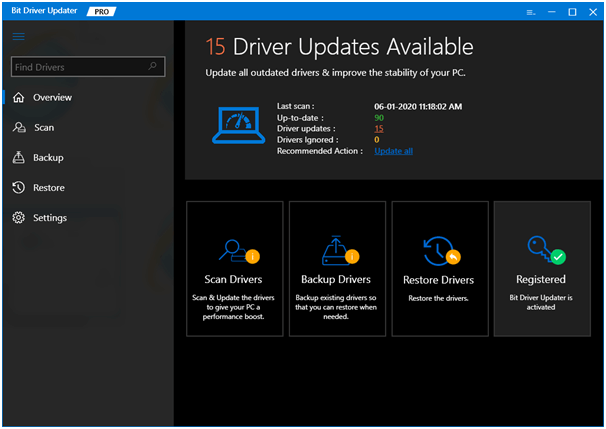
Bit Driver Updater - Best Driver Updater Software

  • Install Bit Driver Updater by clicking the download button.

Windows Download Button

  • Then, hit the Scan button to initiate scanning and detection of missing drivers.
  • After scanning is complete, then tap on the Update Now button to initiate and complete the auto-installation of Xbox controller driver for Windows 10.
  • Restart the system once to make the installation effective.

Read Also: Top Free Driver Update Program


Way 5: Download the Xbox Controller Driver via Microsoft Update Catalog Site

The Microsoft Update Catalog website is a great place to download and install Xbox One controller drivers on Windows 10. Here are the steps you need to perform for the same.

  • Visit the Microsoft Update Catalog page.
  • Type Xbox controller driver in the search box and click on the Search button.
  • Click the “Download” button next to the Xbox controller update you wish to download for your system.
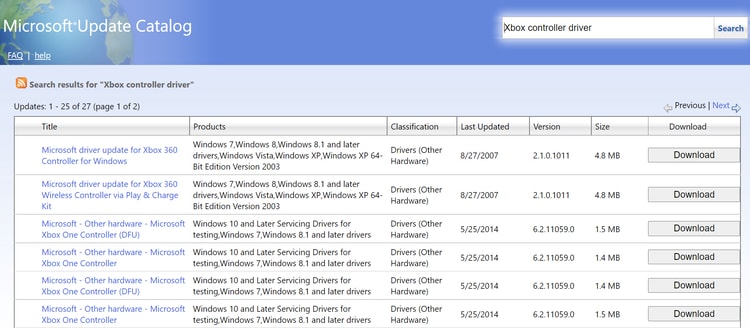
    micorosoft update catalog
  • Follow some on-screen instructions to install the latest driver update for Microsoft Xbox Controller for Windows.

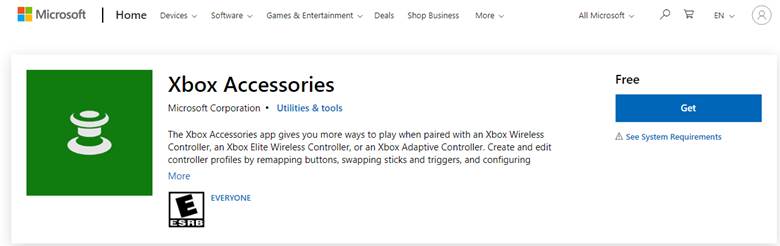
Way 6: Update the Xbox Controller’s Firmware Using the Using Xbox Accessories App

You can also install the latest firmware updates for your Xbox controller wirelessly through the Xbox Accessories app. Here are the step-by-step instructions for the same.

  • First, you need to download the Xbox Accessories app from the Microsoft store.Xbox Accessories app download screen
  • After the application is installed, launch it and click on the three horizontal dots button to access more options.
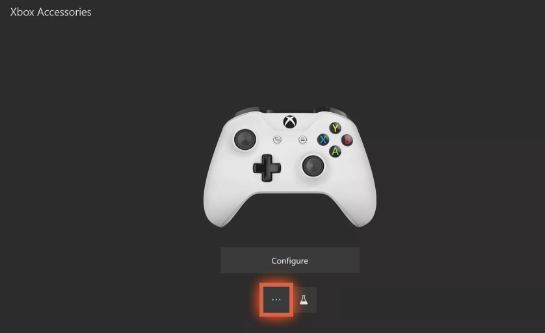
    Xbox accessories option
  • Click on the Firmware version box available on the top-left of the screen.
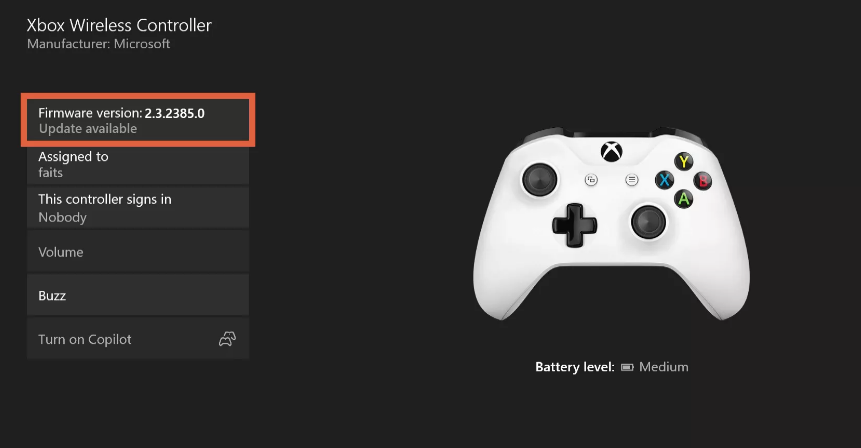
    check Xbox firmware version

Note: If this Firmware version box says ‘no update available’, then it means you already have the latest firmware update installed for your Xbox controller.

  • Next, click the Update now button to begin the process.
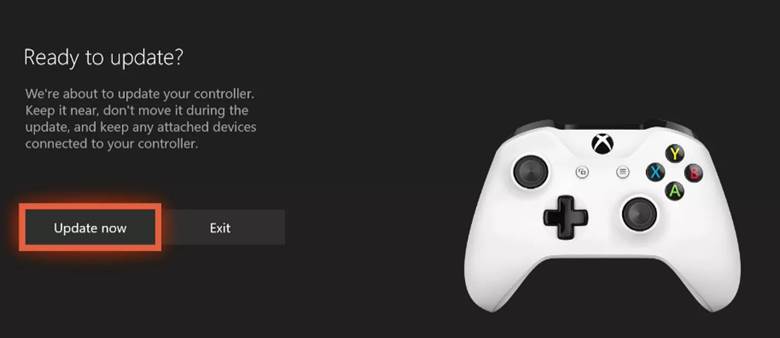
    update Xbox controller
  • After the update process is finished, click the Close button.

Also Read: Download and Update Xbox 360 Controller Driver for Windows 10 PC


Way 7: Update the Xbox One Controller Driver Using a USB Cable

If you wish to manually download Xbox One controller driver for Windows 10 and older operating systems, you can do so by connecting the controller to your gaming console via a USB cable. Follow the easy steps listed below and know how you can use a USB cable to update the controller quickly:

  • Connect the controller to the console via USB.
  • A pop-up for the process to update the controller will appear on your screen. In case you do not get these, press the Xbox button on your controller.
  • Now follow the following path to continue: Settings > Devices & streaming > Accessories > Device info.
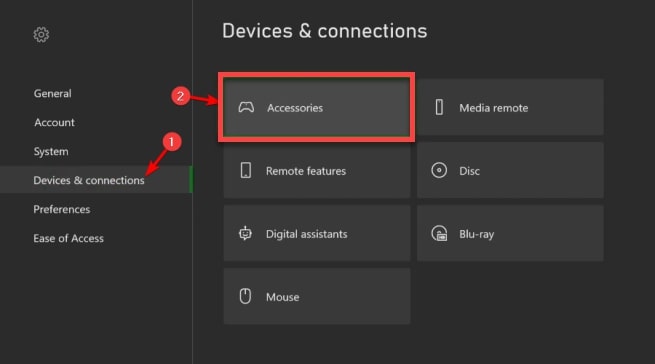
    Choose Accessories under Devices & Connections Menu in Xbox One Controller Setting
  • Open the Firmware version settings and click on Continue. The controller will automatically update now.

Frequently Asked Questions (FAQs)

Q1. Do I need drivers for Xbox One Controller?

The Xbox One drivers runs on the computer’s operating system and enables it to communicate with the controller device you use. Your Microsoft’s Controller won’t connect or pair up with your console if its driver software hasn’t been updated or properly installed on your computer system.

Q2. Is Xbox One controller compatible with PC?

Xbox One is compatible with Windows 10, 8.1, and 7 operating systems. You can use a USB cable, wireless adapter, or Bluetooth to connect a controller to your PC.

Q3. Does my Xbox controller have Bluetooth?

To determine whether you have a Bluetooth-supported Xbox controller or not, you need to look at the plastic around the Xbox or Guide button. If it’s the same plastic as the rest of the controller’s color, then it means you have a controller with bluetooth feature.

Q4. Why my Xbox controller won’t stay on?

Dead batteries, faulty charging cable, outdated driver, or internal faults are some of the most common problems that prevent the Xbox controller from turning on.

Q5. How do I update my Xbox One controller driver?

You can download and update the Xbox Controller drivers on PC either manually or automatically. To install the updated driver version automatically, you can use a potent and well-trusted driver update utility like Bit Driver Updater. In case you choose to do it manually, you can either use Device Manager or visit the Controller Search page.

Q6. How do I connect my Xbox One controller to my PC?

You can connect your controller to the Windows PC with the help of USB cables, wireless adapters offered by Xbox, or through a Bluetooth connection. For more info, you can visit the official Xbox Support page.

Also Read: How To Connect Xbox One Controller To PC

Q7. How to check Xbox controller driver version?

To check the driver version of your Microsoft controller, follow the steps shared below:

  • Open the Device Manager tool on your computer.
  • Expand the Xbox Peripherals category.
  • Double-click on Microsoft Xbox One Controller.
  • On the Properties window, go to the Driver tab and view the driver version.

Q8. How do I fix Xbox One Controller Not Working on PC?

A wrong, outdated or faulty driver is one of the major reasons why your controller won’t connect or work on your PC. The best way to solve this problem is to update your Microsoft controller driver to its most recent version.

Q9. How Do I Know Which Xbox Controller I have?

There is one way to find the difference between the two generations of the Xbox Controllers. On the upper middle side of the controller, there will be an Xbox logo button that triggers up your home screen. Talking about the original controller, this button is noticeably polished. Whereas on the White original controllers the button will be black and white for the S controller.

Q10. Why Does the ‘Xbox One Controller Won’t Sync’?

If you are experiencing Xbox Controller won’t sync or connect issues while trying to pair it with the Windows PC or console, then it might be happening due to signal interference, hardware malfunction, weak batteries, and console bug.

Q11. How to Reset Xbox One Controller?

In order to reset Xbox Controller on Windows PC, you need to follow the steps shared below:

Step 1: First of all, altogether press Windows + I keys from your keyboard to invoke Windows Settings.

Step 2: In Windows Settings, find and click on Devices from the available options.

Step 3: Now, you will see a list of all the devices connected to your PC.

Step 4: From the list, locate your Xbox Controller and click on Remove Device.

Step 5: This will delete the Xbox Controller from your list of Bluetooth Devices.

Step 6: After that, take out the batteries from your controller and try to re-connect your Xbox Controller to your PC via a USB cable.

This will reset the overall wireless connection between your computer system and the preferred Xbox controller. Once it’s done, then you can connect your controller again to your PC.

Q12. Where is Xbox controller driver?

You can find the Xbox controller driver in the Device Manager. This is a Windows-integrated utility that allows you to manage different devices connected to your system. Under the Xbox Perhiphrals category of the Manager, you can find the required Xbox driver.

Q13. How do I reinstall Xbox One controller drivers on PC?

You can reinstall Xbox Controller driver using the Device Manager. Right-click on the driver present under the Xbox Peripherals category of the Device Manager. Select Uninstall Driver and follow the instructions that appear to remove the driver. Lastly, Restart the system and use any of the above methods to download or update the driver.

Also Read: Why is My Xbox Controller Blinking and Flashing? How to Fix it


Accomplished: Xbox One Controller Driver Download for Windows 10, 8, & 7

Through this article, we informed you about the manual as well as automatic methods to download, install, and update Xbox One controller drivers for Windows 10 and older editions. Going the automatic way has its various advantages but we would still be eager to hear from you which method worked wonders for you.

After installing the Xbox One controller PC driver with the help of the aforementioned methods, you can then enjoy your gaming session. Do follow us on social media and subscribe to our newsletters. We also invite you to reach out to us by dropping your comments, suggestions, and queries in the comments box.

Author

Snigdha

Snigdha is a technical content writer with expertise in the field of science & technology. Though she has a very diverse academic and professional profile yet she finds writing to be a creative form that she was unable to explore so far. When not writing, she can be found indulging in other forms of creativity like painting or travelling.

View all posts

Related Posts
How to Fix Ubotie Keyboard Not Working in Windows 10, 11

How to Fix Ubotie Keyboard Not Working in Windows 10, 11

June 4, 2023
0

If your keyboard is bothering you and if you are facing the Ubotie keyboard not working error on Windows devices, then here is a simple guide with some amazing solutions to help you with the error. 

Ubotie is a great electronics brand. It offers multiple devices like keyboards, mice, wireless chargers, headsets, etc. The majority of products from the brand employ advanced technology for the ease of users. Moreover, Ubotie is quite popular for its wide and smart range of keyboards.

Although the keyboards from the brand are some of the best in the line, you may face some problems while using them, due to one or more reasons. This is one of the main reasons why multiple users complain that their Ubotie Keyboard is not working. This problem is common and quite annoying. When your keyboard is not working on Windows, it becomes tough to get the most out of the PC or laptop.

However, this issue is not as big and troubling as it seems. You can easily fix the error and keep on using your keyboard as you were. But, you need to take some necessary steps to ensure this.

The coming sections of this guide address the same.

Here, you will find a set of multiple solutions and instructions that will help you in fixing the keyboard. So, without any further ado, let’s proceed to the same right away.

Methods to Fix Ubotie Keyboard Not Working in Windows 10/11

The methods to fix the keyboard error are quite easy to follow and helpful. Hence, go through the entire thread of this article and deploy the solutions as you proceed to fix the error. However, before you proceed, to follow some of the steps you may need to use the On-Screen Keyboard. For this, open the OS Settings and enable the on-screen keyboard under the Ease of Access category. Once you do this, follow the solutions, in chronological order, to fix the Ubotie Keyboard not working error.

Fix 1: Configure Physical Attributes

The first thing that you should do if your keyboard stops working suddenly is to configure the physical attributes. This means you need to check if there is any physical damage to the keyboard. If the keyboard looks fine, then ensure that it’s properly charged and its battery is not exhausted. Replace the battery if possible. If everything just seems fine physically, then move on to the next solution.

Also Read: How to Fix Keyboard Slow Response in Windows 10, 11


Fix 2: Check the Connectivity

The absence of physical errors means that the culprit behind Ubotie Keyboard not working in Windows 11 error can be something else. The second thing that you should check if this error persists is the connectivity. If you are using a wired keyboard, then ensure that the connection is proper and the cable is connected all the way to the USB port.

However, if you are using a Bluetooth keyboard and want to fix its errors, then you need to ensure that the Bluetooth is connected to your computer. Moreover, check if the USB adapter is plugged in properly. You can try switching the USB port if this helps.

If you find that everything is right and the connection is just fine as well, then follow the next solution.


Fix 3: Update the Driver of the Device

One of the most helpful solutions that can fix the Ubotie Keyboard not working in Windows 10 is updating the driver. A driver is a set of files that helps the system in establishing stable communication between the system and the respective device. Hence, if the driver is missing, corrupted, outdated, faulty, or damaged in any other way, you may face problems in running the same.

The same goes for keyboard drivers as well.

If the keyboard driver is faulty in any way, then you may face the Ubotie Keyboard not working error. So, the best way to deal with this error is to update and install the driver. There are multiple ways to do that. However, we are only offering the automatic one.

To update the keyboard driver automatically, you can take the help of a third-party updater called the Bit Driver Updater. This is an amazing tool that allows you to download and install the drivers for all devices. Moreover, you can also control the drivers in other ways with this tool.

Some of the best features of this software include:

  • Single-click updates
  • Instant and scheduled update options
  • Backup and restore drivers
  • Multilingual interface
  • WHQL-certified safe drivers
  • 24/7 customer support
  • Paid and free versions

There are several other features that you get with the Bit Driver Updater. You can take advantage of all these features after downloading the software. For now, let’s have a look at the procedure to use the tool.

How to Use the Bit Driver Updater for Driver Updates?

Use the procedure below to download the keyboard driver and fix the Ubotie keyboard not working in Windows 11 error:

  1. Click on the button shown below to download the Bit Driver Updater setup.Windows-Download-Button
  2. Install the tool and run it so that the tool automatically scans your system for outdated drivers.
  3. When the list of outdated drivers appears, use the Update Now button to update the keyboard or any other driver if necessary.Update all outdated driver of your windows pc
  4. Restart the system when the procedure is complete.

This is the most reliable method that works quite well to fix the error. However, if you are still facing problems with the keyboard, use the next solution.

Also Read: How to Fix Corsair Mouse and Keyboard Not Working


Fix 4: Disable Sticky Keys, Filter Keys, & Toggle Keys

The last solution to fix the Ubotie Keyboard not working in Windows 10 error is to disable certain features. Windows offers some Ease of Access features to help you make the best out of the OS. However, instead of making everything easy for you, they can also cause problems. Hence, when such problems become difficult to handle, you should turn off such features. That being said, follow the steps provided below to turn off such features to fix the error altogether:

  1. Press the Win+S keys, type Use Sticky Keys, and press the Enter key afterward.Use Sticky Keys
  2. On the window that appears, look for Use Filter Keys, Use Toggle Keys, and Use Sticky Keys and toggle off the same.Use Filter Keys, Use Toggle Keys, and Use Sticky Keys and toggle off

Now when you will use the keyboard, you will not face any problems.


Ubotie Keyboard Not Working in Windows 11/10: Fixed

So, this was all we had to share with you through this article.

All the solutions provided above are the best ones you can ever try. Using these, you can easily get rid of the errors related to not just the Ubotie keyboard, but any other for that matter. The solutions explained to you in the previous sections are quite easy to follow and safe to deploy. Hence, you can get on with the solutions right away.

Also Read: How to Fix Keyboard Numbers Typing Symbols

If you face any problem while using these fixes for Ubotie Keyboard not working, you can seek our help. Explain your queries in the comments section below so that we can offer appropriate solutions to you. You can also share your valuable suggestions or feedback in the same.

Follow us on Instagram, Pinterest, Facebook, Twitter, and Tumblr for more interesting updates. Also, don’t forget to subscribe to our mailing list for instant blog updates.

Nahimic Audio Driver Download and Update for Windows 10, 11

Nahimic Audio Driver Download and Update for Windows 10, 11

December 11, 2022
0

This article acquaints you with 4 quick and easy ways to get the Nahimic audio driver for Windows 10/11 downloaded, installed, and updated.

Nahimic driver boosts gaming audio to give users an enhanced and optimized experience. However, it may malfunction and show signs of degraded performance if you do not update it for Windows 10/11.

Therefore, through this article, we share the best possible methods to download the Nahimic driver (if not already present), install, and update it. Let us begin with them without dilly-dallying any longer.

Methods to Download, Install and Update the Nahimic Driver

You may follow the below-given ways to download and install the updated Nahimic driver for Windows 11/10.

Method 1: Download the Nahimic driver from the official website

The official website of your motherboard manufacturer is one location from where you can download the latest Nahimic driver for Windows 10/11. To do so, you may follow these steps.

  • Navigate to the website of your motherboard manufacturer.
  • Search for the Nahimic drivers compatible with your operating system.
  • Download the driver’s installation file.
  • After downloading the driver installer, double-click on it and follow the instructions to finish the driver installation.

Also Read: How to Update Audio Drivers on Windows 10 and 11


Method 2: Use Device Manager to download the Nahimic driver update

The Device Manager is an in-built mechanism in Windows allowing you to download and install various driver updates. Below is the step-by-step way to use it to get an update for the Nahimic audio driver installed for Windows 10/11.

  • Right-click the Windows icon on the taskbar and choose Device Manager. Open Device manager
  • Click the category of Sound, video, and game controllers to expand the same.Select Sound, Video and Game Controllers
  • Right-click your sound card and select the option called Update driver. Update driver software
  • Search automatically for updated driver software. Windows 11 users may try to Search automatically for drivers. Search Automatically for Updated Driver Software
  • Once the updated Nahimic audio driver is downloaded and installed, you may restart your computer to let it take effect.

Method 3: Update your OS to get the needed driver

Downloading and installing operating system updates also downloads and installs the required drivers (if they are not extremely recent). Hence, you may try the below steps to get the Nahimic driver for Windows 10/11 through an operating system update.

  • Right-click the Windows icon and select Settings from the on-screen menu.
  • Choose the settings for your device’s Update & Security. Clieck on update and security
  • Click on the button that lets you Check for updates. Check for Updates on windows settings
  • Download & install the update available to you.
  • Finally, you may get your computer restarted to let the update take effect.

Also Read: How to Update Audio Drivers on Windows 10 and 11


Method 4: Download the Nahimic driver update via Microsoft Update Catalog

Microsoft Update Catalog offers almost all needed drivers for download and update. Below is the process to get the Nahimic audio driver update for Windows 10/11 from there.

  • Travel to Microsoft’s Update Catalog.
  • Search for Nahimic drivers. Search Nahimic drivers
  • Select Download for the required driver.Select Download for the required driver
  • Now, select the link that you get in the pop-up window.select the link that you get in the pop-up window
  • Click twice on the file that becomes available on your computer.
  • Now, you may follow the directions on your screen to finish the Nahimic driver installation.

Method 5: Download the Nahimic audio driver update automatically (Recommended)

Until now, we guided you through all the manual approaches you can follow to get the latest driver downloaded and installed. As you may agree, manually downloading and installing driver updates requires a lot of patience, effort, technical knowledge, and time.

Hence, we find it better to download and install driver updates automatically through Bit Driver Updater. The Bit Driver Updater program updates all drivers with one click.

Moreover, this software comes equipped with useful features like the creation and restoration of driver backups, acceleration of the speed of downloading drivers, scheduling of scans for out-of-date drivers, and more.

You may experience all the features and benefits of Bit Driver Updater yourself through the link below.

Windows Download Button

After the download and installation, the software scans your device for a few seconds to present a list of outdated drivers. You may click on the button to Update All these drivers instantly.Update all outdated driver of your windows pc

There is also an Update Now tool you may use to update only the Nahimic driver. However, we recommend updating all drivers to get smooth performance from your computer.

Also Read: Best Free Driver Updater for Windows


Nahimic Driver Update Downloaded and Installed

This article walked you through different methods to download the updated Nahimic audio driver and install it. You may follow the method you think is the most convenient for you.

However, if you want to save precious time and effort, we recommend updating drivers with Bit Driver Updater. If you know other time-saving methods to download and install driver updates or have any questions, you may write them in the comments section.

1 Comment
    9 Best Xbox Emulators For Windows PC In 2021 | TechPout says: Reply
    January 1st 2021, 3:26 pm

    […] Also Read: Download Xbox One Controller Driver for Windows 10 […]

Leave a Reply Cancel reply

Your email address will not be published. Required fields are marked *

Sidebar Image bit G ad1

Latest Posts

  • Best third party library for android (1)
    Best Third-Party Libraries in Android 
    by Gunjita Sompura / May 13, 2026
  • vs code extension
    Top 5 VS Code Extensions for Web Development in 2026
    by Gunjita Sompura / May 8, 2026
  • Best Ai Coding tools
    Best AI Coding Tools to Use in 2026
    by Gunjita Sompura / May 7, 2026
  • Top 5 GitHub Alternatives You Should Try Today 
    by Dikshika Singh / May 5, 2026
  • best grindr alternatives
    Best Grindr Alternatives to Use in 2026 
    by Dikshika Singh / May 2, 2026

Categories

  • Cyber Security
  • Driver Updater
  • Entertainment
  • Fitness
  • Games
  • How To
  • laptop
  • OS
  • Reviews
  • Tech News
  • Tips & Tricks
  • Top 10
Sidebar Image bit G ad1
Why is My Xbox Controller Blinking and Flashing - How to Fix it Why is My Xbox Controller Blinking and Flashing? How to Fix itby Niharika / January 5, 2023
Transfer Photos from Mac and Windows PC to iPhone or iPad [With and Without iTunes]by Harshita / January 6, 2023Transfer Photos from Mac and Windows PC to iPhone or iPad [With and Without iTunes]
TechPout Footer Logo

We at TechPout promise to put forth stories that help people to learn and simplify their digital life. Our purpose is to share the true essence of technology with our tech-loving community.

Useful Links

  • About Us
  • Contact us
  • Privacy Policy

Popular Posts

  • Best PC Optimizer Software
  • Best Mac Cleaner Apps
  • Best Driver Updater
  • Duplicate Photo Finder and Cleaner Software
  • Best Free Movie Download Sites
  • Best IPTV Players

Follow us

Copyright © 2026 www.techpout.com. All rights reserved
DMCA.com Protection Status