Don’t know how to connect Xbox One Controller to PC? No need to worry, here are three ways by which you can be able to connect it.
PC gaming offers multiple corsets to the gamers to enjoy an excellent gaming experience. However, Keyboards and Mouse are the preferred bet for many genres. But, a large pool of online gamers believes that controllers can offer them a way supreme-class of digital gaming experience.
Hence, with Keyboard and Mouse, gamers are now heading towards various controllers, one such is Xbox One Controller. Do you have an idea how to connect it? Well, this walkthrough will guide you on the very same.
Ways To Connect Xbox One Controller To PC
Since Microsoft manages both the platforms i.e., PC and Xbox Controller, it is not that tedious to set up a connection between them. There are three ways through which you can pair up your controller to your PC – via Bluetooth, USB Cable, and Wireless Adapters. Let’s read them below!
Way 1: Use Bluetooth To Connect Xbox One Controller To PC
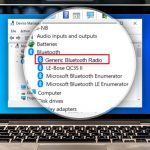
Before you roll ahead to the steps, ensure that your PC and controller both have Bluetooth compatibility. Once you recognize that both have Bluetooth compatibility then follow the steps shared below to connect Xbox Controller to PC via Bluetooth.
Step 1: Ensure that the Bluetooth on your computer is switched on.
Step 2: Now, press and hold the Xbox button to switch on the Wireless Xbox Controller.
Step 3: After this, hold the controller connect button and then release it after 3 seconds.

Step 4: Then, on your keyboard, press Windows and I keys to open Windows Settings.
Step 5: Navigate to Devices and click on it.

Step 6: In the left pane, choose Bluetooth & Other Devices, then click on Add Bluetooth Device & Other Device. Now, choose the Bluetooth device of your Xbox Controller, lastly, click on pair.

Now, your Xbox is connected to your computer via Bluetooth.
Read Also: Best Ways To Fix Xbox One Controller Keeps Disconnecting
Way 2: Connect Xbox One Controller To PC Using USB Cable
Another way to connect Xbox One Controller to a PC is using a USB cable. Through this method, you can connect both wired and wireless controllers. If you have a wireless controller then follow the instructions shared below:
Step 1: If you acquired a wired controller then you can ignore this step. For wireless controllers, connect the one edge of your USB cord into the top USB slot of your Controller.

Step 2: After this, plug the other edge of your USB cord into the USB slot of your Controller.
This is how you can connect Xbox one wireless controller to your computer via USB cable. After performing the above steps, the operating system of your Windows will automatically install all the Xbox controller drivers. Just in case, if it lags in installing the drivers then you need to update the Xbox One Controller drivers.
For updating drivers automatically, one can use Bit Driver Updater. The software finds the correct driver and installs it too without any manual efforts from the user’s end. Plus, it can super-charge the performance of your system by around up to 50%. You can download the Bit Driver Updater for free by clicking on the button below.


Read More: How To Gameshare On Xbox One
Way 3: Connect Xbox One Controller To PC Via Wireless Adapter
Apart from the USB cable or Bluetooth, through the wireless adapter, you can set up a connection. Microsoft has a new flagship called Xbox Wireless Adapter that lets you connect your Xbox One Controller wirelessly to your PC even without the Bluetooth.
However, that comes built-in into a few PCs. But, there may be chances this functionality does not come built-in in yours. In this case, firstly you need to buy an Xbox Wireless Adapter. Below is how to connect Xbox controller to PC via Wireless Adapter:
Step 1: Once you purchased Wireless Adapter, plug it into your computer and hit the button that existed on the top corner of the device to initiate it.
Read More: What Are the Best Driver Updater for Windows 10
Step 2: The above process, automatically downloads and installs all the necessary Xbox One Controller drivers. Just be sure that your controller is all empowered with enough batteries and then press and hold the button for at least 3 seconds presented on the edge of the controller to turn it on.
Step 3: At last, hit the blind button on your controller and you will notice the flash on your Xbox controller. Then, your wireless adapter also flashes for a few moments and then goes stable.
Finally, your controller is connected to your Windows PC.
Connect Xbox One Controller To PC – [DONE]
That’s all, now your Xbox Controller is connected to your PC. The walkthrough has guided you on how you can connect Xbox to PC monitor hassle-free. We hope now you may enjoy the classy gaming experience on your PC. If there is something you want to share with us then feel free to tell us in the comments below. We look forward to your suggestions. Plus, let us know the way you connected the controller to your PC in the comments section. Before you leave, do subscribe to our Newsletter.
![Fixed: Black Screen Problems on Windows 10 [Solved]](https://wpcontent.techpout.com/techpout/wp-content/uploads/2020/02/18182734/Fix-Black-Screen-Problems-on-Windows-10.jpg)