How to Fix Sony Vegas Keeps Crashing on Windows 10, 8, 7
A detailed troubleshooting guide on how to fix Sony Vegas keeps crashing on Windows 10, 8, 7 PC. Read on the entire write-up for a better understanding.
Undoubtedly, Sony Vegas is one of the most powerful video editing applications available out there. It helps you create and edit the videos before posting or uploading them on social media platforms like YouTube. And, thousands of YouTubers prefer to use this complete editing software package for ease of use. However, we have seen numerous reports complaining about Sony Vegas not functioning properly.
Do you also use Sony Vegas for video editing? Does the software lag in responding as expected? If yes, then you are not all alone. Fortunately, you can easily fix the issues like crashing, lagging, or freezing of a professional video editor, Sony Vegas.
This article has included some of the best and effective resolutions to fix crashing issues with Sony Vegas on Windows 10, 8, 7 PC.
Most Workable Solutions to Fix Sony Vegas Keeps Crashing on Windows 10, 8, 7 PC
Check out the list of most recommended solutions by tech experts to fix Sony Vegas crashing on your Windows computer.
Solution 1: Erase Temporary Files in Windows PC
If you have unnecessary temporary log files on your computer then you may face crashing issues while running Sony Vegas. Removing all the temporary log files could increase your PC performance, also, help Vegas run more smoothly. Below are the simple steps to erase temporary files in Windows PC.
Step 1: Using a keyboard combination (Windows Logo + R) launch the Run Dialog box.
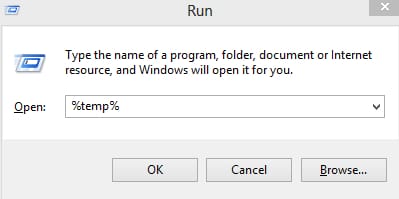
Step 2: Next, input %temp% in the run box and click on the Ok button. Or, you may also hit the Enter key to proceed further.
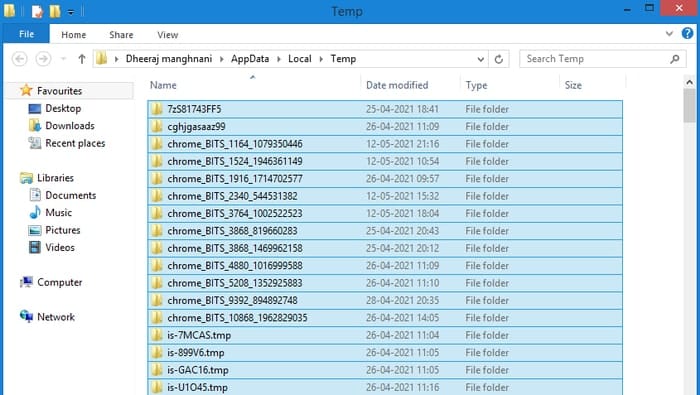
Step 3: Now, altogether press CTRL + A keyboard keys to select all temporary files, then make a click on the selected files and click on the Delete option from the prompted list. Alternatively, you can also hit the Delete button on your keyboard.
Step 4: Once done, reboot your computer to apply the new changes.
After that, try to access Sony Vegas, just to see if it still crashes. If this fix doesn’t help you, then move on to the next troubleshooting tactic.
Also Read: 9 Best Free Video Editing Software With No Watermark
Solution 2: Set Priority for Sony Vegas
Another way to fix Sony Vegas not responding is by assigning a higher priority. Microsoft lets its users set priority for the applications installed on their computer system. Allowing higher priority to Sony Vegas helps it to use more rights and system resources. Here is how to do that:
Step 1: On your keyboard, simultaneously press Windows + R keys to open the Run Dialog Box.
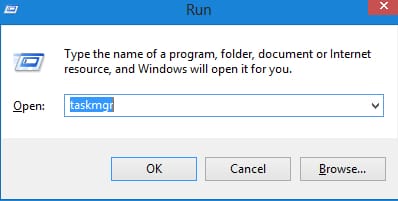
Step 2: In a prompt, type taskmgr and press the Enter key.
Step 3: This will take you to the Task Manager window, where you need to switch t.o the Details tab.
Step 4: Navigate to the Sony Vegas and click right on it.
Step 5: Click Set Priority from a quick access menu list and then click High.
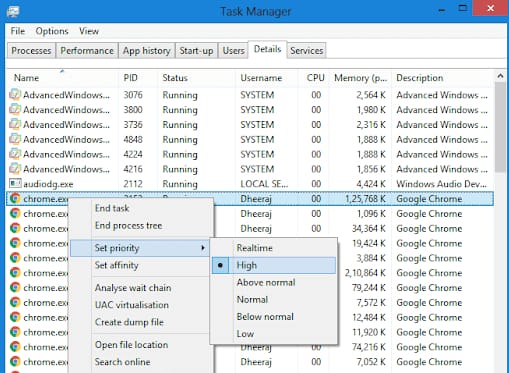
After assigning the higher priority to Vegas Pro, try to run the application and check whether the issue is resolved or Sony Vegas keeps crashing on your Windows PC.
Also Read: Best Free Photo Editing Software for Photographers in 2021
Solution 3: Update your Graphics Card Driver
If you are using old, broken, or outdated GPU drivers, then you may encounter numerous problems including crashing, freezing, or lagging. Hence, you should keep your graphics card up-to-date, to ensure its proper functioning.
In order to update your outdated drivers, you have two options, either do it manually or automatically.
Manual Driver Update: To update outdated graphics manually, you will need to visit the official manufacturer of the graphics card drivers like NVIDIA, INTEL, AMD, Asus, etc. Then, choose the driver file that is compatible with your Windows operating system.
Automatic Driver Update: Unable to search for the correct GPU drivers manually? Don’t worry, use Bit Driver Updater to automatically find, download and install the most suitable drivers for your device. Bit Driver Updater is a well-known solution to repair faulty, broken, or outdated drivers on your Windows PC. Unlike others, it only takes one click to update all outdated drivers. To use this software, follow the steps outlined below:
Step 1: Download and install Bit Driver Updater.
Step 2: Run the driver updater utility on your computer and wait until it finishes scanning and prompt you with a list of outdated drivers.
Step 3: Click on the Update Now button presented next to the driver you want to update.
Step 4: Else, click on the Update All option to install the latest version of all drivers in one click.

Thus, one can easily & quickly install all the latest driver updates on Windows PC. In order to unleash the overall strength of Bit Driver Updater, it is necessary to rely on the pro version.
Note: It is worth noting that the support team of Bit Driver Updater provides 24/7 technical support to its users with the pro version. Also, possesses a 60-days complete money-back guarantee.
Also Read: 10 Best GPU Benchmark Software For Windows In 2021
Solution 4: Change Processor Settings
Still, Sony Vegas crashes when adding effects? Don’t worry, try to change processor settings as a final resort. Follow the steps below to carry out this solution:
Step 1: Click right on your Taskbar and then choose Task Manager from the quick access menu list.
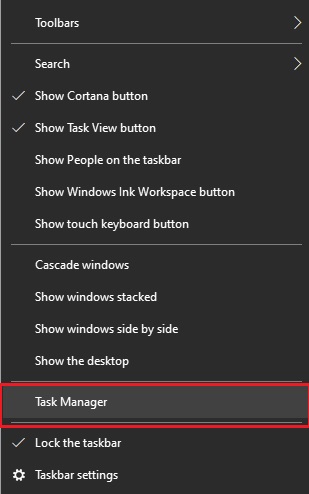
Step 2: In the Task Manager window, head to the Details tab, and search for Vegas Pro.
Step 3: Right-click on the Sony Vegas and next click Set Affinity.
Step 4: Now, you can decrease or increase the number of CPU cores for this application as per your preference.
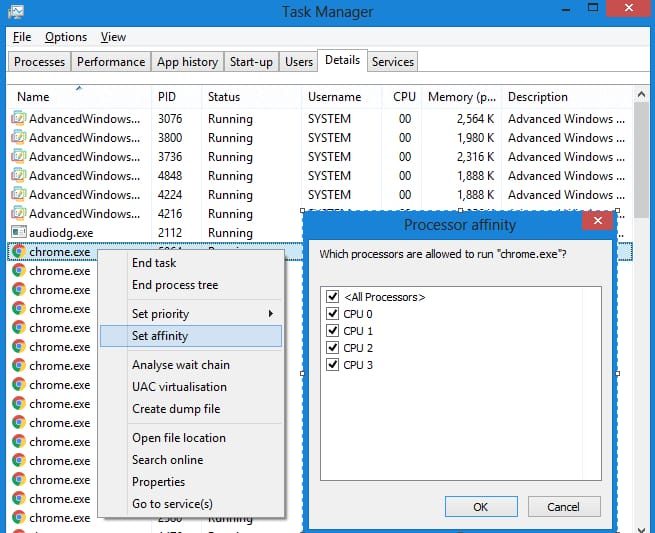
Additionally, if you see any box that remains unmarked, then you can mark all CPU cores. After doing so, run the program to check if the Sony Vegas keeps crashing fixed. Hopefully, the issue will be resolved.
Also Read: 13 Best Free CPU Benchmark Software For Windows In 2021
Sony Vegas Keeps Crashing on Windows 10, 8, 7: SOLVED
So, these aforementioned solutions have got positive reviews on the gaming forums and therefore are suggested to try. Furthermore, keeping your graphics drivers or other PC drivers updated is the sure-shot way to make sure that your system doesn’t produce minor problems and errors, also Bit Driver Updater is the best way to perform the same task.
We hope the troubleshooting guide of how to fix Sony Vegas keeps crashing on Windows 10, 8, 7 helps you. Please let us know through the comments if you have any queries or additional information. For more updates, do subscribe to our Newsletter and follow us on Facebook, Twitter, Instagram, and Pinterest.


