How to Fix AppHub Requests Processing on Android Phones
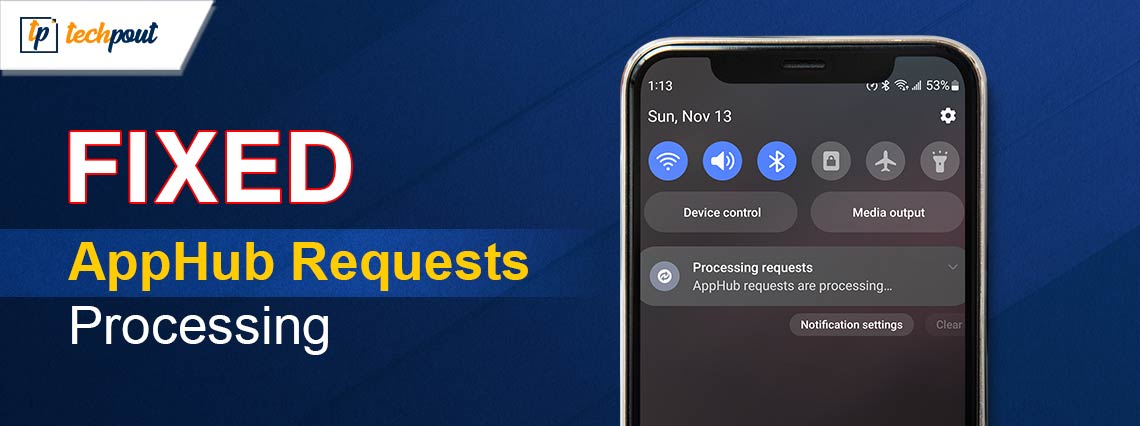
AppHub problems like requests processing notifications are easy to fix. You can go through this guide to learn the quickest and easiest ways to fix them.
AppHub helps developers upload and distribute various applications through a centralized repository. This service forms a Google Play Console component. However, it may sometimes run into problems, such as the AppHub requests processing.
Are you also experiencing a similar issue on your Android phone? If yes, do not panic. You have come to the right place. We understand how disruptive this problem can get. Hence, we have deeply researched the issue to find the best solutions.
However, let us first shed some light on the problem before jumping into troubleshooting to help you solve it better.
What Is AppHub Requests Are Processing
AppHub or Carrier Hub is a pre-installed application on Android phones to manage various services related to the carrier and your phone settings. This app aids the management and distribution of software. Moreover, this app allows you to manage connected devices, customize your phone, and configure WiFi hotspots.
The AppHub requests processing notification indicates your device’s inability to perform network signal detection to connect to the application or the internet, resulting in failed processing requests. Though the problem sounds unmanageable, it has some quick and easy solutions. Let us walk you through them in the subsequent sections of this guide.
How to Fix AppHub Requests Processing Problem
You can solve the AppHub problem in the following tried and tested ways.
Fix 1: Check your data connection
You may experience Samsung’s “AppHub requests are processing” issues because of poor data connectivity or network coverage problems. Hence, ensuring a strong network coverage or data connection helps fix the issue. If your phone’s network bar shows poor signal quality, go to an area with good coverage and check the internet connection. Mobile data users can turn the Airplane mode on and off or switch to another WiFi network.
Also Read: How to Fix Google Discover Not Working on Android and iPhone
Fix 2: Delete AppHub cache and data
Accumulating old and incorrect data or cache is another factor contributing to AppHub requests processing notifications. Hence, you can delete the cache and data by following the below directions to solve the problem.
- Firstly, you are required to open your phone’s Settings.
- Secondly, choose Apps from the available settings.
- The Apps now appear on your screen. Find and tap on the CarrierHub application.
- Now, you will get the App info. Choose Storage from the available options.
- Next, tap on the Clear Data and Clear Cache options.
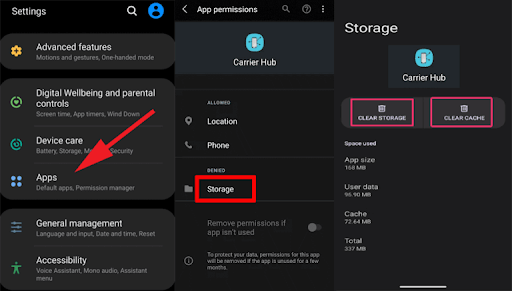
- You will be asked for confirmation. Tap Delete to proceed to the next step.
- Lastly, repeat the above steps for the AppHub application.
Fix 3: Update the application
The Carrier Hub version on your phone may be outdated, leading to the AppHub requests being processing notifications. Thus, you can update the app by navigating through the following path to resolve the problem.
- To begin with the process to update the application, open the Google Play Store.
- Next, choose your profile from the upper-right corner of the Play Store screen.
- Select the Manage apps & devices option from the menu on your screen.
- Tap Update Available to view the applications you can update on your phone.
- Next, find Carrier Hub in the list of applications and tap on the Update button.
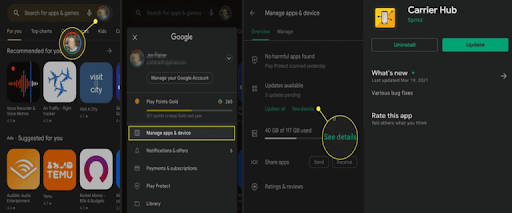
- Lastly, wait for the application to get updated.
Also Read: How to Enable WiFi Calling on Android & iOS Smartphones
Fix 4: Disable the Carrier Hub notifications
You will not get the annoying AppHub notifications if you disable them. Hence, here is how to disable the notifications for this application.
- Firstly, navigate to the phone’s Settings.
- Next, find and tap on Notifications.
- You can now choose App Notifications from the available options.
- Locate and choose AppHub and CarrierHub.
- Lastly, turn off the notifications toggle for these applications.
Fix 5: Use the Android Debug Bridge (ADB) to uninstall the application
Uninstalling the Carrier Hub app can fix the problem you are struggling with. However, since the uninstallation option for this application is generally disabled, you are required to uninstall it with ADB by following these steps.
- The first step is to open the Settings app.
- Secondly, choose About Phone from the available settings.
- You can now view the Software Information.
- Next, tap the Build number seven times.
- If prompted, input your pin or pattern to enable Developers Options.
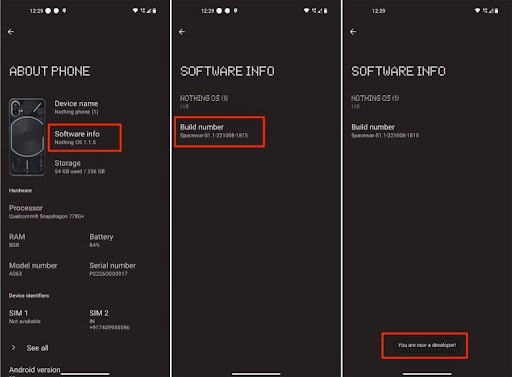
- Return to the System settings and tap the Developers Options to view them.
- You can now toggle on the USB Debugging switch.
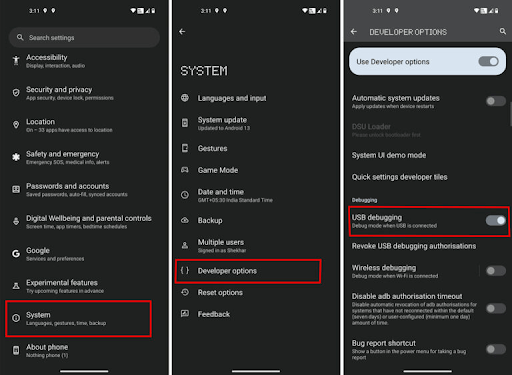
Note: After performing the above steps, perform the following steps on your computer.
- Get the “Platform-tool” (ADB and Fastboot drivers) downloaded on your PC.
- Extract the file you downloaded in the previous step.
- After entering the “platform-tools” folder, move the “platform-tools” folder to your system’s C drive.
- Now, use a USB cable to get your handset connected to your computer and wait until the system detects it.
- Press and hold the Shift key while right-clicking a blank space inside the platform-tools folder.
- Select the Open Powershell window here from the context menu.
- Next, click Yes to grant administrative privileges.
- Now, input the adb devices command in the command line and press Enter.
- You can now copy and paste the adb shell pm uninstall –user 0 com.sprint.ms.smf.services command in the command line and hit Enter.
- Wait for a few seconds before disconnecting the device and USB cable from each other.
- Lastly, restart your handset and uninstall the Carrier Hub application.
Also Read: How to Fix McDonald’s App Not Working on Android and iPhone
Fix 6: Try disabling the Carrier Hub application
Disabling the application is yet another way to drive the issue away. Hence, here is how to disable the app.
- Firstly, open Settings on your phone and choose App Management from the on-screen options.
- Secondly, tap the three-dot icon and select the option to Show System Apps.
- Next, choose the Carrier Hub and tap App info.
- Lastly, tap Disable to get the application disabled.
Fix 7: Factory reset your device
If none of the above fixes work, factory resetting your phone is the last resort. However, remember to back up your data before following these steps to reset the phone.
- The first step requires you to launch the Settings app.
- Secondly, choose General Management from the above settings.
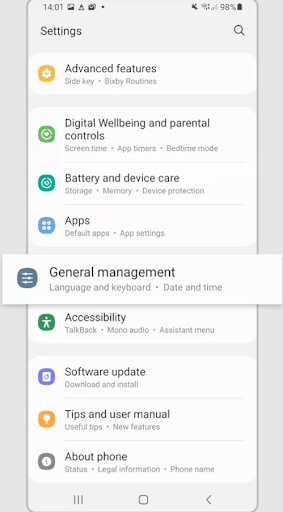
- Select Reset from the on-screen options.
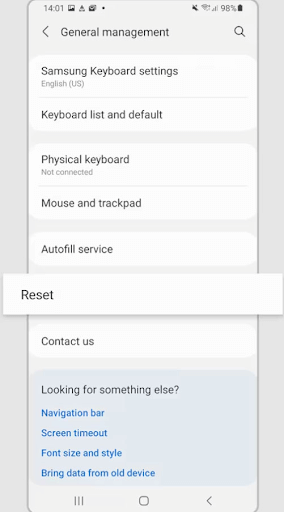
- Choose Factory data reset to reset your phone to its factory default settings.
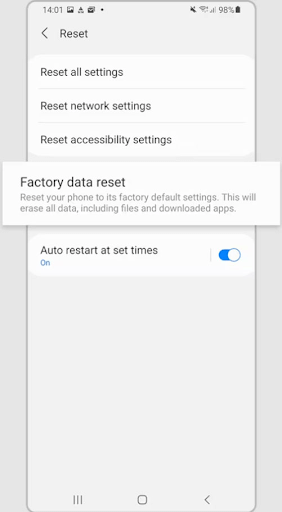
- Lastly, tap Reset and choose Delete All to complete the reset process.
Also Read: How to Fix Screen Overlay Detected Issue on Android
AppHub Requests Processing Issue Fixed
So, these were some effective solutions to your problem. We hope one of these fixes worked to help you fix the issue. However, please write us a comment if you have any questions, confusion, or tips to improve this article. Let us now take your leave with a promise to see you soon with another helpful guide to fix another annoying tech issue.


