Not Enough Quota is Available to Process This Command (Fixed)
This article acquaints you with the quickest and easiest solutions to the Windows quota error.
Windows computers have a plethora of unique features. For example, there is a Windows disk quota to limit the disk space you can use. However, it becomes highly frustrating when you get the “not enough quota is available to process this command” 0x80070718 error out of nowhere when you are busy performing crucial tasks on your computer.
Since you have found this article, you can stop worrying about this annoying issue. Here, you will understand how to fix the Windows quota problem quickly and easily. Let us begin by understanding the possible causes of this problem to make troubleshooting as easy as a walk in the park.
What Ca uses “Not Enough Quota Is Available to Process This Command” Error
Below factors may be responsible for the issue you are experiencing.
- Background applications hog system resources
- Low disk usage limit
- Small paging file size
- Your default save location is on an SSD drive
After looking at what may have caused the issue you are experiencing, let us learn how to solve the problem.
Fixes for “Not Enough Quota Is Available to Process This Command” Problem
Here are the solutions you can apply to solve your Windows quota problem.
Fix 1: Change the disk usage limits
Low disk usage limit may be a reason there is no space available to accommodate the file you wish to transfer. Hence, you can follow the below steps to increase the disk usage limits to fix the “Not enough quota is available to process this command” error.
- To begin with, input the Control Panel in Windows search and select it from the on-screen results.
- After opening the Control Panel, change the view to Small icons or Large icons.
- You can now navigate to the Sync Center.
- Choose the option to Manage offline files from the left panel of the on-screen window.
- Navigate to the Disk Usage tab and select the option to Change limits.
- You can now use the Maximum amount of space all offline files can use and the Maximum amount of space temporary files can use sliders to increase the disk usage limits.
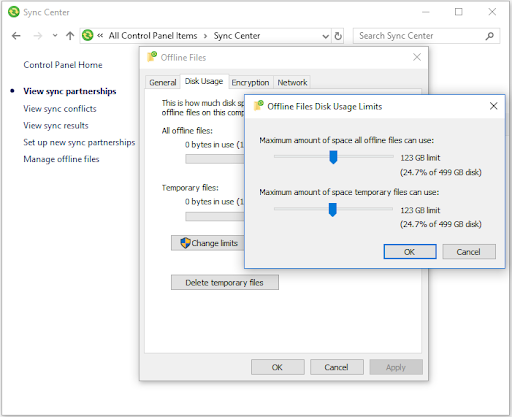
- Navigate back to the Offline Files window and select Apply.
- Click on the OK button to proceed to the next step.
- Lastly, you can reboot your computer to complete the process.
Also Read: How to Fix ‘Antimalware Service Executable’ High CPU Usage
Fix 2: Close background applications
If you have too many background apps running on your PC, these applications will eat up system resources, including your disk quota. Hence, you can close the unnecessary background applications to fix the issue. Here are the steps to do it.
- Firstly, use the Windows+S keyboard shortcut to access the search box.
- Secondly, input Task Manager in the on-screen box.
- You can now select Task Manager from the search results to open it.
- After opening the Task Manager, navigate to the Apps segment.
- Now, select the application you want to close and click on the End Task button.
- Repeat the above steps for all the unnecessary applications.
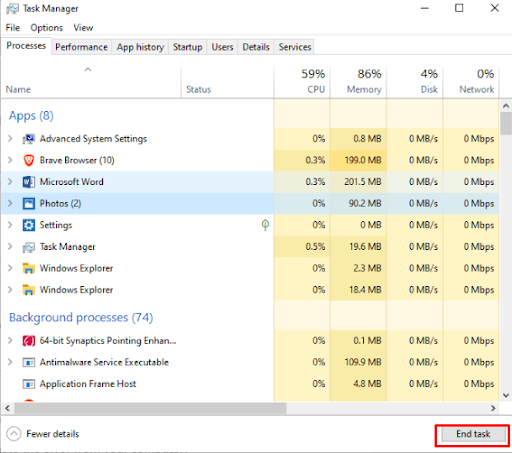
- You can now exit the Task Manager and restart your computer.
Fix 3: Change the default save location
Changing the default save location can solve the problem if the file showing the “not enough quota is available to process this command” Windows 10/11 error is saved on an SSD drive. Hence, here are the directions to change the save location.
- To begin with, access the Run tool using the Windows+R keyboard shortcut.
- Secondly, input ms-settings:savelocations in the on-screen box and press the Enter key.
- You can now navigate to the Default Save Locations window.
- Change the default drive for saving to a traditional HDD. You can do so by using the drop-down menu connected to every kind of folder present in the Default Save Location window.
- Click on the Apply button connected with all folders for which you have changed the default location in the previous step.
- Lastly, you can restart the PC to finish the process.
Also Read: How to Fix Ntoskrnl.exe High CPU and Disk Usage in Windows 10, 11
Fix 4: Try changing the paging file size
In your Virtual Memory settings, if the paging file size is set as small, you may experience quota problems. Thus, you can follow the below directions to change the paging file size.
- Firstly, open the Control Panel using the Windows search function.
- You can now change the Control Panel view to Small icons.
- Now, navigate to the System option.
- Choose the Related system settings from the right pane and select the Advanced system settings.
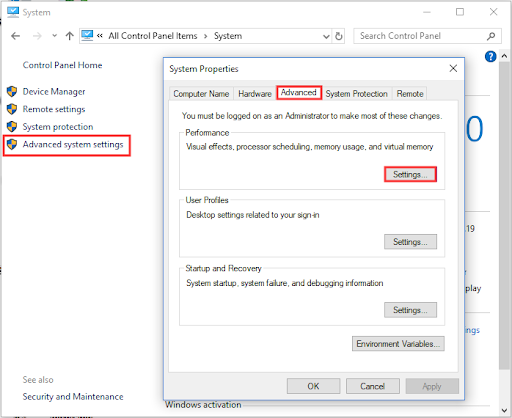
- Select Settings from the Performance section.
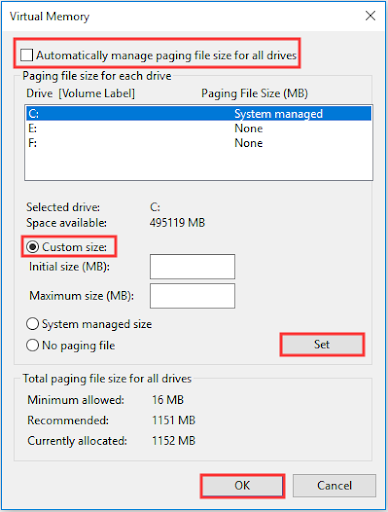
- Navigate to the Advanced tab and choose Change.
- Unselect the option to Automatically manage paging file size for all drives.
- Now, input the Initial and maximum sizes in the custom size section.
- Click Set and OK to save the changes.
- Lastly, restart your computer.
Also Read: How to Fix Windows 10, 11 Memory Leak Issue
“Not Enough Quota Is Available to Process This Command” Windows Error Fixed
Hopefully, this article helped you solve the quota problem. However, leave us a comment if you have any questions or suggestions about this write-up. Also, remember to bookmark this blog and subscribe to our newsletter to get notified when we come up with another helpful tech guide.


