Logitech Web Camera Drivers & Software Download For Windows 10, 11
Read to learn about the non-cumbersome methods to find, download, and install Logitech web camera drivers for Windows 10, 11.
The brand Logitech produces the majority of the world’s most popular computer accessories. Logitech hardware, such as mouse, webcams, keyboards, and other accessories, is very well-known among Windows PC users across the globe. However, in order to maintain the reliability of Logitech devices, you will need to install the appropriate driver file. And, in the case of already installed drivers, you need to ensure that they are updated to their latest version.
We have lately received a large number of complaints from users reporting that the Logitech camera is not functioning as expected. If you are also having this problem, then you are not alone. Numerous customers all around the world have reported experiencing the same problem with the Logitech webcams they have purchased and used. The good news is that this annoyance may be solved by simply upgrading the Logitech web camera drivers.
Recommendation on How to Update Logitech Webcam Driver on Windows 10
If you do not have much time and patience to download and install the latest driver for your Logitech webcam manually, then you can do it automatically with Win Riser Driver Updater. This easy-to-use utility scans every nook and cranny of your computer for potential driver problems and repairs them automatically for better hardware compatibility and peak performance.
Now, if you are concerned about how one may do this, then don’t worry; we have prepared this driver downloading guide especially to educate you on how to get the most recent version of Logitech web camera drivers for Windows 10, 11.
Different Ways to Download, Install, & Update Logitech Webcam Drivers on Windows 10, 11
On a computer running Windows 10, 11 you may download the Logitech web camera driver using one of three different approaches provided below. Have a look at them!
Method 1: Manually Download the Logitech Webcam Driver from the Company’s Official Website
You may perform the Logitech webcam driver download for Windows 10, 11 manually using the manufacturer’s official website. However, bear in mind that in order to use this strategy, not only do you need a suitable amount of time, but you also need experience in the technical field. For this task, you can follow the instructions below:
Step 1: To begin, go to the official Logitech website.
Step 2: After that, choose the Support tab from the menu.
Step 3: Next, choose Downloads from the drop-down menu.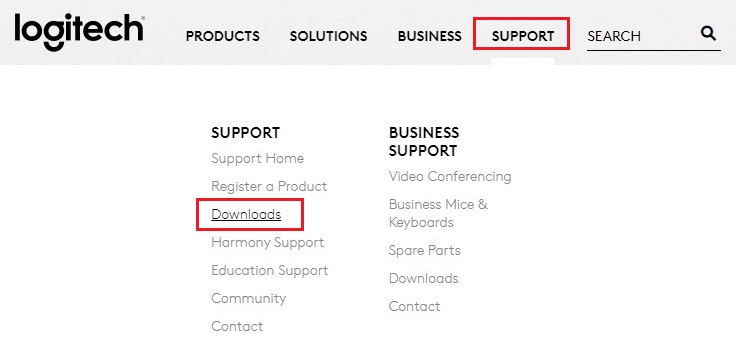
Step 4: Then, go to the Find Your Product area, and from there, choose Webcams & Camera Systems to proceed to the next step.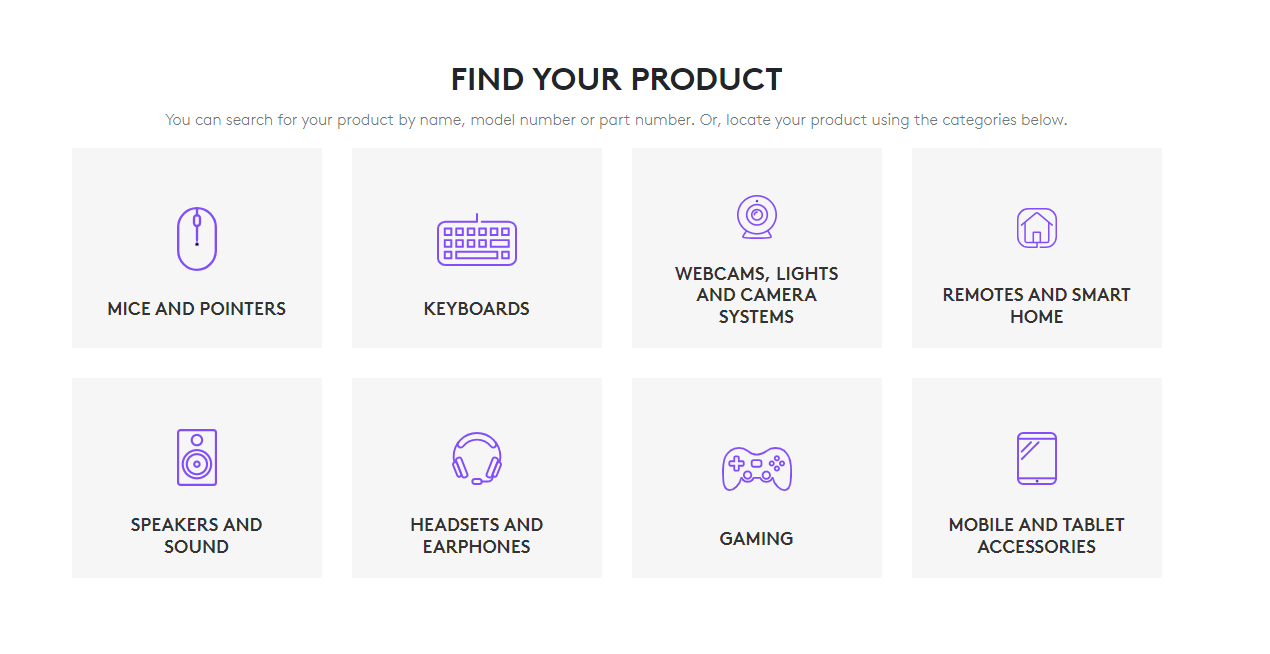
Step 5: Now, inside the search box, type either the name of your Logitech camera or the serial number of the webcam for which you need to update the drivers.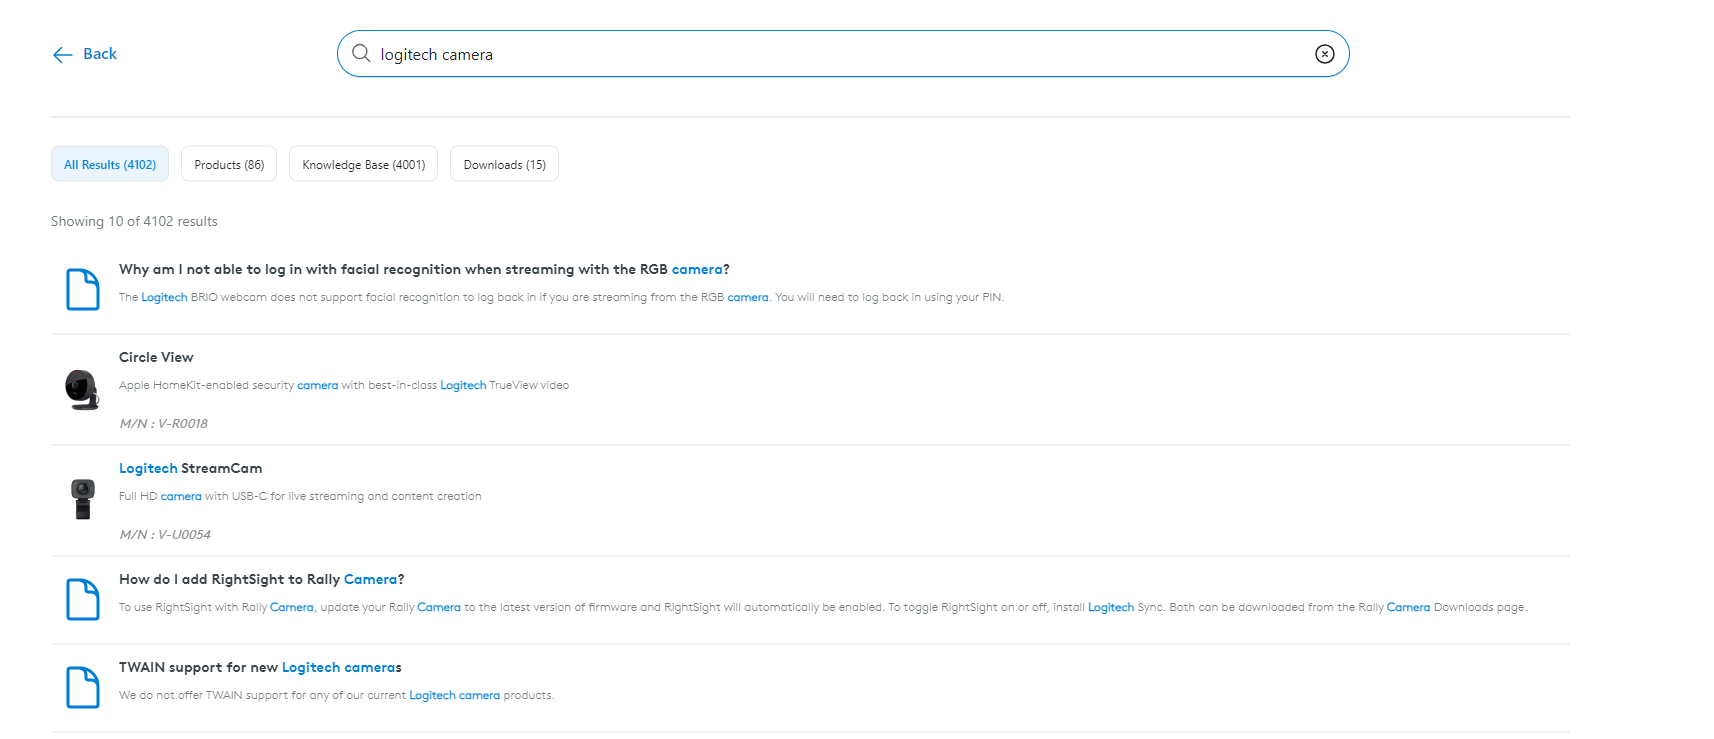
Step 6: In the new window, go to the Downloads area, and then click the option that says “Download Now.”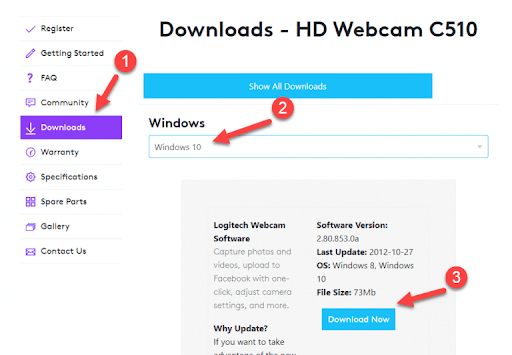
Step 7: You will complete installing the driver by running the set-up file and following the instructions that appear on the screen.
Step 8: To save new Logitech web camera drivers, you will need to reboot your computer system.
Also Read: Download, Install and Update Logitech HD Webcam C270 Drivers for Windows
Method 2: Use Win Riser Driver Updater to Automatically Install Logitech Webcam Drivers (Recommended)
You may use Win Riser Driver Updater to automatically perform Logitech webcam driver download for Windows 10, 11. This method is completely risk-free. If you lack time or technical skills, then this is one of the best methods for you to install the latest driver updates on a Windows PC. It is the most well-known driver updater program in the world, and it can repair all of your outdated drivers with only one click of the mouse.
You will get access to more sophisticated features of the program if you purchase the premium edition of this utility. Some of these features include scan scheduling, driver updates with a single click, round-the-clock technical support, and other features. On the other hand, the free edition of the driver updater tool only provides access to the most fundamental functions.
Not only that, but with the assistance of this utility, you can also repair other problems associated with Windows, such as the lack of security updates, blue screen of death errors, frequent system malfunctions, and a lot of other problems.
Now, you are probably wondering how to install the Logitech web camera driver for Windows 10, 11 using Win Riser Driver Updater. Then you don’t need to search any further since we’ve provided a tutorial for the same thing below.
Step 1: From the button below, download and install Win Riser Driver Updater.
Step 2: Once installed, launch it on your device and let it scan your device for problematic and outdated drivers.
Step 3: Wait for the scanning to be completed, after that, check the scan results.
Step 4: Click on the Fix Issues Now button to update all available drivers including the Logitech web camera driver.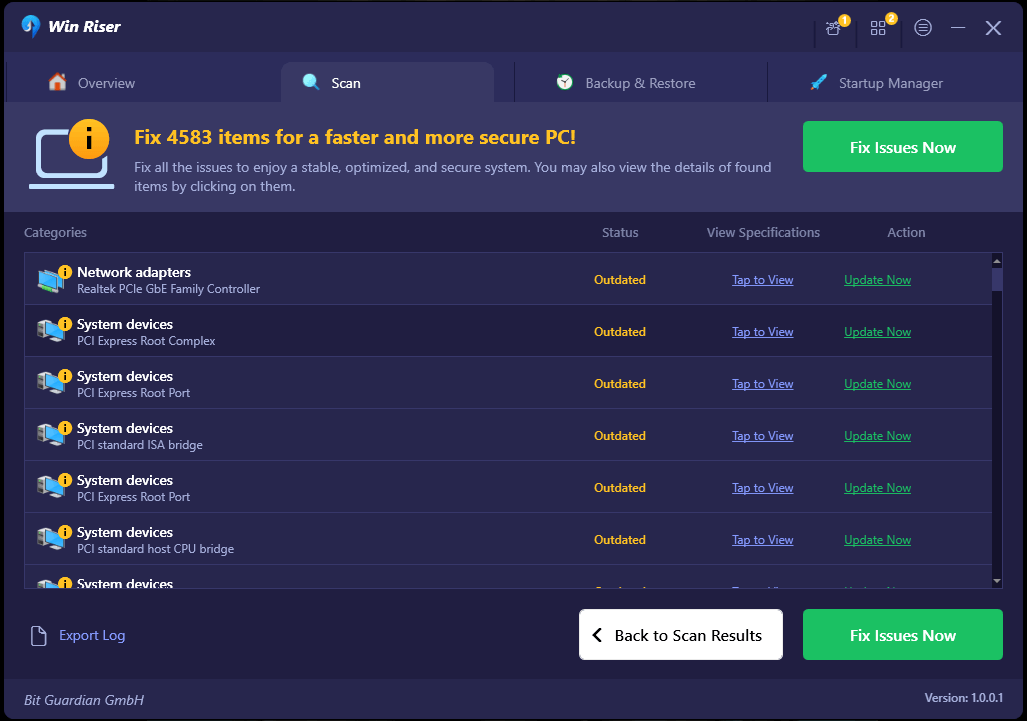
To apply recent changes, simply reboot your device. See how simple and quick it is to update drivers using Win Riser Driver Updater.
Also Read: Logitech C920 Webcam Drivers Download & Update for Windows 10
Method 3: Update Logitech Webcam Driver in Device Manager
Downloading the Logitech camera driver on Windows 10, 11 may also be done using the built-in utility tool known as Device Manager that comes with Windows. To update the drivers for your Logitech webcam using Device Manager, follow these steps:
Step 1: Open the Run dialog box on your computer by simultaneously pressing the Windows logo key + R key on your keyboard.
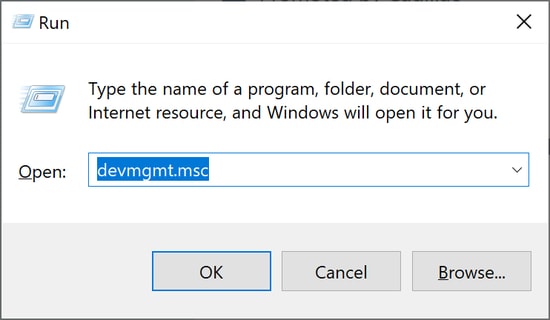
Step 2: Then, type “devmgmt.msc” in the run box and press the “Enter” key.
Step 3: This will take you to the Device Manager window. Once you’re there, expand the Imaging Devices area so that you can see all of your options.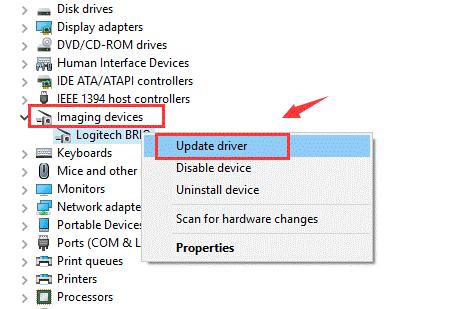
Step 4: After that, right-click on your Logitech webcam and choose Update Driver Software.
Step 5: Next, click on Search Automatically For Updated Driver Software to proceed.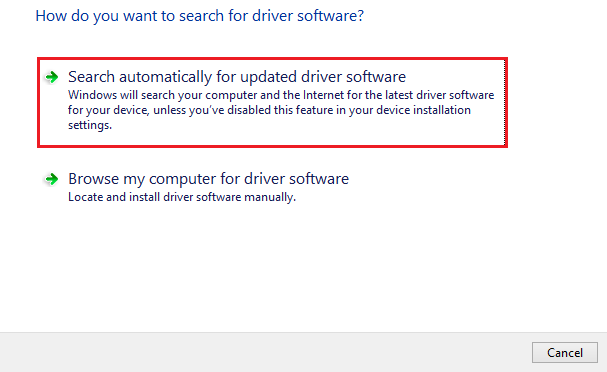
Now, Device Manager will search for the most authentic Logitech webcam drivers for Windows 10, 11 and then automatically install them too.
Also Read: Logitech MX Master Software Free Download, Install, and Update
Method 4: Run Windows Update to Install Logitech Webcam Driver
You can also use Windows service to find and install the latest drivers as well as other system updates. To perform the Logitech webcam driver download, follow the steps below:
Step 1: Press Windows + I to open the Windows Settings menu.
Step 2: Then, choose the Update & Security option.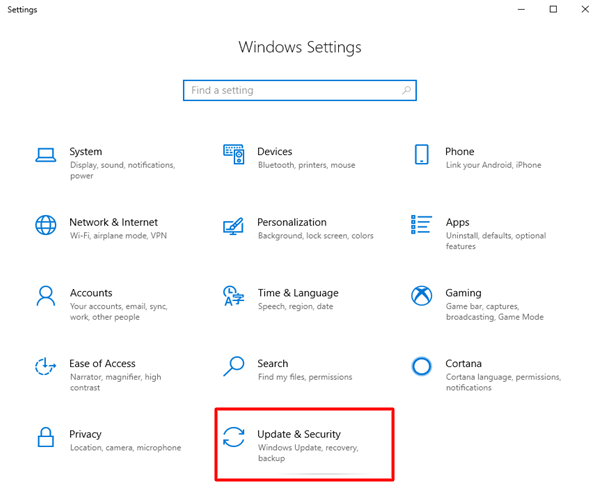
Step 3: After that, be sure to check Windows Update is selected from the left menu pane.
Step 4: Next, click on Check For Updates.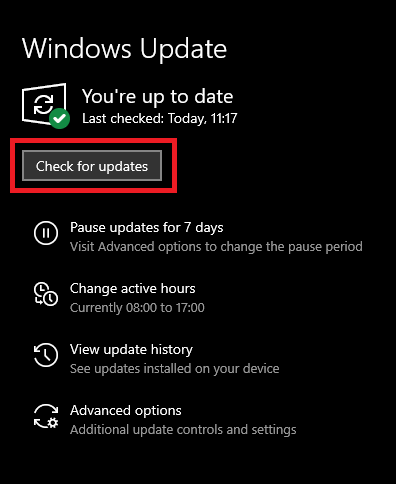
Now, wait until Windows locates, downloads, and installs the system updates including the Logitech webcam driver for your device. Once everything is done, you need to simply reboot your device to save new changes.
Also Read: How to Fix Logitech Webcam Microphone Not Working
Logitech Webcam Driver Download & Update on Windows 10, 11: Done
In sum, the above shared are some powerful and easy-to-use methods to find, download, and install the latest Logitech web camera driver updates on Windows 10, 11. You can choose either of the following options. However, in our opinion, you should utilize Win Riser Driver Updater to automatically install the latest and compatible drivers on a Windows PC.
So, that’s all! We hope you liked the information provided in this article. But, if you have any questions or better tips regarding the Logitech webcam driver download, then please feel free to drop them in the comments section below.
Additionally, for more tech-related information, you can subscribe to our Newsletter and follow us on Social Media.

