How To Get Blue Tick On Instagram: A Step-By-Step Guide

Do you ever wonder if you could just dive into the celeb feels with a blue tick crowning your username? Yes, the same blue tick which smoothes the way to more influential reach and grips ample followers every single day. If your answer is yes, then you must know as much of a demanding job it may appear to be, here are tips to help you know How to get a blue tick on Instagram.
What Does the Blue Tick on Instagram Mean?
The blue tick on Instagram is probably one of the most sought-after goals in the world to many. It can easily make you smitten and consistent to earn it for many justified reasons.
This blue tick, a verification badge next to the username, confirms the authenticity of an account which may belong to a famous figure, brand or organisation. It is primarily used to distinguish fake accounts from the real one to avoid the exploitation of an established name/entity and it helps users to search for celebrities or brands in one go.
Instagram’s blue tick proves beneficial to influencers and businesses to promote and establish the brand value among the target audience.
Read Also: How to Post on Instagram from Mac or Windows PC
How to Get a Blue Check on Instagram?
Unlike what used to follow a few years ago, you finally have the freedom to apply for that little blue tick instead of just staring at your Instagram and hoping for that blue tick to appear magically on your username.
Of course, no desired fruit has ever been reaped with without the deal of efforts and patience. It is okay if you are not Taylor Swift, you simply have to apply to get a blue check on Instagram. Here is how you can apply for Instagram’s verified badge:
Step 1: Open your Instagram account. Go to the ‘Settings’ section and click on the ‘Account’ option.
Step 2: Now you will see the ‘Request Verification’ option, click on it.
Step 3: As you click on verification, you will be directed to the application request page where you will be asked to fill out the following details:
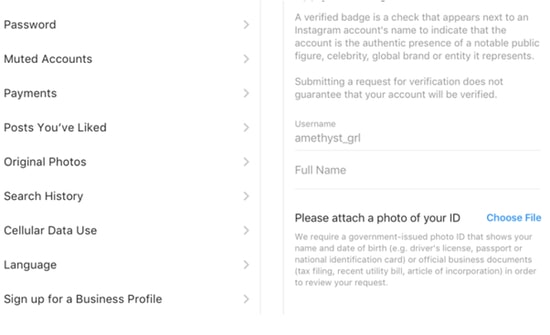
- Username
- Full Name
- Known as: Here you have to write the name/tag that you or organisation is known as.
- Account Category: You will be given a list of categories to select one from. (Including News/Media, Fashion, Blogger and Brand.)
- A picture of your government-issued photo ID
Step 4: Once you have finished filling out the information, Hit send.
Instagram will review your request. Be patient and do not expect the notification overnight since it can take about 30 days to get notified if your blue “verified” checkmark request has been successful or not.
Read Also: Best App to Get Instagram Followers for Free on Android & iOS
Tips to Improve the Chances of Getting Blue Badge
Instagram does not approve every verification request and while there is a chance that you may not make it there, you must keep note of your contribution to public interest and secondly, your profile must attract followers that impact the status of your verification request.
How many followers do I need to get verified on Instagram?
What are the must-have(s) to get a blue checkmark icon on Instagram?
With an urge to see that blue tick next to your username, ending up on such questions is no big deal. While there is no set count of followers to get verified on Instagram, there are some checks that you should never skip.
Take a walk down this To-do of getting verified on Instagram:
1. Follow Instagram’s Guidelines
Before you begin to build your Instagram profile and apply for verification badge on Instagram, you must educate yourself about Instagram’s Terms of Service and Community Guidelines and make sure that you completely adhere to them. It will only increase your chances of getting a blue tick.
2. Be Authentic
Creating a genuine profile on Instagram is not only important to boost credibility but also accelerates the chances of getting a blue tick. From name to every single post on your profile should depict what you have got to offer to the public.
3. Be Public
Make sure that your Instagram profile is viewable to everyone and if it is not, then set it to Public by going to privacy settings. It is important as Instagram does not approve verification of private accounts.
4. Complete Your Profile
The viewers should be made aware of what they are being offered by visiting your page. Make sure you fill out information related to you or your organization to let the audience get insights about you. Add your website’s link, write a bio to suffice your introduction and keep your posts as unique and useful as they can be.
Read Also: How Do You Know When Someone Unfollows You on Instagram
What if you Get Rejected?
It is okay if your request of Instagram’s verification badge does not get approved. The silver lining is that you can reapply for Instagram’s blue badge after 30 days. In the meantime, you can focus on chiselling the complete presence of your Instagram profile and stiffen it to stand high chances of getting that blue tick.
Conclusion
Getting Instagram’s blue verification badge may be out of your reach but you can put your best efforts to ensure your eligibility by being consistently active and by earning genuine followers. You must always come up with engaging posts and get more connected by putting stories on your page to build strong communication with your followers.
What do you think about this article? You may want to jump to the comment box and tell us if you have applied for Instagram’s verification badge. Was it a success? Share with us.
