How to Fix Realtek Audio Not Working in Windows 10,11
Do not panic if you are experiencing issues like sound or Windows 11/Windows 10 Realtek audio driver not working. All these problems are easily fixable with the 9 effective solutions shared in this article.
Imagining a soundless computer is nearly impossible. We all need sound on our computers for various purposes, like gaming, calls through the webcam, and so on. However, recently many users reported an annoying issue where Realtek audio is not working.
If you are also facing similar issues, firstly, do not panic as the Windows 1 1/Windows 10 Realtek sound not working is effortlessly fixable. All you require is the quick and easy fixes shared in this article to drive this problem away.
However, before discussing how to fix the Realtek audio issues, it is crucial to know why the sound is not working in the first place. If you understand what caused the problem, fixing it becomes easy as pie.
Why Is Realtek Audio Not Working
The following are the reasons Windows 11/Windows 10 Realtek sound stopped working.
- Outdated Realtek audio driver
- Active audio enhancement
- Windows audio service not working correctly
- Conflicts with the Microsoft UAA Bus Driver
- Issues with the current sound format
- Improperly installed/incorrect sound driver
- Incorrect output device
Above were some causes behind Windows 11/Windows 10 Realtek audio problems. Let us now discuss how to fix these issues.
Fixes for the Realtek Audio Not Working Problem [2022 Guide]
You may try the following solutions to get rid of the Realtek sound not working issues on Windows 10/11.
Fix 1: Turn off audio enhancements
Audio enhancement changes may interfere with Realtek audio, causing issues like the Realtek audio not working on Windows 11/10. Therefore, it is better to disable audio enhancements. Below are the step-by-step directions to do it.
- Right-click the system tray’s volume icon.
- Open sound settings.
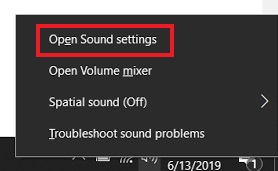
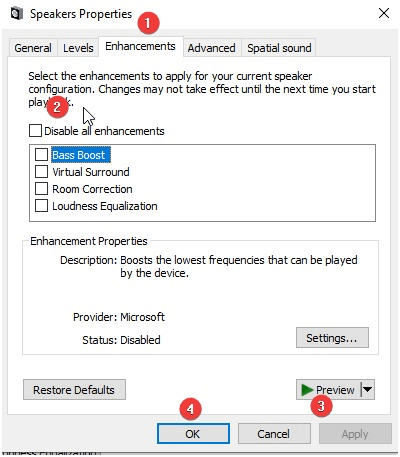
- Go to Device Properties and then select Additional Device Properties.
- Navigate to the Enhancements tab and check the Disable all enhancements box.
- Select Apply and OK.
Also Read: Realtek Gaming GBE Family Controller Download and Update
Fix 2: Start the Windows audio service again
Windows 10 Realtek sound stopped working issue may be a result of an improperly functioning or disabled Windows audio service. Hence, restarting or enabling it may solve the problem. You may restart or enable the Windows audio service through these steps.
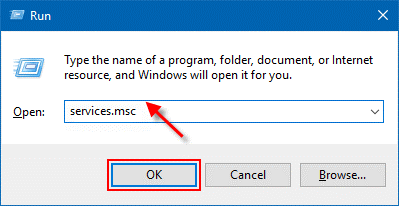
- Launch the Run window using the Windows+R keyboard command.
- Input services.msc in the on-screen box and select OK to open the Services window.
- Find and right-click on the Windows Audio service.
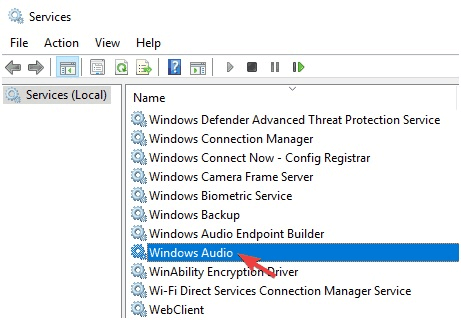
- Select Properties from the context menu.
- Go to Startup type and change it to Automatic. If the startup type is already automatic, you need to restart the service by right-clicking on the Windows Audio service and selecting Restart from the on-screen menu.
- Click on Start, Apply, and OK.
- Try playing the sound to check whether Realtek audio is working or not.
Also Read: Realtek HD Audio Manager Download for Windows
Fix 3: Disable the Microsoft UAA Bus Driver
Conflict may occur if two high-definition drivers coexist on a computer. Hence, you should try disabling the Microsoft UAA Bus Driver if the Realtek audio driver on Windows 10 is not working. Below are the directions to do it.
- Search Device Manager to launch it.
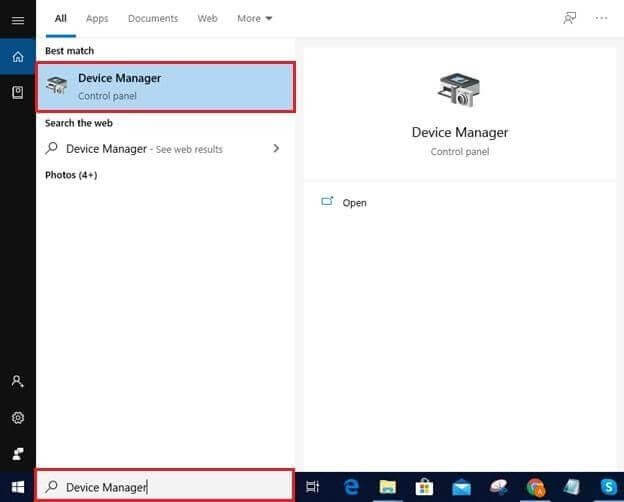
- Find and double-click System Devices to view them.
- If you see Microsoft UAA Bus driver, right-click on it, and choose Disable device from the available options.
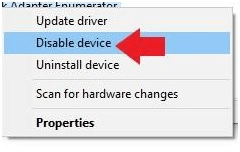
- Now, you need to restart your computer.
- Play sound to check whether the Realtek audio not working issue is fixed or it still exists.
Also Read: How to Fix Realtek Audio Stuttering on Windows
Fix 4: Update the Realtek audio driver (Recommended)
Outdated drivers are the most problematic for your computer. They lead to many issues like the one you are experiencing, i.e., Realtek speakers not working on Windows 10/11.
Therefore, updating the Realtek audio driver is the strongly recommended solution to the Windows 10 Realtek audio problems. You may update the driver hassle-freely using automatic software like Bit Driver Updater.
The Bit Driver Updater software updates all problematic drivers with just a click. Moreover, it also boasts many benefits like driver backup and restore, scheduling of scans, acceleration of driver download pace, and many more.
Below is the link to download and try Bit Driver Updater.
Once you get the software on your computer, it takes only a few seconds to display all the outdated drivers. After you have all the out-of-date drivers listed on the screen, you may select the option to Update All. 
There is also an option, called Update Now, to update only the Realtek audio driver. However, we are in favor of updating each driver to ensure top-notch computer performance.
Fix 5: Try changing the sound format
Your current sound format may also be the reason Realtek audio is not working on Windows 10/11. Hence, you should change the default sound format to fix the issue. Here are the steps to do it.
- Right-click the sound icon and open sound settings.
- Choose Device Properties and go to Additional device properties.
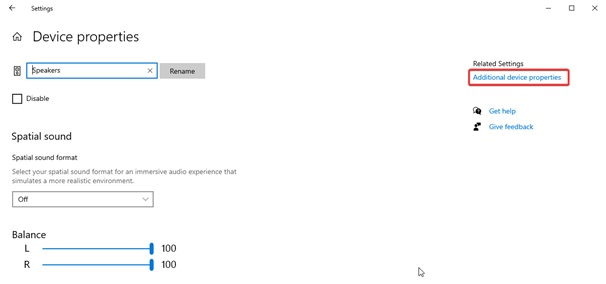
- Go to the Advanced tab.
- Click on the down arrow and choose 24bit/44100 Hz or 24 bit/192000Hz according to the speaker’s configuration.
- Click Apply and OK.
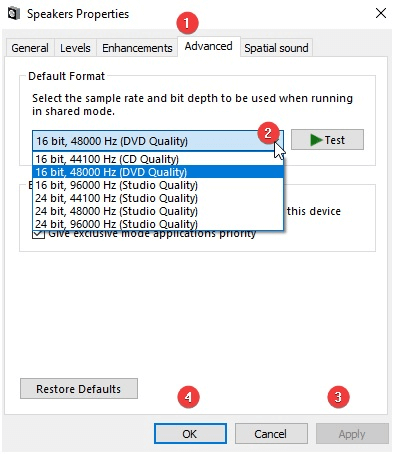
- Check whether the above steps resolved the Windows 10 Realtek speakers not working problem or if it remains unresolved.
Also Read: How to Fix Install Realtek HD Audio Driver Failure in Windows
Fix 6: Reinstall the audio driver
Improperly installed or incorrect audio drivers may also lead to Windows 10/ Windows 11 Realtek audio not working issues. Hence, you may uninstall the audio driver and install it again to solve the problem. Below is the process to do it.
- Launch Device Manager on your computer.

- Double-click on the Audio inputs and outputs.
- Right-click on the sound driver and choose Uninstall device from the options in the context menu.
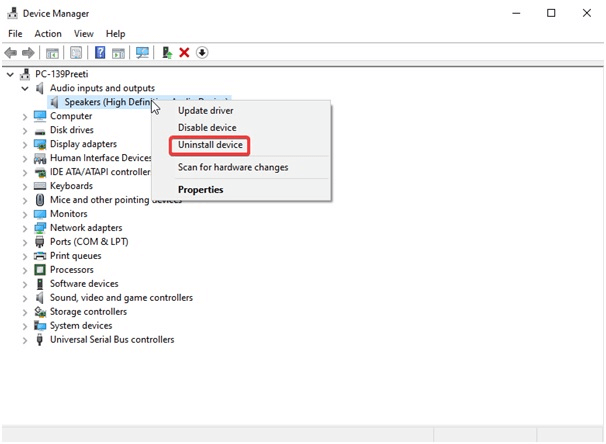
- Delete the driver software for this device and choose Uninstall/OK.
- Select Action from the Device Manager and scan for hardware changes.
- Restart the computer to complete the driver reinstallation process.
- After performing the steps given above, check whether the Windows 10 Realtek speakers’ not working issue is fixed or not.
Also Read: Download Realtek High Definition Audio Drivers for Windows
Fix 7: Select the correct output device
Incorrect audio output selection may also cause Windows 10 Realtek audio problems. Hence, you may select the right output device to fix the problem. Below given are the steps to do it.
- Right-click the volume icon located in the System Tray.
- Choose the open sound settings option.
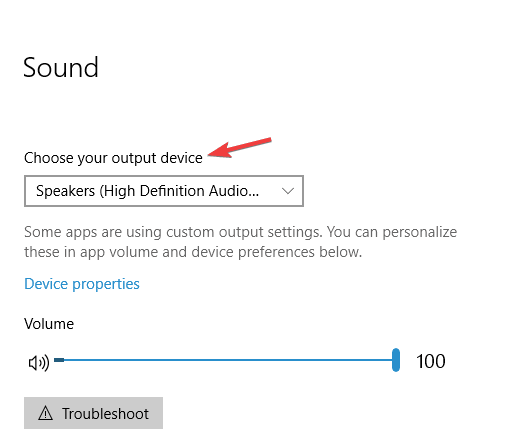
- Select Speakers/Headphones as your output device.
- Now, confirm whether the issue is fixed or still Realtek audio is not working.
Fix 8: Ensure speakers are properly connected
Connecting speakers to an incorrect port on the computer may also be a reason your Realtek speakers are not working on Windows 10. Hence, you should make sure that the speakers are connected correctly to the right port on the PC. Moreover, the power supply cable should be properly secured to ensure proper speaker functioning.
Also Read: Ways to Reinstall Realtek HD Audio Manager For Windows
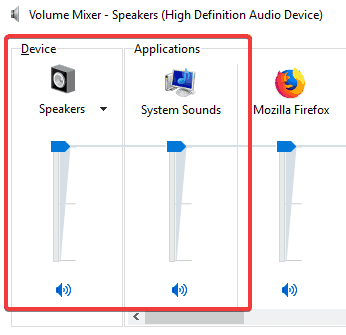
Fix 9: Ensure speakers are not muted
It may seem that Windows 10 speakers are not working if they are muted. Therefore, you should check and unmute them to get the sound. Here is the step-by-step process to do it.
- Right-click the speaker icon and Open Volume Mixer.
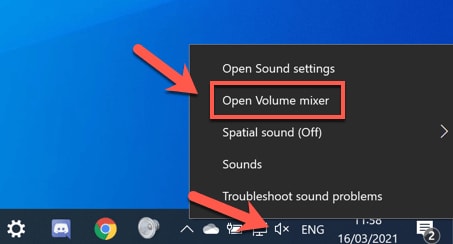
- Turn up the System sound and Speakers channels.
Above, we discussed how to fix the sound and Windows 10 Realtek audio driver not working issues. Now, let us answer some commonly asked questions to clear doubts if any.
Frequently Asked Questions
Below you will find answers to almost every question you may have about the Windows 10/Windows 11 Realtek audio not working issue.
Q1. How do I fix the Windows 10 Realtek audio driver not working problem?
Updating drivers is the best way to fix the Realtek audio driver issues. You may update the driver hassle-freely and automatically with the most recommended driver updater, i.e., Bit Driver Updater.
Q2. How do I get my Realtek audio back?
The above guide shared multiple ways to fix the issues and get the Realtek audio back. You may refer to it to find the best possible solution in your case.
Q3. Why does my speaker work but the mic doesn’t?
If the speaker is working but the mic is not, there are chances that the mic is muted or its volume is too low. Moreover, other causes of the problem may include updating the speaker driver but keeping the microphone driver outdated and accumulating dust in the mic.
Q4. Why is Windows 11 Realtek audio not working?
In addition to the causes mentioned at the beginning of this article, Realtek audio may not work after updating to Windows 11 for reasons like corrupted Windows registry or OS incompatibility.
Also Read: Download and Update Gigabyte Realtek Audio Driver on Windows PC
Realtek Audio Not Working: Fixed
Above was a comprehensive guide to fixing the Windows 11/Windows 10 Realtek audio driver not working issue. You may follow the fixes shared in this article one by one to find the most suitable solution.
However, if you wish to save time and effort, you may directly update outdated drivers using Bit Driver Updater. It instantly fixed the problem for many users. Hence, you may also try it.
Lastly, do not hesitate to drop us a comment if you have any questions or concerns regarding this write-up.


