Do you want to reinstall the Realtek HD audio manager in your Windows 10 system? There are some easy methods to reinstall it and these are outlined below in this article.
Realtek HD audio manager is a tool which comes in combination with Realtek HD audio driver. It plays a key role in controlling the sound play on Windows 10 systems and devices. Realtek audio manager and driver is widely used all across the world. It efficiently provides good quality DTS, Dolby, and Surround Sound.
The Realtek HD audio manager helps in producing different kinds of sound effects and you can instantly become a DJ with the help of this tool. The Realtek audio manager comes along with the package when the Realtek HD audio driver is installed on the PC.
It can be launched from the system tray by double-clicking on the icon located in the bottom left corner of the taskbar. You can find it in the Control Panel, alternatively also locate it from the File Explorer.
To locate the Realtek HD audio manager in the installation folder, you can go to the C Drive. Under Program Files, you should see a folder called Realtek. You can enter this folder, to find another set of folders – Audio\HDA folder.
If you are able to locate an executable file called “RtHDVCpl.exe” in the above-mentioned location, then you can just launch the Realtek HD audio manager by double-clicking on the executable file.
However, many times it is seen that the Realtek HD audio manager is missing from the taskbar. If it is missing then, it could be due to the corrupted Realtek audio driver. Reinstalling the driver can help restore the Realtek HD audio manager tool on your Windows PC’s taskbar.
How Can You Reinstall Realtek HD Audio Manager:
Let us look at the ways of reinstalling the Realtek HD audio manager by fixing the Realtek audio driver.
1. Reinstall Realtek HD Audio Manager Manually
Realtek audio manager can be reinstalled by downloading the drivers manually from the manufacturer’s website. However, you need to have plenty of time to do that and also require some technical skills and expertise.
Visit the Realtek website for finding the correct drivers version for your system. After going to the download centre, search for the driver with the driver name.
Once you identify the right drivers, download it and then double-click on the executable file to let the installation of the driver begin. You can follow the on-screen instructions to complete the installation steps.
Alternatively, if the auto-installation process fails then you can install the driver with the help of Device Manager. To do this, you can refer the below steps:
- Go to the Device Manager from the Start menu.
- Expand the ‘Sound, video and game controllers’ section.
- Right-click on the ‘Realtek High Definition Audio’ to select the first option called “Update Driver Software.”
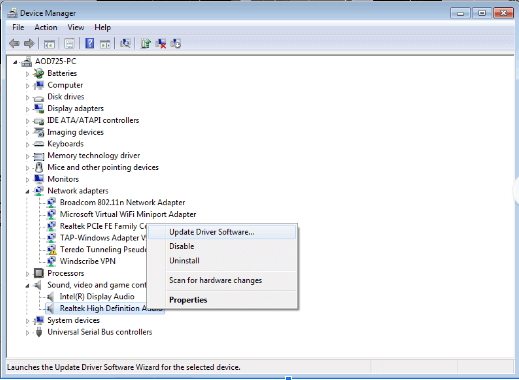
- This will then open another window with two options; viz “Search for drivers automatically” and “Browse my computer for driver software.”
- You need to choose the second option and select the downloaded file.
- Then, the installation process will commence and the Realtek HD audio manager will be reinstalled in your computer.
Read More: How to Update Nvidia Drivers on Windows 10
2. Reinstall Realtek HD Audio Manager Automatically
A quick, smart, and easy way to resolve all the driver-related issues of your PC is by installing a free driver updater tool and letting it perform all the hard work for you.
The driver updater software is easy to install and easy-to-use. The intuitive UI, easy-to-use features and real-time scans help to spot outdated, missing, and corrupted drivers instantly.
With one-click feature you can easily update the drivers and have a smooth functioning PC in a few minutes. You can also avail round the clock technical assistance, in case you are stuck with some tool-related issue.
You can even back up your system drivers and restore them whenever you want.
If the driver update software discovers that the Realtek audio driver is somehow corrupted, then it will immediately search online for the latest released version and download it. It will also perform the installation process instantaneously and then help you access the Realtek HD audio manager smoothly.
Read More: Download & Install Sony VAIO Drivers on Windows 10 (2020)
Final Words
So, now you are familiar with all the ways of fixing and reinstalling the Realtek HD audio manager, so that you can conveniently control the audio of your Windows 10 PC without any hassles and difficulties.
Although not an extreme necessity for your PC, yet Realtek audio manager acts as the Control Panel for the audio adapters of your system. It is capable of automatically detecting the newly added devices like speakers/headphones/microphones and helps in setting them up on your system.
It offers impressive features like sound manager, system sound events, volume control, sound recorder, etc.
Thus, having it on your system helps you experience your system sound in the best possible manner and if you are having any issues with it, then refer our article to troubleshoot and reinstall Realtek HD audio manager readily on your system.