Cut, copy, paste. Sounds familiar?
Millions of us, transfer and copy files almost on a daily basis. Let us find out thus, some of the best file transfer software and file copy software for Windows.
If you notice, there might be typical days when we have spent not just one but a few hours in transferring files and copying files. But, let’s say a typical file is quite large, then what happens? Of course, it takes a longer time for transfer. Several developers have come up with different data copy software applications that help you avoid the errors coming up during the transfer or copy of large files/folders from one system to another in Windows.
What Are the Best File Copy Utility Software for Windows?
Let’s look at the detailed features of each of these best file transfer tools below:
1. File Fisher
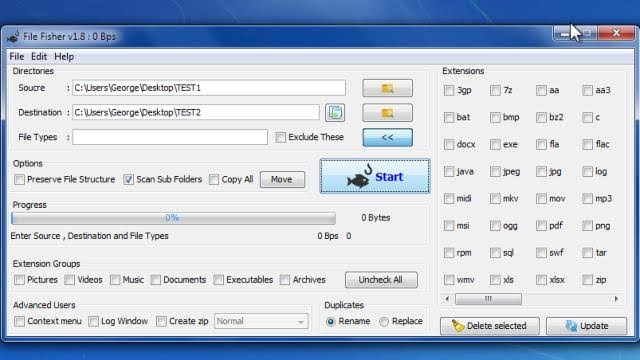
This is one of the most portable file copy software that can be used for copying and transferring the files from one system to another. This is also one of the fastest file copying apps available in the market.
The best part of using this app is that you don’t have to download the app at all; instead you have to just drag it to your desktop and then simply run it in your system. In addition to it, you can also keep the app in your pen drive or your flash drive for smooth installation into your PC anytime. The interface is highly easy-to-use and quite interactive.
Since it supports a huge number of file formats, you can copy any file into your PC comfortably with the help of this app. Newcomers and experienced PC users can all use it easily and effectively.
Features of File Fisher
- File Fisher offers a simple yet unique user interface
- This file copy tool does not require any installation as it is a portable tool
- You can easily transfer files from one format to another easily
- The software is compatible with all the Windows OS even with the latest ones too
Pros
- Easy to adapt the user interface
- You can copy and transfer files as per needs
- This Windows file copy utility software is portable and does not require installation
- You can pause, resume and stop transfer at any time
Cons
- Does not have a separate feature to copy the entire drive
- The software does not offer a description of the file transfer
- The download page is tough to find
Reasons to use File Fisher
- Portability: You can carry the application on a flash drive and use it without downloading anything on your computer.
- Highly customizable: The app supports personalization and integration with the context menu.
- A lot of filters are available: File Fisher boasts powerful filters that help you perform only specific file transfers.
Read Also: Best Bluetooth Software for Windows 10
2. TeraCopy
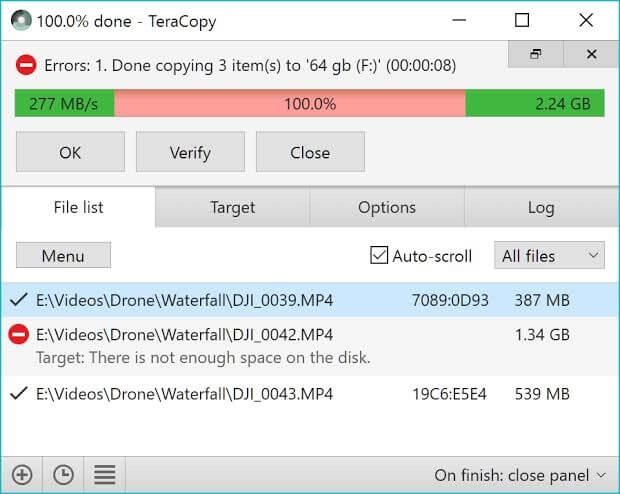
Use TeraCopy as data copy software to copy files comfortably within folders or into Windows desktop. TeraCopy provides a robust and interactive interface. This app is extremely flexible and is one of the most fast running apps. TeraCopy is available freely as well as in a paid version. The free version of TeraCopy also has a lot of features that help successful copying of files from one system to another.
With TeraCopy you can comfortably evade those files that seem to be troublesome and still continue copying rather than stop for some corrupted files. If you’re wondering how would be the transfer over a network then let me tell you with the use of TeraCopy it is a lot easier and faster. You can drag and drop files that can prevent moving folders accidentally.
Features of TeraCopy
- It is one of the simplest file copy utilities
- The software automatically skips corrupted or problematic files
- It even repairs the corrupt file and recovers data
- You can easily drag and drop files from one drive to another
Pros
- No installation required
- Pause, resume and stop whenever required
- Drag and drop functionality
- Best alternative to Windows default copy software
Cons
- Slow speed of transfer
- It uses a lot of system resources
Reasons to use TeraCopy
- Skips corrupted files: With TeraCopy at your disposal, corrupted files cannot block the file transfer as the application skips them instead of halting the entire process.
- Fast and easy to use: The options like drag and drop, high customization, etc. make this app fast and friendly enough for both beginners and advanced users.
- Useful shell integration: TeraCopy boasts individual plugins, i.e., shell integration support to save your time and effort.
3. Fast Copy
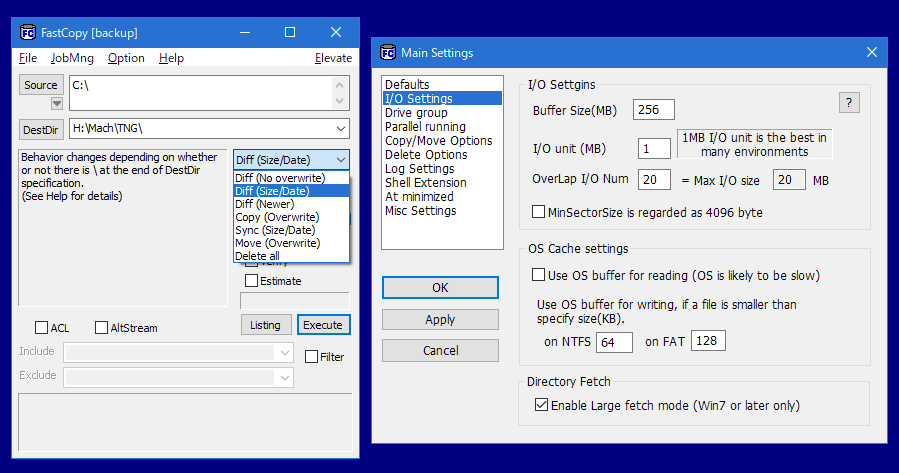
The interface of Fast Copy is not one of the most efficient ones but the app is definitely one of the most efficient fast copy software for Windows. Fast Copy is freely available as a program and helps you move the files rapidly from one network to another.
To ensure enjoying the best speed, it employs multiple threads to read, write, verify and also uses the overlapped and direct I/O systems.
Due to the interface not everyone can use the app comfortably especially if you’re a novice, however, for an experienced PC user; it is indeed a wonderful copy software for Windows.
Features of Fast Copy
- It is one of the fastest file copying tools
- The software supports UNICODE and over MAX_PATH file pathnames
- It supports UNIX wildcard
- It uses multi-threads to bring out the best speed of devices
Pros
- It is very fast in copying and backing up files
- Doesn’t take many resources of the system
- supports multi-threads for better performance
Cons
- Basic user interface
- Requires donation for FastCopy improvement
Reasons to use Fast Copy
- NSA File Wiping Support: One of the best things about Fast Copy is that it supports data sanitization methods approved by the National Security Agency (NSA) to keep your confidential information safe.
- Resource-friendly: This application does not bug your computer with unnecessary pressure on the resources as it is lightweight.
- Command-line: For the techies out there, it has command line and UI wrapper support.
4. ExtremeCopy
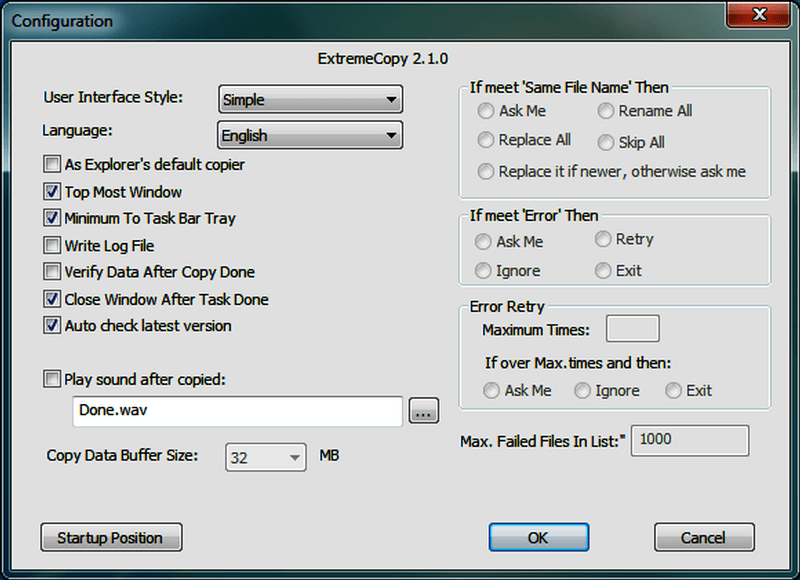
ExtremeCopy can help copy files from one system to another quickly. It can enhance the speed of the machine based on the physical structure of the machine. There are a lot of user-friendly features in the app. However, it would not support copying files from the network.
The program is capable of integrating with the Windows Explorer making it easier to use. Extreme Copy is not a software that supports file syncing but is one of the best file transfer software available.
Features of ExtremeCopy
- The software offers the freedom to pause and skip any file easily
- You can easily resume the interrupted process
- It comes with a built-in error management feature
- It is one of the best file transfer software for PC
Pros
- Easy to adapt the interface
- The process can be paused, resumed, and canceled at anytime
- Comes with integration with Windows Explorer
- Fastest file copy tool
Cons
- Doesn’t offer any advanced feature in the free version
- Lacks performance while network file transfer
Reasons to use ExtremeCopy
- Fast copying: It lets you copy files much faster (20% to 120% speedier) than the native Windows copy tool.
- Optimizations: ExtremeCopy can be a perfect choice for you, as it optimizes the copying speed and its resource consumption automatically.
- Efficient free version: We agree that the free version of this software has no high-end features. But, it does not reduce its functionality, and you get the same fast copying speed for free.
5. Unstoppable Copier
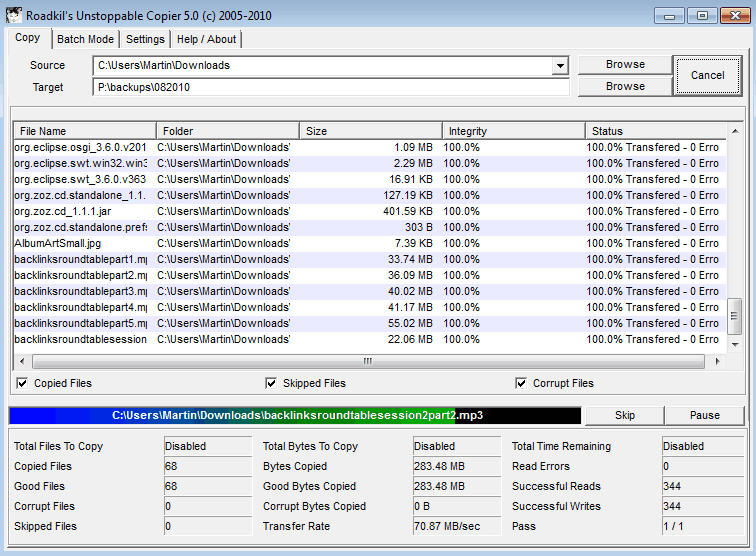
This app has been in use for a very long time. This file copy software functions at an enormous speed. Unstoppable Copier is a recovery solution that copies and transfers all your files from the directory.
The best part of it is that they also try to repair the faulty and damaged files. It works on any of the Windows operating systems except Windows 10. This is one of the best interactive Windows copy software that one can obtain.
Features of Unstoppable Copier
- The software lets you copy, recover and repair files easily
- It offers great speed transfer
- Being one of the oldest software it offers the best tools and speed
- It is compatible with most of the Windows OS
Pros
- You can recover corrupted files
- Resume the interrupted process
- It offers a batch mode feature
- Superfast transfer of files
Cons
- Doesn’t support Windows 10
- Not an ideal software for single file transfer
- Windows integration not available
Reasons to use Unstoppable Copier
- Command-line support: If you are a techie who is not a fan of those graphical interfaces, you’ll be glad to know that this application supports command-line UI.
- Backup tools: There are backup options available such as creating and saving transfer lists for future use.
- Blazing fast: Unstoppable Copier is among the most high-speed copying tools available currently to copy files.
Read More: Fix Copy and Paste Not Working Issue in Windows
6. GS RichCopy 360
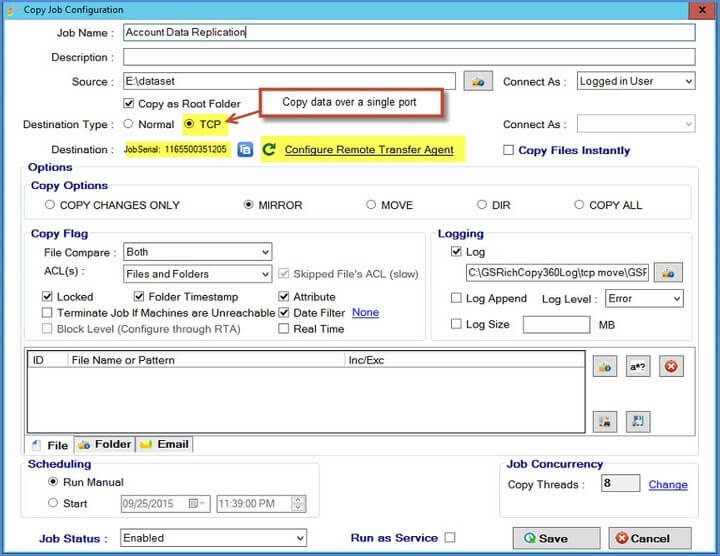
With GS RichCopy 360 copying many files from one system/folder to another is swift and quite easy.
In fact, there is a backup software with GS RichCopy 360 for MS Windows operating systems. This backup software can allow you to synchronize through the servers, Windows OS and also through various networks. You can always know and see all the copied tasks through a special Wizard interface available only with this tool.
Features of GS RichCopy 360
- It can be considered as the fastest file transfer software for Windows 7,8 and 10
- To help you check all the tasks it offers WIzard Interface
- It can easily transfer data between network
- You can share files, directories, or even drives effortlessly
Pros
- The Software offers remarkable transfer and copy speed
- You get a very simple wizard interface
- 24*7 tech support
- All file names are supported
Cons
- No free version offered
- The interface is stuffed which makes it tough to adapt
Reasons to use GS RichCopy 360
- Byte-level replication: One thing that you might find highly useful in this application (that many other similar programs lack) is its ability to replicate files at the byte level.
- Supports long path names: Some files have really long path names (over 260 characters long). But, you don’t have to worry, as this software supports them all.
- Simultaneous file copying: It does not take a long time to copy files using this software as it copies files (up to 255 threads) simultaneously.
7. Perigee Copy 1.7
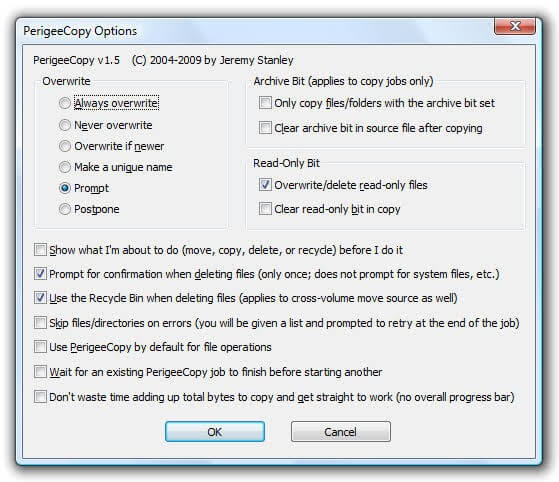
You can use this tool to copy the files from one system to another in the shortest amount of time.
If there are many files to copy from one server to another, then you know very well how long it takes to copy, if you use the default Windows copy function. Therefore, the Perigee Copy tool can offer a quicker solution.
It is an easy-to-use software with an interactive interface that is effective in so many ways. However, the drawback with Perigee is its incompatibility with Windows OS versions 8 and 10.
Features of Perigee Copy 1.7
- It offers a very easy to adapt interface which can be used by any user
- Apart from just copying files, you can delete them too
- You get many features like archive bit, overwrite, and others.
- It works perfectly for the Windows 7 and older versions
Pros
- Simple and easy to adapt UI
- Copy and delete files side by side
- Great speed transfer
- Support all the Windows OS
Cons
- No drag and drop functionality
- Doesn’t offer advanced features
Reasons to use Perigee Copy 1.7
- Shell integration: With this software’s integration with the Windows menu, you can perform copy-paste tasks much more easily.
- Security: You get a confirmation message whenever you perform any action to inform you about the files that are going to be affected to take care of their security.
- Feature-rich: If you are looking for software that is a complete package with all essential features, like overwrite, etc., this program can be your best choice.
8. Copy Handler
For those users who are always transferring multiple files from one system to the other, Copy Handler can help immensely in transferring bulk files in less time.
It is a free to use app. Copy Handler operates at a faster rate, and aids in pausing, resuming, restarting and cancelling the different functionalities. It supports many languages at a time. You can transfer files between drives and computers in quite a less amount of time.
Drag and drop functions are also supported by the copy handler. To note, Copy Handler would resume the paused and unfinished copying of all files with a system restart. It is an extremely easy-to-use app and its effectiveness and flexibility is worth applauding.
Features of Copy Handler
- You can easily copy files in bulk using this best file copy software
- Easy drag and drop functionality for copying and moving files
- Even when the PC shutdown it pauses the process and can be easily resumed
- The software offers detailed statistics to help you understand better
Pros
- Free to use software
- Highly customizable software
- Offer detailed stats
- Drag and drop functionality
- Multi-[platform utility
Cons
- Tough to install
- Doesn’t offer tutorial or support for understanding
Reasons to use Copy Handler
- Open source: One of the best things that make Copy Handler a perfect pick is that you can examine its code if the techie in you wants to do it.
- Complete control: You get full control over the entire copy/paste process and its speed.
- Queue support: Copy Handler has a unique feature that allows you to carry out multiple tasks at once in a specific order.
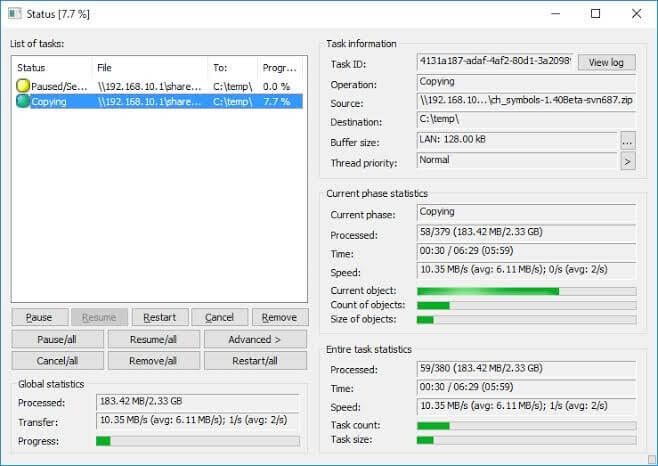
9. Robocopy
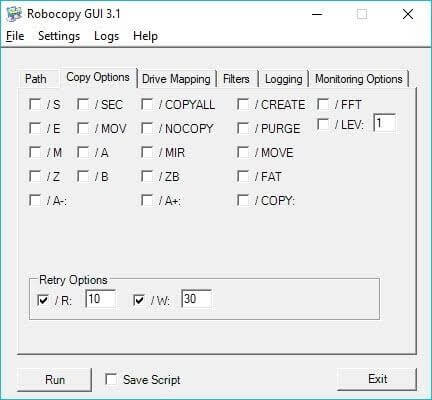
Robo Copy is not an app in actuality but rather a command-line utility to copy and transfer files from one server to another many times. Robo Copy replaces XCopy and has more offerings as a data copy software. If you have to run this utility, your command would be called Robo Copy.
It can work on Windows Vista and also on Windows 8. Robo Copy does not work on all PC’s as it does not have an interactive GUI.
Features of Robocopy
- Robocopy requires no additional tool for copying or transferring files
- Even when the network is interrupted the software performs great. It resumes when the connection is better
- Using the software you can skip files that are already copied
- You can easily transfer files and data from one server to another
Pros
- It is free to use Windows Command
- Easy to copy files on various networks
- Helpful in copying NTFS attributes
- Doesn’t require any other application
Cons
- The speed of transfer depends on the network
- Not advised for new users
- No option to pause, stop or resume
Reasons to use Robocopy
- Error-free copying: Robocopy is a Windows command that does not make any error even when copying paths with over 259 to 32,000 characters.
- /MT feature: With this command, you can perform file copying in multithreaded mode.
- Wide availability: Being portable and compatible with almost all Windows versions, this tool is widely available.
Read More: Best Proxy Servers For Windows
10. EaseUS Disk Copy
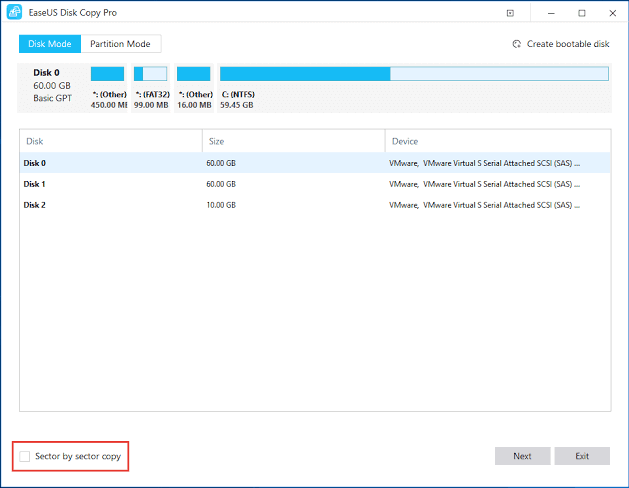
Are you planning to copy an entire drive?
You can call it more like a drive cleaner since it copies a drive to another drive. EaseUS disk is quite fast as a data copy software and the best versions for file copy are available for Windows 7, 8 and 10.
It is an extremely precise app and can clone the entire disk with perfect precision and accuracy.
Features of EaseUS Disk Copy
- The software is compatible with all major Windows OS
- It is a fast software for copying or cloning the whole disk to a new location
- You can easily create a bootable disk with this software
- The software is accurate and performs copying with 100% accuracy
Pros
- 16TB hard drive supported
- Accuracy in cloning and copying
- Rescues corrupted and damaged hard drives
- It helps in creating partition and boot disk
Cons
- No free version offered
- Takes a lot of system resources
- No drag and drop functionality
Reasons to use EaseUS Disk Copy
- Ease of use: To copy/paste files with this software, all you need to do is follow a simple three-step process.
- One-click migration: Using this software, you can migrate your data, apps, and complete OS to a new hard drive safely with just a click.
- Easy replacement: You can get EaseUS Disk Copy to use SSD instead of an HDD effortlessly.
11. UltraCopier
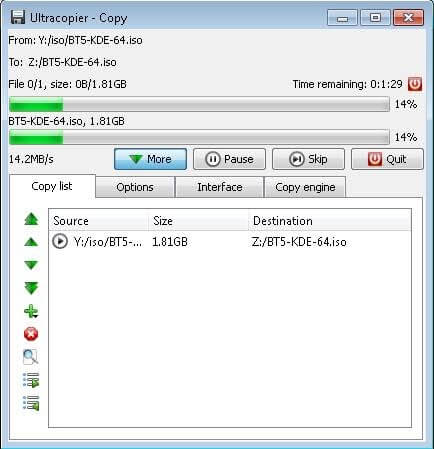
UltraCopier is an open source file copy software used to copy files. UltraCopier is very simple to use and has a multitude of premium features at your disposal for free. No matter how less versed you’re with a computer, you can always use this particular software without any difficulty.
There are some features like start, stop, resume that you can navigate through comfortably. You can perform a multitude of copy tasks from one server to another. It is also compatible with Linux and macOS.
Features of UltraCopier
- The software offers advanced features like speed limitations, pause, resume and stop
- You can easily perform multi-copy tasks
- It is compatible with Windows, Mac, and Linux
- UltraCopier has a built-in error management feature
Pros
- Takes very less space on the hard disk
- Data transfer from one server to another
- Highly customizable and open-source software
- Multi-platform utility
Cons
- Lacks in offering advanced features
- Doesn’t offer impressive speed
Reasons to use UltraCopier
- Useful features: It offers some of the high-end features, such as speed controls and functionality to search in the copy lists.
- Customizations: If you are looking for a straightforward and customizable (with the plugin support) file copy utility, UltraCopier can be the best choice.
- Multilingual: UltraCopier boasts support for multiple languages and a portable form of the software.
12. MiniCopier
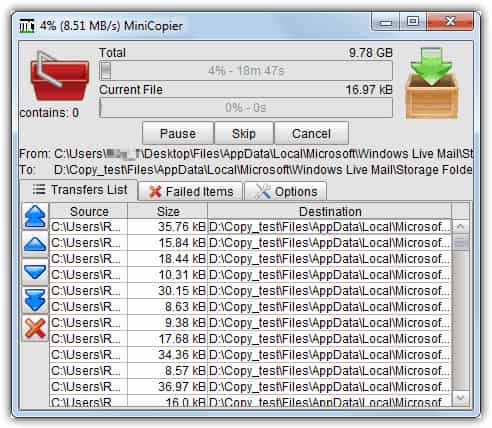
MiniCopier, a super-fast utility to copy files very quickly. It is a completely automatic utility for copying files. All you need to get started is – just drag and drop the files that you want to copy, in the red basket presented in the software’s window. And, then it will begin the rest procedure automatically. It has the standard buttons as well such as Pause and Start.
Though the user interface of this application is very simple, at the same time, it is very effective and productive too. Apart from this, it also keeps records of those transfers as well which gets dismissed. Overall, it is the best way to copy or paste files and folders in no time.
Features of MiniCopier
- You can queue all the transfers easily on this software
- The transfer speed can be set easily with MiniCopier
- You can pause and resume the process anytime
- Using the software you can easily change the name of the file
Pros
- Great speed of transfer
- Manageable transfer queue
- You get an option to overwrite files
- Multi-platform utility
Cons
- Doesn’t support drag and drop functionality
- Outdated interface
- Not compatible with the newer version of Windows
Reasons to use MiniCopier
- Queue support: The software supports queuing, where you can add a transfer to the queue when current transfers are ongoing.
- Greater control: With options like limiting the copy and transfer speed of files, MiniCopier lets you be in charge of the process.
- Behavior setting: MiniCopier allows you to specify a default target file behavior.
See Also: 15 Best Context Menu Editors For Windows 10
13. FF Copy
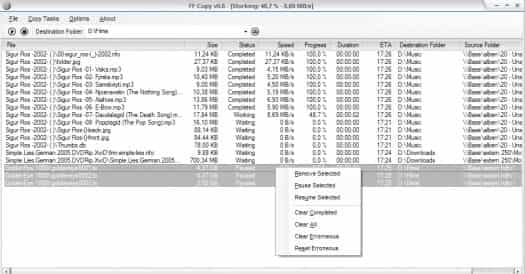
The next best file copy utility software for Windows in our list is FF Copy. It is a file transfer utility for Windows users. With this, you just only need to copy or paste the file to a transfer queue and then it will be copied in the sequence. Comparatively, it is way faster than other such kinds of utilities. FF Copy lets you transfer multiple files or folders simultaneously.
Just in case, if the source becomes unavailable then FF Copy automatically re-generates the source and starts transferring the files after a while. It allocates the disk space and eliminates disk fragmentation. FF Copy is highly capable of boosting the speed of the entire process. Undoubtedly, if you are searching for the best way to copy files pretty instantly then you should rely on this amazing utility.
Features of FF Copy
- The software offers a feature to add files in queue for ease
- You can easily pause and resume the process as per requirements
- During file transfer issue you can easily skip to the next file transfer
- It offers a detailed description of the process
Pros
- Reduces disk defragmentation
- Quick file transfer among different network
- Drag and drop functionality
- Easy to control transfer
Cons
- Doesn’t offer handy features
- No multi-threaded file transfer feature
- Old user interface
Reasons to use FF Copy
- Portability: FF Copy is a portable software, hence no installation is required to run it.
- System friendly: This software does not burden your system unnecessarily, as its memory and CPU utilization remains low.
- Fast speed: With features such as queue support, this software lets you copy/transfer multiple files really quickly.
14. KillCopy

KillCopy is an excellent and fastest file-transferring software available for Windows PC. This utility tool makes the overall process of file copying much easier with a drag-and-drop feature. In order to ensure an error-free file-transferring process, KillCopy utilizes a high-speed verification mode.
Features of KillCopy
- It comes with a KillDelete option to erase the source file, once the copying process completes.
- Has a feature called Auto Resume functionality that automatically starts the file transfer process when the process abruptly stops.
- It’s Turbo Mode enhances the copying speed of large files.
Pros
- Drag & Drop functionality.
- Simple navigation.
- Fast access.
- Availability of Auto-Resume feature.
Cons
- Since it’s free, the tool has limited features compared to other paid software.
Reasons to Use:
- Parallel: This mode boosts copy speed when copying files between different physical devices.
- Speed Limit: This feature lets you limit the maximum copy transfer speed in Kbps units.
- Turbo Mode: This mode can improve the overall speed of the file copying process, especially when copying large files between local disks.
15. NiceCopier

The next on our list of the best utilities to copy files and folders with NiceCopier. It is a quick and easy-to-use software that allows you to copy and paste data hassle-freely.
Moreover, it boasts many outstanding features, such as pausing and resuming the copy/paste process, an option to change the settings like running at startup, and much more.
Furthermore, below are its other features, pros, cons, and reasons to use it.
Features of NiceCopier
- A single window displays all the running tasks
- Calculates the best file copying speed
- Task queue creation to improve software performance
- Allows you to perform check-sum-based verification of files after copying them
Pros
- Allows you to customize the application look
- Multiple display modes
- Various configuration options
- Automatically shuts down after completing the task
Cons
- No round-the-clock customer support
- Occasional hangs or crashes
Reasons to use
- Portable: One of the top reasons you should use NiceCopier is its portability. You can carry it in a flash drive and use it without downloading anything on the computer.
- Lightweight: NiceCopier does not pressurize your system resources and consumes very little space on the device.
16. Total Commander

Allow us to conclude this entire list of the best file copy utility software with Total Commander. Total Commander is not merely a copy utility but a smart file manager. With the help of the tool, you can run two windows side by side and use them to copy and move the data within the system and its storage. Let’s know more about this tool from the information below.
Features of Total Commander
- Custom columns
- Quick View panel
- Tabbed interface
- Built-in FTP client
- Thumbnails view
Pros
- Easy to use
- Basic interface
- Supports USB
- Multilingual
Cons
- Outdated UI
- Occasional crashes
Reasons to use
- Thumbnail: One of the main reasons why you should download the Total Commander tool is that the tool offers a preview of the files in the form of thumbnails for ease of decision-making.
- Supports Multiple Archives: Total Commander supports various extensions of Archive files like CAB, ACE, TAR, GZ, RAR, UC2, ZIP, 7ZIP, etc.
17. Copywhiz

Copywhiz is another best file copy utility software that you can try. Just like any other software on this list, Copywhiz is a very advanced and a great utility to enjoy copying data smartly.
Features of Copywhiz
- Easy copying
- Handles multiple files
- Integration is possible
- Smart UI
Pros
- Contains shortcuts
- Supports USB
- Easy to use
Cons
- Better alternatives available
Reasons to use
- Recent Files: The software allows you to copy and manage recently modified or added files with ease.
- Personalized: Copywhiz allows you to look for files and copy them according to the name or extension of the file.
18. SuperCopier

The next name on this list of the best file copy utility software for Windows 10/11 is SuperCopier. This is a simple tool that makes it feasible for you to copy data from one location to the other.
Features of Copywhiz
- Simplest file copying
- Smart UI
- Personalizable interface
Pros
- Lightweight
- Multi-thread compatible
- Multilingual
Cons
- Better alternatives available
Reasons to use
- Effective Performance: The software allows you to move or copy multiple files at once. Moreover, you also get lightning-fast copying speed with the tool.
- Smart UI: The user interface of SuperCopier is quite simple yet smart. Even a beginner can get the most out of the tool with ease.
19. OrganizerMaX

Here’s another addition to this list of the best file copy utility software for Windows. OrganizerMaX is multiple levels better than the traditional copy utility of Windows. Using this tool, you can add tags, copy and paste, search for files, and do a lot more with ease.
Features of OrganizerMaX
- Simple interface
- Modifiable
Pros
- Works on low-end devices
- Supports older Windows versions.
Cons
- Better alternatives available
Reasons to use
- Reliability: The software offers some of the most advanced features for a copy utility.
- Fast: OrganizerMaX is quite fast as compared to any other tool offered in this list.
Final Words
These are some of the best file copy utility software available for Windows in 2024. Most apps are quite efficient in handling the speed with which the files are transferred from one server to the other or from one network to the other.
Bulk file transfers and copying is possible with some of these apps as well. Some can also help you transfer an entire folder from one server to another. With some apps you can avail many premium features whereas with other open source platforms you can enjoy splendid features free of cost.


1 Comment
Unstoppable Copier 5.2 seems to work just fine under Windows 10.