Do you use the LogMeIn Hamachi VPN service on your Windows PC? Has the Hamachi service stopped working on your Windows system? Generally, Windows is capable of supporting the LogMeIn Hamachi program but occasionally users encounter some malfunctions and errors that stop them from using this service. Different issues might be triggered by different reasons.
You may see different kinds of error messages like “Hamachi service status stopped in Windows 10,” or “Hamachi service stopped,” etc.
So, in this tutorial, let’s look at the causes behind the “Hamachi service stopped” error followed by learning about the various solutions to fix it.
Bit Driver Updater: The Most Recommended Method
Before moving on to the detailed solutions, we would like to recommend the safest and hassle-free way to fix the Hamachi service-related problems. A number of users who have reported the ‘Hamachi not working’ error were able to fix the issue by updating their network adapter drivers using the Bit Driver Updater tool.
To update network adapter and other Windows drivers for free, click the given link below!

What is Causing the “Hamachi Service Stopped” Error on Windows Systems?
LogMeIn Hamachi, a centrally managed VPN service for Windows users to help them securely extend LAN-like networks to distributed teams, gamers, mobile workers, etc. It is a cross-platform service that can create direct links between systems behind the NAT firewalls.
So, the main issues which cause the Hamachi service stopped error are:
- When the WMI(Windows Management Instrumentation) service has been disabled.
- When the Hamachi app lacks administrative privileges.
- The third-party antivirus could cause the Hamachi tunnel issue.
- If the LogMeIn Hamachi Tunneling Engine is not configured properly to startup automatically.
Techniques to Solve “Hamachi Service Stopped” Error:
You can fix the “Hamachi service stopped” error with the help of the following techniques. Let us take a look at each one of them in detail.
Technique 1: Check If the WMI Service is Disabled
You need to check if the WMI (Windows Management Instrumentation) service is disabled because if it is then the Hamachi service stopped error would occur. To enable the WMI service on Windows you can use the below steps:
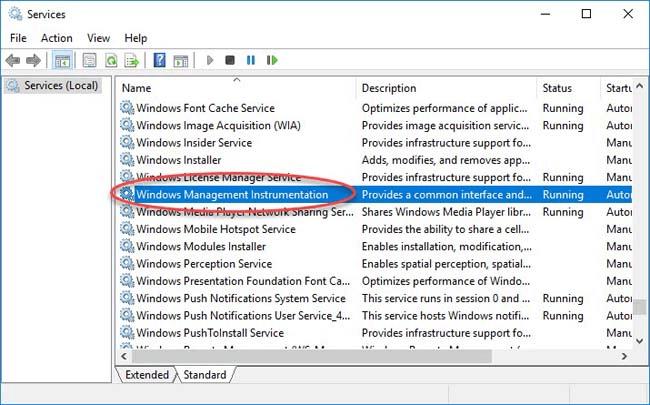
Step 1: Go to the Services window by typing “services.msc” in the Run dialog box followed by pressing the Enter key.
Step 2: Scroll down till you find the Windows Management Instrumentation service and then using the double-click action, open its Properties window.
Step 3: In the General tab of the Properties window, check if the Startup type is Automatic.
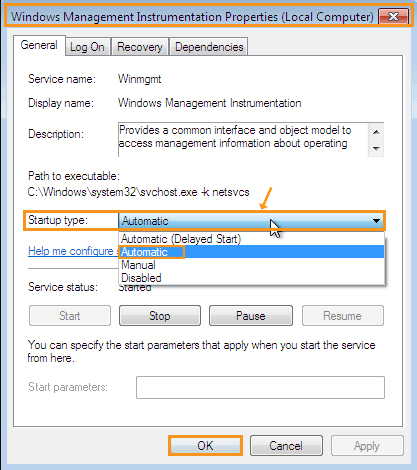
Step 4: If not, then select Automatic from the drop-down.
Step 5: Hit the “Apply” button followed by clicking “OK.”
Check now if you are able to start the Hamachi service again. If not, then don’t get disheartened as there are other ways to resolve the issue.
Read Also: How to Fix Steam Download Slow [Solved]
Technique 2: Use Admin Privileges to Run Hamachi Service
You can resolve the issue of the LogMeIn Hamachi server stopped working by running the Hamachi service app with admin privileges.
Step 1: Right-click on the Hamachi.exe file and choose the option of “Run as administrator.”
Step 2: You can also go to the Properties window and go to the Compatibility tab.
Step 3: Here you will see a box beside “Run this program as an administrator.”
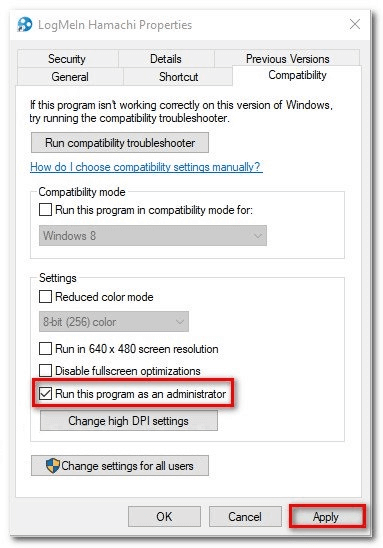
Step 4: Ticking this box will always launch the Hamachi app as an administrator.
Step 5: You can click “Apply” and then “OK” to bring this change into effect so that you don’t have to keep doing this repeatedly.
Technique 3: Disable the Third-Party Antivirus Tool
If you are still experiencing the “Hamachi service stopped” error, then try disabling the third-party antivirus software momentarily to see if that helps. Sometimes, the antivirus tool can block the VPN service, so disabling it for sometime can help determine if it is the antivirus tool’s fault or not.
Hence if the Hamachi service starts working after doing this, then you can uninstall the current antivirus software and install a new antivirus tool into your system.
Technique 4: Reinstall LogMeIn Hamachi Service
If the Hamachi service is not installed correctly, then you can reinstall it to ensure that the “Hamachi service stopped” problem is fixed permanently. How to reinstall the Hamachi service?
Here’s how you can do it:
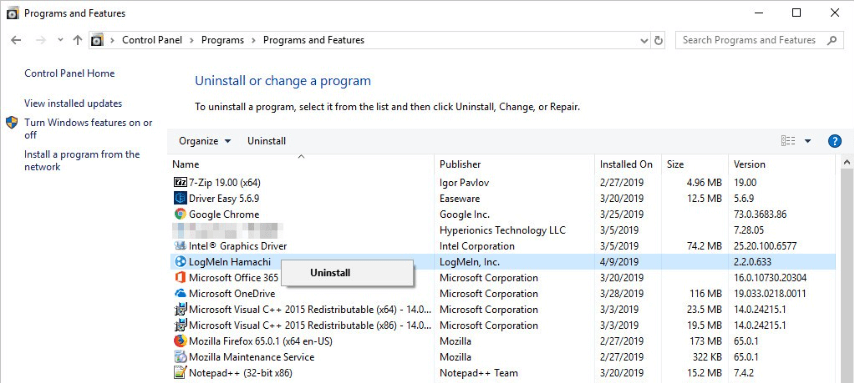
Step 1: Go to the Control Panel and then go to the “Uninstall a program” option under the Programs & Features section.
Step 2: Find the Hamachi service and Uninstall it.
Step 3: Once the uninstallation is over, then visit the official site of the LogMeIn Hamachi to download the program and then install it on your system again.
Finally, see if the Hamachi program is now functioning correctly.
Read More: VAC was Unable to Verify the Game Session: Problem Solved
Technique 5: Configure the Hamachi Tunneling Engine Properly
Configure the Hamachi Tunneling Engine to get rid of the Hamachi server stopped working error in the following way:
Step 1: Launch the Run dialog box and type “services.msc” and click “OK.”
Step 2: Locate the Hamachi Tunneling Engine in the Services window and then click right on it to go to the Properties.
Step 3: In the Properties window, under the General tab, you will see an option called “Startup type” which you can set to Automatic.
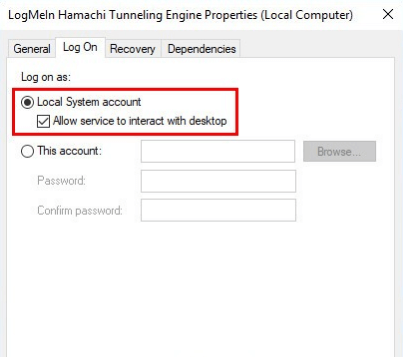
Step 4: Then, navigate to the Log On tab and ensure that the Local System account is enabled with the option of “Allow service to interact with desktop” is ticked.
Step 5: After this, click “OK.”
Step 6: Now, navigate to the location from the File Explorer. “C:\Program Files (x86)\LogMeIn Hamachi”
Step 7: You need to then click open the Properties of the hamachi-2-ui.exe file with the right-click action.
Step 8: Edit the Users group permissions under the Security tab to set to “Read & execute.”
Step 9: Click OK to save the changes.
Technique 6: Automatically Update the Device Drivers
The last remedy to the “Hamachi service stopped” error would be to update the network adapter drivers, to ensure that the VPN performs error-free and smoothly. As the process of manual update of the network driver adapters can be cumbersome, critical and time-consuming, so we are going to recommend the automatic update process.
All you need to do is install the best driver updater software on your system and scan the system with it to detect the faulty network adapter driver. Once detected, you can update it easily with the update button next to the name of the faulty driver. The driver updater tool will download and install an updated version of the network driver adapter on your system.
If there are any other driver-related issues, then that too will be fixed by the driver updater tool for your system and finally, you will be able to operate your system effectively without any errors and hassles.
Hamachi Service Stopped Error Fixed
This was all about the “Hamachi service stopped” error and its feasible solutions. Whatever is causing the VPN service to malfunction can be sorted easily with one of the aforementioned solutions.