If you want to know how to fix Dolby Atmos not working in Windows 11 & 10, then keep reading!
Dolby Atmos is a powerful spatial audio technology that takes sound to a completely new level. Dolby Atmos music is an immersive musical experience that adds more clarity, depth, and space to your music. Instead of just hearing your music, with Dolby, it feels like you are inside the song. With this technology, you can understand how songs are created and experienced. Having access to this technology helps you hear precision, stunning detail, and realism in movies, shows, and games with the sound that hovers all around them.
This simply means that Dolby Atmos not only boosts the sound quality but also delivers a high-grade cinematic experience. However, this couldn’t be possible if Dolby Atmos doesn’t work as expected on your Windows operating system. Majorly, Dolby Atmos stops working accurately due to outdated or broken sound drivers. Hence, it is suggested to keep sound drivers always up-to-date to avoid such issues. Apart from damaged or corrupted sound drivers, old Windows versions, misconfigured settings, disabled exclusive mode, and the Dolby Atmos access app itself are responsible for the problem.
But, you just don’t worry about all that, as we are going to discuss some potential solutions in this article to help you make Dolby Atmos work again as you expect.
Best Ways to Fix Dolby Atmos Not Working in Windows 11/10
Following are the most workable tactics to fix Dolby Atmos not working in Windows 10 and Windows 11.
Solution 1: Perform Audio Troubleshooter
Windows operating systems come with numerous troubleshooters that are specifically designed to resolve some common problems like Dolby Atmos not working in Windows 10, 11. When you are experiencing issues with Dolby Atmos, using the Windows in-built audio troubleshooter might help you fix the problem. Here is how to do that:
Run Audio Troubleshooter on Windows 10:
Step 1: Using Windows and I keys combination, open Windows Settings.
Step 2: Click on Update & Security.
Step 3: On the left, choose Troubleshooter. Then, scroll down until you see Additional Troubleshooters. Once found, click on the very same.
Step 4: Next, select Playing Audio and click on Run the troubleshooter. Check the image below for reference.
Step 5: Lastly, follow the instructions on your screen and let the Windows troubleshooter detect and fix the problem for you.
Once everything is done, simply reboot your computer to test the issue. Proceed to the next solution, if it didn’t work for you.
Run Audio Troubleshooter on Windows 11:
Step 1: Press Windows and I keys together from your keyboard to invoke the Windows Settings menu.
Step 2: Choose System from the left menu pane. After that, on the right, scroll down to find and select Troubleshoot.
Step 3: Next, choose Other troubleshooters.
Step 4: Locate Playing Audio and click on the Run button adjacent to it.
Thereafter, comply with the on-screen instructions and let the troubleshooter find and fix your problems. And, if Dolby Atmos still does not work as expected, then try the next solution.
Also Read: How to Download Dolby Audio Driver for Windows
Solution 2: Install Latest System Updates
The Dolby Atmos spatial audio feature isn’t introduced in those earlier system updates. Hence, you will need to ensure that you have the latest Windows OS version installed in order to make proper use of it. Also, the system updates usually come with bug fixes, and performance improvements and bring additional new features to your computer. Below is how to do that:
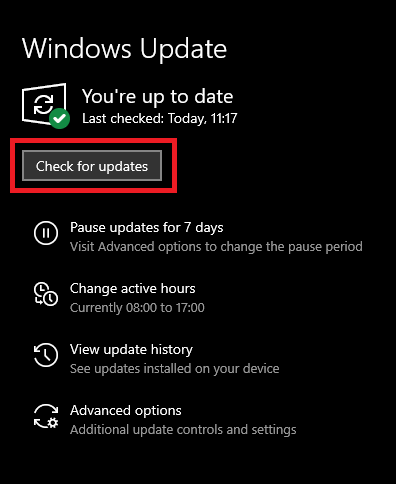
Step 1: Open Windows Settings and click on Update & Security to proceed.
Step 2: Next, make sure that Windows Update is selected from the left pane.
Step 3: Click on the Check for Updates button.
Be patient and let Windows search for the newer system updates. If the prompt says, “You’re up to date, jump to the next fix. And, if the prompt indicates, “Updates are available”, then click on Install Now and wait for Windows to install the available updates on your computer system.
Solution 3: Update your Outdated Sound Driver
Corrupted, damaged, or outdated sound drivers are majorly responsible for Dolby Atmos not working issue. In this case, you need to check whether your sound drivers are updated to the latest version or not.
You can update outdated audio drivers either manually or automatically. To perform audio driver download and update manually, you can use the Windows default Device Manager tool. If Windows isn’t able to find the latest and most compatible drivers, then go to the official website of your manufacturer, search for the correct driver file and follow the instructions on your screen to get the latest version of drivers installed on your PC.
If in case, updating device drivers manually seems too time-consuming and daunting for you, then you can utilize any third-party driver updating service like Bit Driver Updater. It is a smart and handy software that automatically recognizes your device, then finds, downloads, and installs the most genuine drivers for it. With Bit Driver Updater, performing driver updates is just a matter of 2-simple clicks of your mouse.
Below is how to update outdated audio drivers via Bit Driver Updater:
Step 1: Go to Bit Driver Updater’s official website and download its setup file. You can even do it for free from the download link provided below.

Step 2: Double click the downloaded file and follow the wizard to complete the installation process.
Step 3: After the completion of successful installation, run the driver updater utility on your PC. then, click on Scan from the left pane.
Step 4: Wait for the software to scan your device for erroneous or outdated drivers. Once done, click on the Update Now button adjacent to the driver you wish to update. Alternatively, you can also click on the Update All button. This way you can perform bulk driver updates at once.
However, for accessing one-click driver update functionality, you need to upgrade to the pro version of Bit Driver Updater. With the pro version, you’ll also get access to additional features like an in-built auto backup & restore tool, scan scheduler, 24/7 technical help, system optimizer, and full money-back guarantee but for a limited time.
After installing the latest driver updates, restart your computer system for the new changes to take effect. Then, try to access Dolby Atmos to test the issue. If it remains the same as earlier, move on to the next tactic.
Also Read: Download Realtek High Definition Audio Drivers for Windows
Solution 4: Turn On Exclusive Mode
Windows has a built-in feature called Exclusive Mode that takes complete control of an audio device’s drivers. Generally, it is enabled by default. But, if in case, it is disabled, accidentally, you may face issues with your audio like Dolby Atmos not working in Windows 10 and Windows 11. Therefore, to resolve the issue, you should follow the steps mentioned below to enable the Exclusive Mode feature:
Step 1: In the System Tray, click right on the Speaker icon and choose Sounds from the available options.![]()
Step 2: Switch to the Playback tab, and right-click on your speaker.
Step 3: Choose Properties.
Step 4: Now, the Speakers Properties window appears, choose the Spatial sound. Click the drop-down button and choose Dolby Atmos for Headphones.
Step 5: Click on OK to apply the new changes.
Step 6: Now, choose the Advanced tab. Scroll down to the Exclusive Mode section, and tick mark all the checkboxes listed there. Then, click on OK to validate the recent changes.
Now, try to play some content just to check whether the Dolby Atmos is functioning correctly or not. Try another method, if this didn’t help.
Solution 5: Create a System Restore Point
If this problem occurred lately, it is likely activated by a modification that your machine has gone through quite recently that you cannot identify. If that is the case, then you can fix the problem, just by restoring your system to an earlier version when the system was running correctly. Follow the steps below to perform a system restore:
Step 1: Go to the search box on the taskbar, and input restore. Then, click on Create a restore point from the list of searched results.
Step 2: Navigate to the Configure… button and make a click on it.
Step 3: In the next pop-up window, find and choose the Turn on System Protection option.
Step 4: Click on OK to proceed.
Step 5: After that, choose your preferred System driver and click Create… button.
Step 6: Type a report for your restore point that you can identify. Then, click on Create.
Step 7: Now, you’ll be prompted with the following (The restore point was created successfully) message. Click Close to finish the process.
Once done, check to see if your problem has been fixed. If Dolby Atmos not working still persists, move on to the last resort.
Solution 6: Reinstall Dolby Access
None of the above fixes worked? Don’t worry, consider uninstalling and reinstalling the Dolby Access as a final resort. Dolby Access is a software application that you can use to set up Dolby Atmos for your Windows operating systems or other devices as well. But, many times, the current version of Dolby Access stops functioning as expected. In this situation, a clean reinstallation might help you out. To do so, all you need to do is – just follow the steps outlined below:
Step 1: On the taskbar, type Dolby Access in the search box. Then, find the same from the searched results and choose Uninstall.
Step 2: Wait for the Dolby Access to be successfully uninstalled from your computer system. Once it’s done, then you can visit Microsoft Store and reinstall the latest & compatible version of it.
After that, follow the on-screen instructions to set up Dolby Atmos on your Windows 11 or Windows 10 PC as you did once. This should definitely get the issue resolved for you.
Also Read: Realtek HD Audio Manager Download for Windows
Dolby Atmos Not Working on Windows 11, 10: FIXED
So, these were all the solutions you can use to fix issues or technical glitches that are preventing Dolby Atmos from working correctly. We hope Dolby Atmos not working in Windows 11, and 10 should get resolved after implementing the above-discussed ways.
Please share your experience with us through the comments below. Plus, let us know which solution worked for you in the comments box below. Are you interested in reading more tech-related articles? Then, do subscribe to our Newsletter. Alongside, follow us on Facebook, Twitter, Instagram, and Pinterest.