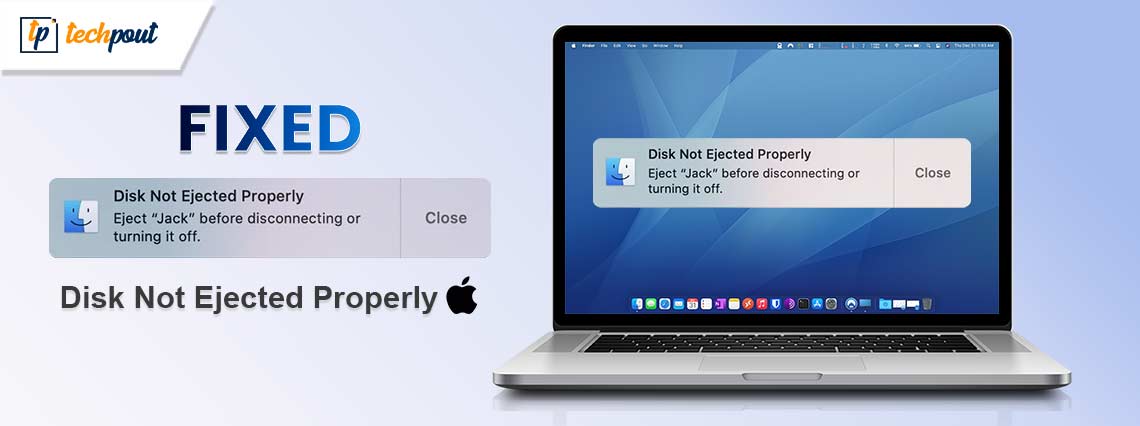
This article guides you through the best possible solutions to the Mac external disk ejection notification issue.
Safe disk ejection helps prevent data loss. Hence, a notification “Disk Not Ejected Properly” pops up when you do not safely eject the external drive from your Mac. However, many users reported annoying instances where this alert message appears out of the blue even if they have not disconnected the external drive from their device.
Are you also experiencing a similar issue? If yes, this article is the ultimate guide you are looking for to solve this problem. Here, we are going to discuss the tried and true fixes to this issue.
However, let us first discuss why the “Disk Not Ejected Properly” Mac notification appears unnecessarily before trying to turn it off. You can solve a problem with much less effort if you know what may have possibly triggered it. Hence, the following section of this article talks about the same.
Causes of Disk Not Ejected Properly Issue
Below are the possible reasons you get the unsafe disk ejection notification unexpectedly without performing disk ejection.
- Operating system errors
- External drive cable problems
- Any issue with the removable hard drive
- Defective USB or other Mac ports
- Your device has gone into a sleeping state
- Corrupt NVRAM or PRAM
Above, we listed various factors which may be responsible for the problem you are experiencing. Now, let us learn the best possible ways to solve it.
Fixes for “Disk Not Ejected Properly” Issue on Mac
You can apply the following solutions to get rid of the unnecessary or stuck Mac “Disk Not Ejected Properly” notification.
Fix 1: Check the External Drive Cable
A damaged cable may be a reason your external drive is connecting and disconnecting to your Mac, leading to the annoying appearance of the disk ejection notification. Hence, try changing the connecting cable to see if it solves the problem. However, there are more solutions for you to try if the issue remains unresolved.
Also Read: How to Share Screen on Facetime (Mac Guide)
Fix 2: Reset Your Mac’s Energy Saver Settings
After the macOS Monterey update, many users report the repeated appearance of “Disk not Ejected Properly” notifications after their Mac comes out of sleep mode. It hints towards problematic Energy Saver preferences, preventing the device from recognizing the connected drive after waking up. Hence, you can reset your Mac’s Energy Saver settings by following the below steps.
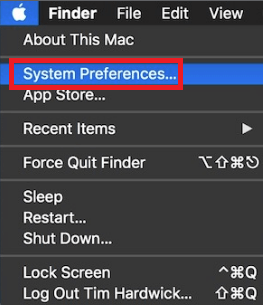
- To begin with, click on the Apple icon.
- Secondly, choose System Preferences from the menu present on your screen.
- Now, find and select the Energy Saver option from the available options.
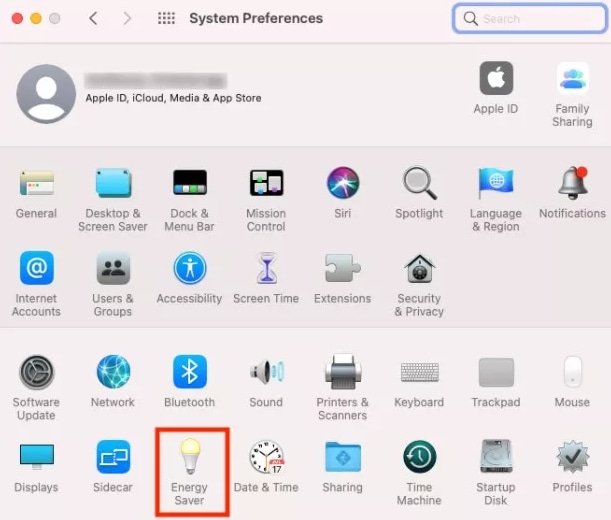
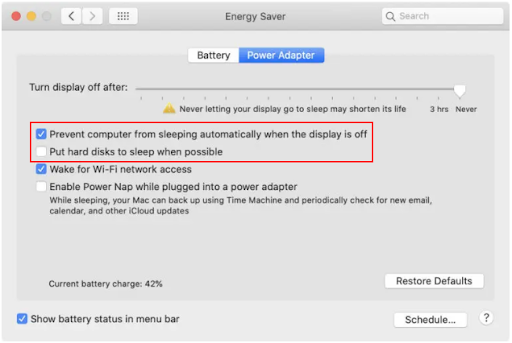
- Mark the Prevent computer from sleeping automatically when the display is off box. MacBook users will get this option after selecting the Power Adapter in Energy Saver.
- Unmark the option to Put hard disks to sleep when possible.
- Lastly, restart your Mac to complete the settings reset.
Fix 3: Try Formatting your External Hard Drive
External hard drive malfunction can be a reason you get improper disk ejection notifications. Hence, you can follow the below directions to format the drive to fix the issue. Please note that formatting the hard drive can erase some of your data. Hence, create a data backup before performing the below steps.
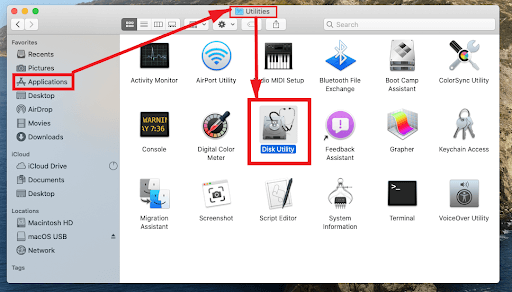
- Firstly, navigate to the Disk Utility and choose the drive you want to format.
- Secondly, choose the disk Format and Scheme.
- Click on the Erase button to proceed further.
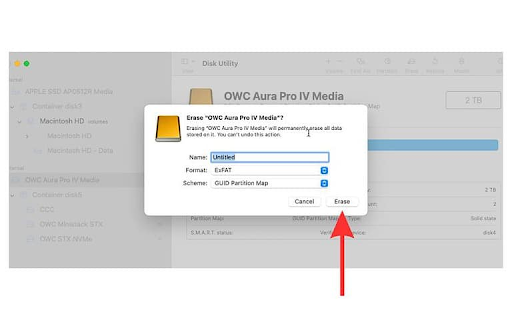
- You will now get a Scheme pop-up menu. Select GUID Partition Map from it.
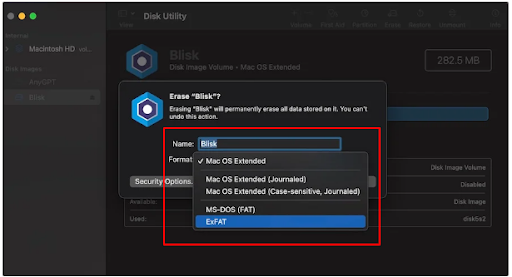
- Now, choose a file system format and input a drive name. We recommend the exFAT file format, as it boasts compatibility with both Mac and Windows.
- You can choose Security Options if your disk drive boasts additional features to ensure security.
- Choose the number of times you want to write over the deleted data and select OK.
- Lastly, select Erase and click on Done to complete the drive formatting.
Also Read: How to Fix Airdrop not showing up on Mac
Fix 4: Use First Aid to Perform a Check on Your External Hard Drive
The First Aid feature on Mac helps fix common external hard drive errors that may trigger the Mac “Disk Not Ejected Properly” issue. Hence, you can follow these directions to perform First Aid.
- To begin with, navigate to the Mac Finder.
- Secondly, choose the Go option present above the menu.
- Now, select Utilities from the available options.
- Double-click Disk Utility to launch it.

- Choose the connected external hard drive from the left pane of the Disk Utility screen.
- Select First Aid from the available options and click on the Run button.
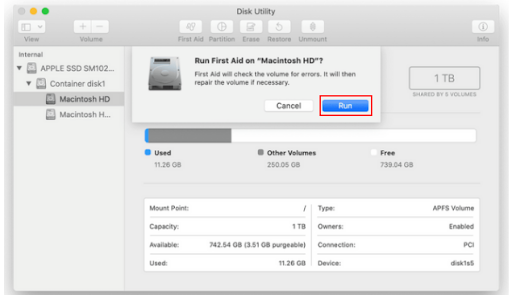
- Lastly, wait until the First Aid is completed.
Fix 5: Reset your Mac’s NVRAM or PRAM
NVRAM is responsible for storing your device’s configurational information. However, you can experience problems such as “Disk Not Ejected Properly” on Mac if the NVRAM or PRAM gets corrupted. Hence, here are the steps you can follow to reset the NVRAM/PRAM to drive the problem away from your Mac.
- To begin with, power off your Mac.
- Secondly, press your Mac’s Option, Command, P, and R buttons in unison until twenty seconds.
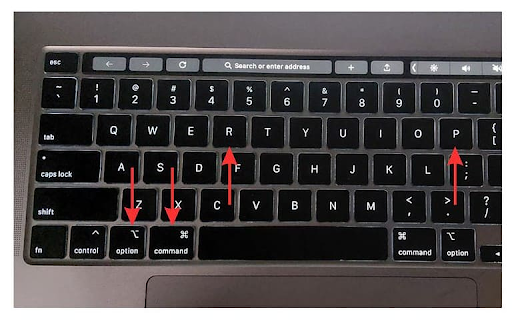
- Lastly, release all the above keys when you get the Apple logo twice on your screen.
Fix 6: Check the USB port
Many users need a USB adapter to connect their external hard drives to Mac, as a lot of Macs boast USB-C ports and hard drives/SSDs continue to have the old USB-A connector. Hence, you can check the port for damages and use a different adapter to solve the problem.
Also Read: How to Fix Frozen Mac or Macbook
Fix 7: Update macOS
macOS is not immune to bugs. Like every other operating system, random bugs can affect its performance and cause problems like the one you are experiencing. Hence, you can follow the below steps to update macOS to fix bugs.
- To begin with, select the Apple icon and choose System Preferences from the menu that appears.

- Secondly, select General from the System Preferences menu.
- Now, select Software Update from the General options.
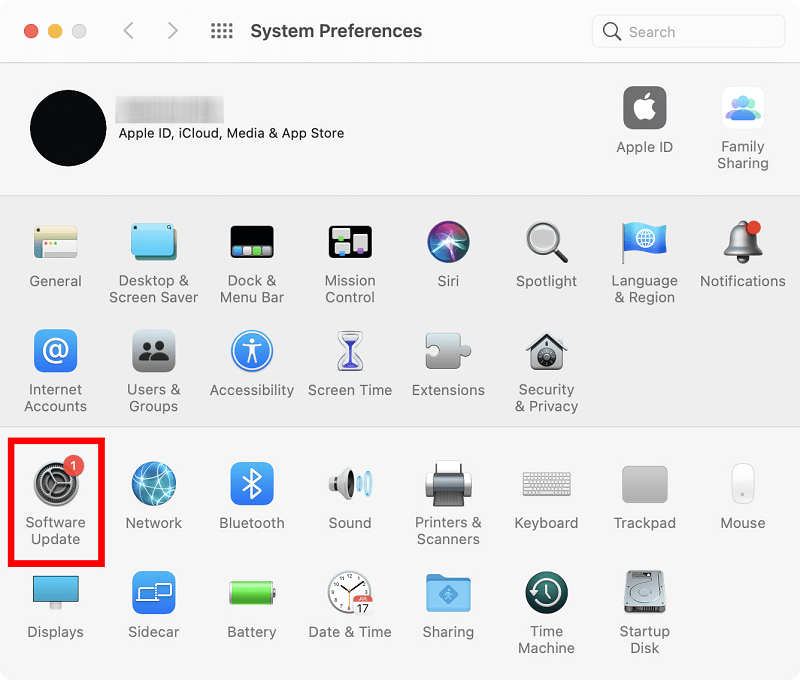
- Allow your Mac to find the available updates for your device.
- Download and install the available macOS updates.
- Lastly, restart your Mac after completing the above process.
“Disk Not Ejected Properly” on Mac Fixed
This article guided you through various fixes to the Mac disk ejection problem. You can start troubleshooting the problem with the first solution and keep moving forward until the issue disappears. However, if you have any questions or suggestions about this article, feel free to drop a comment in the comments section. We will be pleased to get in touch with you.

