How to Fix Black Box on Mouse Cursor Issue

Experiencing black box on Mouse cursor in Windows 10, 11? If yes, then nothing to worry about, here are a few workable solutions to get rid of this problem. Continue reading for more information!
Do you have a strange problem on your computer in which black box appears around the pointer in the middle of the screen? This issue manifests itself either when the pointer on the mouse is broken or when the WDDM (Windows Display Driver Model) gets compromised.
In any case, utilizing your system with a massive black square around your mouse cursor may be a source of annoyance. Not only does it spoil the experience for the user, but it too makes accessing a PC a lot harder. If you’ve experienced anything similar, there is no need to worry since we may have a solution for you!
In this tutorial, we will walk you through the process of resolving the Black Box on Mouse Cursor in Windows 11, 10.
What Causes Black Box on Mouse Cursor?
This is an infuriating problem, and in most cases, the following factors are to blame for it:
- Broken or Outdated Drivers: If the GPU drivers on the computer are not up to date, you may have difficulties. It is for this reason that you should consider updating the drivers for your graphics card.
- Mouse Settings: Adjusting the mouse settings on your own computer may be all that is required to rectify the situation and resolve the problem.
A List of Solutions To Fix Black Box on Mouse Cursor in Windows 10, 11
Now, without further ado, have a look at the solutions mentioned below to easily fix black box on mouse cursor in Windows 11, 10 PC.
Solution 1: Try Adjusting the Size of the Pointer
It is not feasible that the mysterious black box was brought about by a technical error in the PC. It’s possible that by fiddling about with the fundamental settings of the mouse pointer, you may refresh it & get rid of the issue. Follow the steps below to resolve black box on mouse cursor in Windows 10, 11:
Step 1: Navigate to settings menu on your system. You may do this by using the keyboard shortcut Windows + I, or you can look for settings using the search function in start menu.
Step 2: Then, from the menu that appears, choose “Settings,” then select “Left Panel” in order to reveal the option “Accessibility“.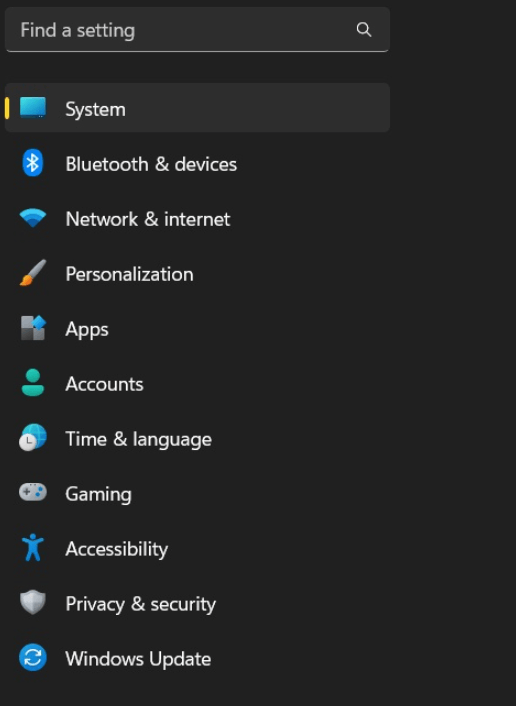
Step 3: After that, in the Accessibility menu, choose the “Mouse” option available under “Interaction” heading by scrolling down the page.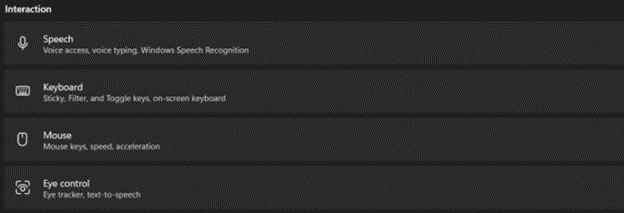
Step 4: Locate the “Mouse pointer” option in the “Mouse settings” section of the control panel. Simply clicking on it will bring up the pointer settings.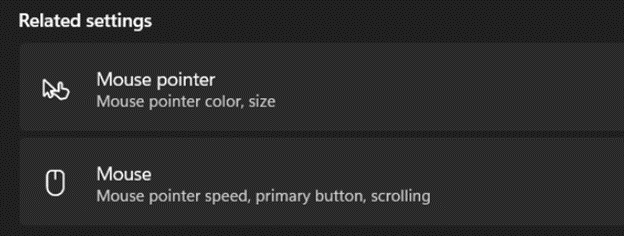
Step 5: Now, ensure to set the Mouse Pointer Style to normal from all the available choices in the settings, and then move the slider for changing the settings so that they are appropriate for your needs.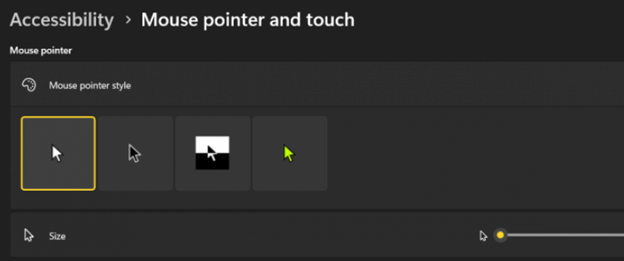
Also Read: Fixed: Mouse Double Clicks Issues On Windows 10 [Solved]
Solution 2: Turn on the Pointer Shadow Setting
Enabling the pointer shadow in the pointer settings is another potential solution to the issue you are experiencing. Follow the steps below to enable the pointer shadow setting in order to fix black box on mouse cursor in Windows 11, 10.
Step 1: While holding down the Windows + S, type the pointer. Now click on Change the mouse pointer display or the speed.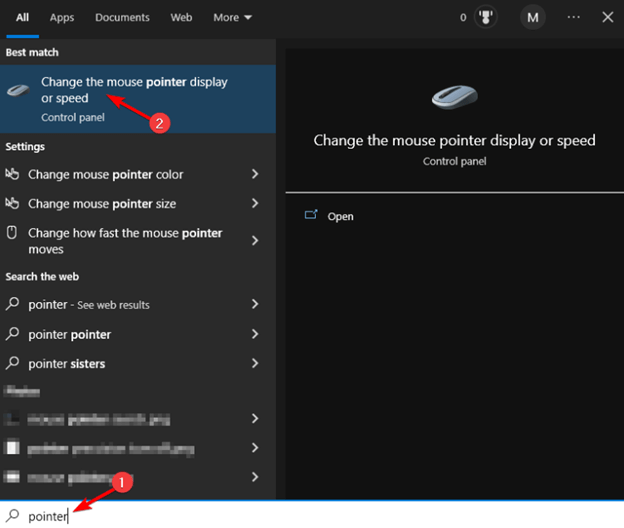
Step 2: Locate and click on pointers, and tick the box next to Enable pointer shadow.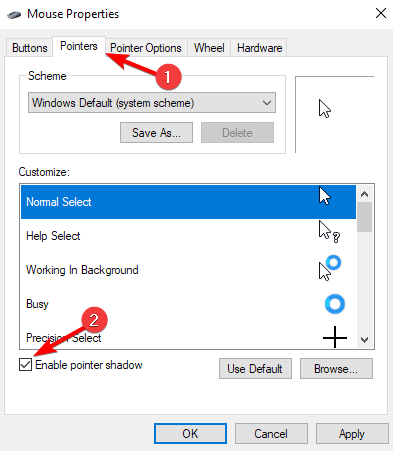
Step 3: In the last step, click the Apply and OK buttons to preserve your changes.
Solution 3: Alter the Display Scheme for the Mouse Pointer
The mouse pointer setup may be the root of the problem. In most cases, when users attempt to personalize the cursor, they end up changing the settings, which often results in problems such as a black box appearing around it. In either case, reverting the mouse pointer display option to its default, “basics,” may be a solution to the problem. Here is how to fix black box on mouse cursor in Windows 11, 10 this way:
Step 1: While holding down the Windows + S, type Pointer. Choose Change the Mouse Display or Speed. 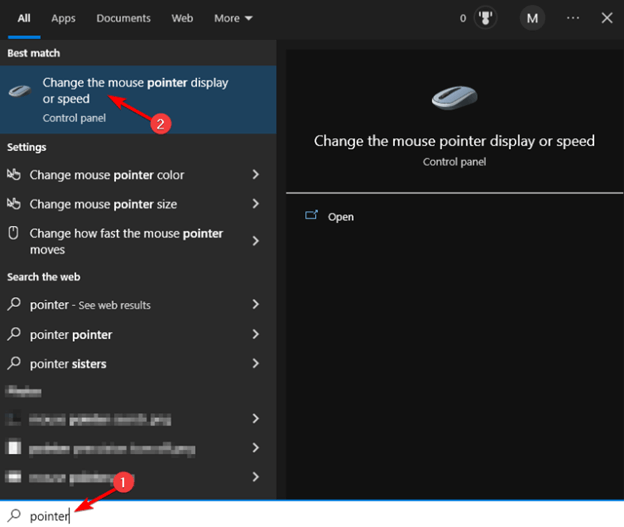
Step 2: Make sure you’re on the Pointers tab.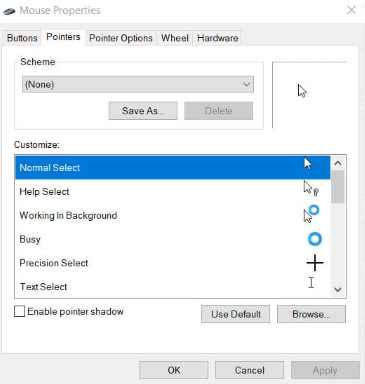
Step 3: The next step is to use the drop-down menu under the Scheme heading and pick the “None” option. To save the updated configuration, you need to click the Apply button.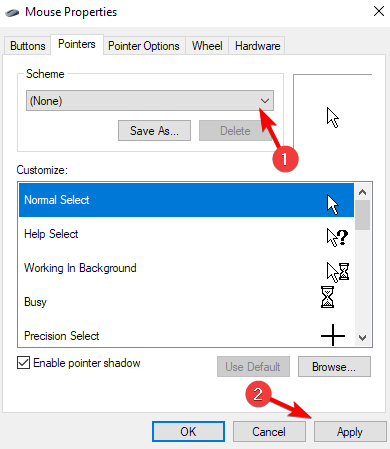
Now, test the issue, if you still encounter a black box on mouse cursor error, then try another solution.
Also Read: Fix: Mouse Cursor Disappears On Windows 10 [Solved]
Solution 4: Update Outdated Graphics and Display Drivers
Do not worry if modifying the mouse pointer settings as well as the display scheme did not solve the problem for you since there are more solutions. The first step in removing the black box that appears around the mouse pointer is to find and update the outdated, broken, or missing graphics card drivers.
In most cases, the appearance of spots like these on display is due to an outdated, or incompatible graphics driver configuration. Therefore, keeping it up to date might be beneficial to you.
Nevertheless, keeping drivers up to date is not a simple process. Especially if you’re just starting out or are not acquainted with the specifics of how to carry out the same task. We strongly encourage everyone to make use of Bit Driver Updater as it will make the procedure much easier.
Step 1: The first thing you need to do is follow this link below to download & install the program.
Step 2: Conduct a speedy check to locate all of the out-of-date drivers on the computer. To do so, simply click on the Scan option.
Step 3: When the scanning finishes, choose the drivers that need to be updated by clicking the Update All button. This will install the latest version of all PC drivers in one click.
Because you are unsure as to whether the issue is related to the GPU drivers or the mouse drivers, the tool comes in helpful for troubleshooting this particular issue as well. It may be possible for you to complete the task at hand by updating all of the older drivers that are present up to date. Proceed with the next solution if this didn’t solve the black box on mouse cursor problem for you.
Solution 5: Turn Off the WDDM Graphics Display Driver
If in case, updating the GPU drivers did not work for you, then you can try to turn off the WDDM (Windows Display Driver Model) graphics display driver to fix the black box on mouse cursor in Windows 10, 11 PC. To do so, follow the steps mentioned below:
Step 1: Hit Windows + R keys together to open Run terminal. Then, type in gpedit.msc. After that, hit the enter key.
Step 2: Next, under the box for the Group Policy Editor, choose Computer Configuration.
Step 3: Expand Administrative Templates, then choose Windows Components from the menu that appears.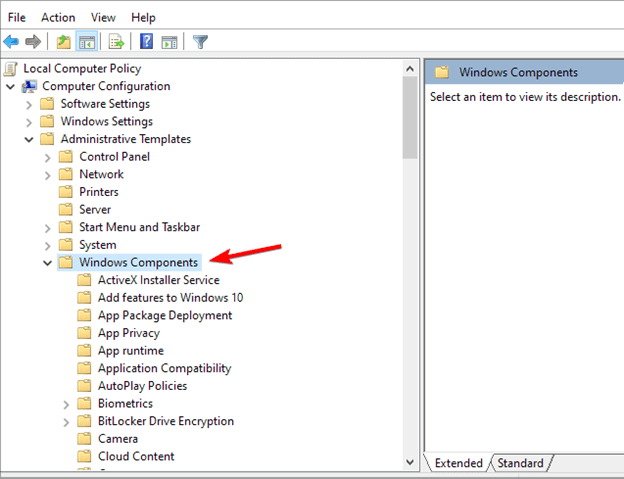
Step 4: Choose Remote Desktop Services option from the component list. Following that, go to the location known as Remote Desktop Session Host.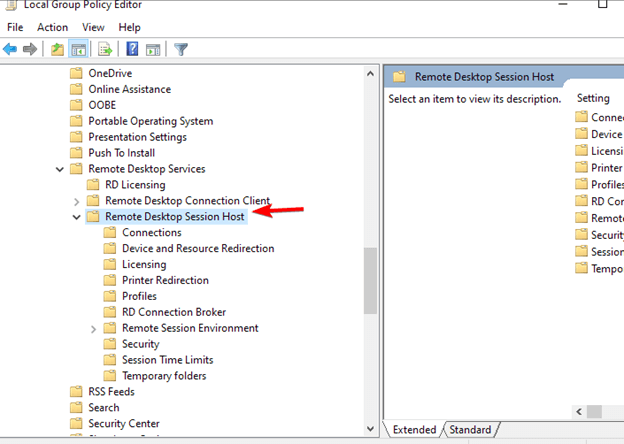
Step 5: After that, choose Remote Session Environment from the menu on the left side of the Group Policy Editor window. In the last step, choose the Use WDDM graphics display driver for Remote Desktop Connections option and then double-click it.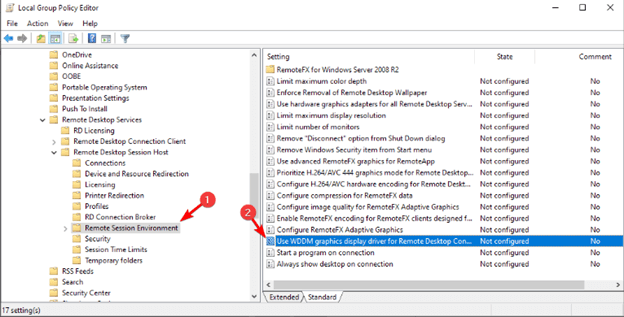
Step 6: To disable it, click the corresponding radio option. Choose the Apply & OK buttons.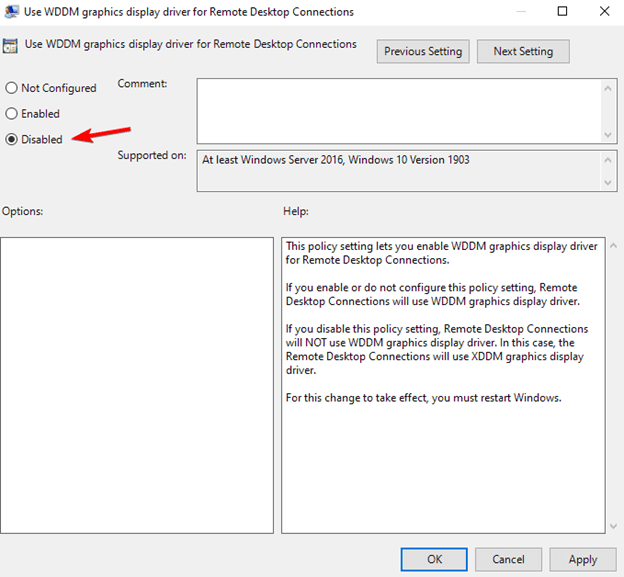
Also Read: How to Fix Mouse Right Click Not Working in Windows 10, 11
How to Fix Black Box On Mouse Cursor In Windows 10, 11: Explained
These are some of the probable methods that people have verified to work for repairing the black boxes that appear around the cursors. If you apply these solutions, you should be able to fix the black box on mouse pointer in Windows 11, 10.
We really hope that this article was able to assist you in regaining control of your mouse cursor. What other potential options have you looked into? Leave your thoughts in the comments section below. For more technical information, you can subscribe to our Newsletter and follow us on Social Media.


