Read on to know the handiest methods to download and reinstall wireless network adapter drivers for Windows 10 PC.
If you want to ensure that the WiFi connection of your Windows 10 PC works smoothly or if you want to resolve issues related to your wireless network, you should keep your wireless network adapter driver updated. Because when the wireless network adapter driver goes missing or becomes corrupted, you can face connectivity or wireless performance issues.
Therefore, in order to fix all possible network issues updating or reinstalling your wireless network adapter driver is essential. Now, if you are wondering how to download the wireless network adapter driver for Windows 10, then we can help. The post has multiple ways that help you fix unexpected wireless network issues on your Windows 10 PC.
Methods to Download, Install and Update Wireless Network Adapter Driver
Here are three ways for you to download and install the Wireless network adapter driver for Windows 10, easily & quickly. Let’s read them below:
Method 1: Download Wireless Network Adapter Driver from Manufacturer’s Website
The user can download WiFi drivers by going to the official website of their device manufacturer, then install the required drivers manually. Here are the steps to download wireless network adapter driver for Windows 10 through this method:
- Visit the official site of your device manufacturer (it can be either your computer or wireless network adapter manufacturer).
- Next, type the model name and search for your product.
- Navigate to the Support or driver download page of your product. Then click on the Download button to get the driver installer.
Note: Do keep in mind to download the driver that is compatible with the version of your Windows operating system. - Run the downloaded file and perform the on-screen instructions to successfully install Wireless network adapter driver for Windows 10 PC. Lastly, reboot your system to apply the recent changes.
Also Read: Update Wifi Driver on Windows 10 – Update Wireless Software Easily
Method 2: Update Wireless Network Driver in Device Manager
Another way to perform WiFi driver download is using Device Manager. It is a default program in Windows PC for managing connected hardware and related drivers. So you can use this tool to download Wireless network adapter driver for Windows 10. Follow the steps outlined below:
- First of all, open the Run terminal using Windows + I keys combination.
- Then, write the following command and hit the Enter key.
devmgmt.msc
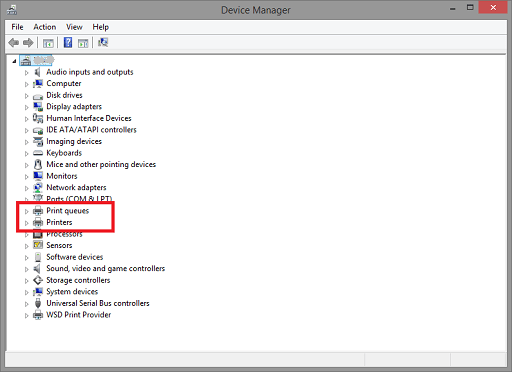
- This will trigger Device Manager on your screen. You need to locate and double-click the Network Adapters category here.
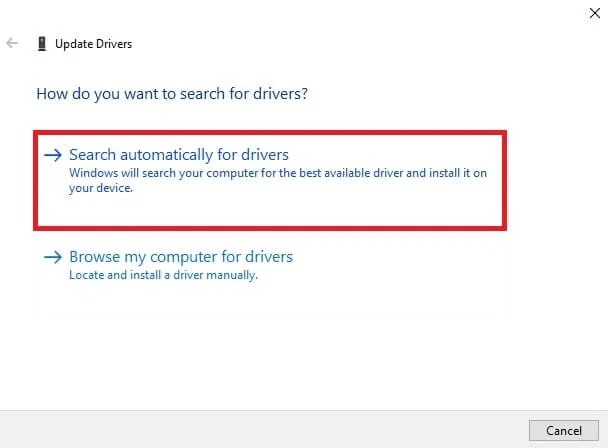
- In the list, find and make right-click on your wireless network driver. Then, choose Update Driver Software.

- From the next window, select Search Automatically For Updated Driver Software.

Now, the Windows in-built program starts looking for the latest version of drivers. If detected, they will be installed automatically.
Also Read: How To Fix WiFi Not Working in Windows
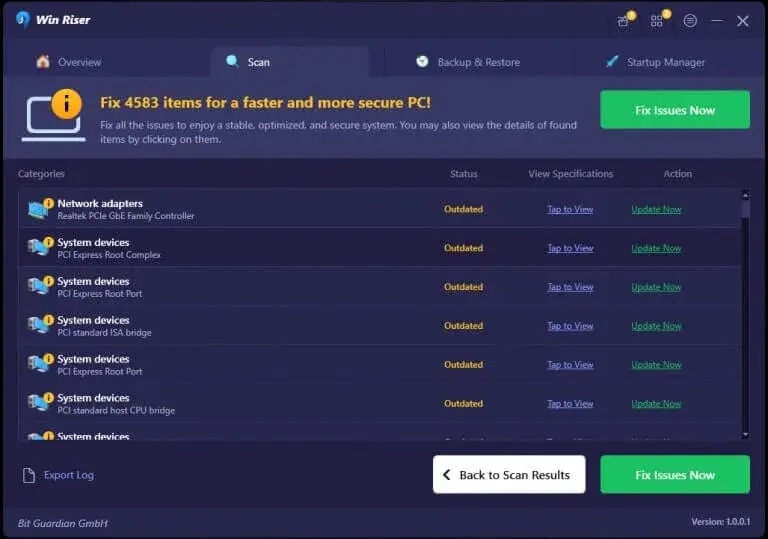
Method 3: Automatically Update Wireless Network Adapter driver using Bit Driver Updater (Recommended)
Unable to find WiFi driver manually? Don’t worry, try Bit Driver Updater to automatically install the latest wireless network adapter driver on your PC.
Bit Driver Updater is the best way to fix all driver-related issues. What’s more, the software takes only a few simple clicks of your mouse to find and install the latest driver updates. In addition to updating the drivers, it is also an excellent way to clean system junk and speed up the PC performance.
Scan scheduling, auto backup & restore, certified drivers, round-the-clock support, system optimizer, and automated working are some of the major features of Bit Driver Updater.
The driver updating program comes in two different versions i.e., free or pro version. With its free version, you can update drivers one by one. Whereas, the pro version allows you to update all outdated or damaged drivers just within a click. Also, you get a 60-days complete refund policy. Now, here are the steps that need to be followed in order to update wireless network adapter driver for Windows 10 via Bit Driver Updater:
- Download and install Bit Driver Updater. You can do it for Free by clicking on the button below.
- Run the driver updater on your system and click on Scan.

- Wait for the scanning to be completed. Check the scan results and click on the Update Now button reflected next to the wireless network driver. Users with the pro version can also make a click on the Update All button. By clicking on the Update All button, users can update all outdated or corrupted drivers within a click.

- Lastly, restart your computer.

See how amazing and quick it is to use Bit Driver Updater. This is the most uncomplicated way to update outdated PC drivers.
Bonus-Tip: How to Reinstall Wireless Network Adapter Driver on Windows 10?
If updating the WiFi drivers fails to make your Wireless network adapter driver work again as expected. Then, you can also try to reinstall the respective drivers to fix the issue. To do so, you simply need to follow the steps shared below:
- First of all, launch Device Manager by quickly pressing Windows + X keyboard keys at a time.

- Locate and double-click on the Network adapters category to expand it.
- Navigate to your wireless network adapter and right-click on it.
- Next, choose Uninstall Device to proceed.

- After that, tick the box adjacent to Delete the driver software for this device and click on Uninstall. If a confirmation box prompts on your computer screen, then you need to click on YES to continue.

- Once it’s done, your wireless network adapter will vanish from the list of Network adapters.
- Choose Network Adapters in the Device Manager and click on Action.
- Click on Scan for hardware changes. Now, Windows will find the missing driver for your network adapter and automatically reinstall wireless network adapter driver on Windows 10.
To be more specific, you can check if the latest wireless network adapter driver is re-appearing in the list of Network adapters. For this, simply click double on Network adapters, and here you will see the wireless network driver which has been reinstalled. Once everything is done, restart your PC.
Also Read: Update Network Adapter Driver on Windows
WiFi Driver Download & Reinstall on Windows 10: DONE
In this tutorial, we have shared non-cumbersome methods to download and update Wireless network adapter driver for Windows 10. Out of all, we recommend you use Bit Driver Updater in order to automatically and hassle-free perform this task.
Furthermore, we have also discussed the steps to reinstall Wireless network adapter driver on Windows 10. We hope you find this guide useful. If you have any kind of doubts or queries, then feel free to drop them in the comments section below.
For more tech-related information, articles or news, do subscribe to our Newsletter. Also, get the latest tech trends on Facebook, Twitter, Instagram, and Pinterest.
![Dell Latitude E6430 Drivers Download & Update for Windows [Fixed]](https://wpcontent.techpout.com/techpout/wp-content/uploads/2022/02/25180030/Dell-Latitude-E6430-Drivers-Download-Update-for-Windows-Fixed.jpg)