How to Map Network Drive Windows 11 [Complete Guide]
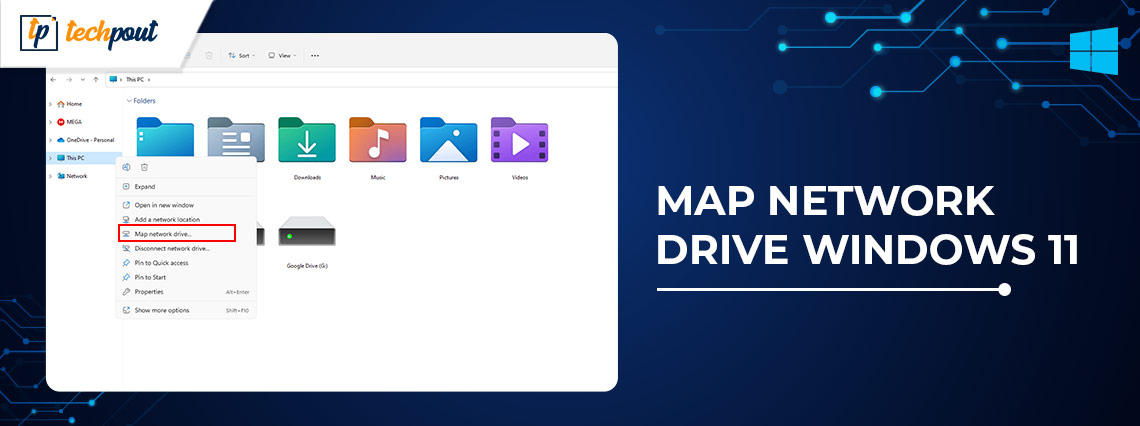
This article acquaints you with the 3 easiest ways to map a network drive on Windows 11 to access a folder effortlessly on the other computer in your network.
Do you wish to share folder resources between computers connected to a local network? If yes, you can map Windows 11 network drive.
Windows 11 network drive mapping helps access resources like they are present on your local device, making it easier for users (particularly organizations or businesses with multiple servers/computers) to share files and other resources effortlessly.
If you also wish to map a drive on Windows 11 but are unsure how to do it, you have arrived at the right place. This article presents the easiest guide to do it.
Let us begin with Windows 11 network drive mapping without wasting your extremely-valuable time.
Quick and Easy Methods to Map Windows 11 Network Drive for Free
You can follow these simple ways to map a network drive on Windows 11.
Method 1: Map Windows 11 network drive using File Explorer
You can map the network drive on Windows 11 by following two easy steps. Below we share the same.
Step 1: Make your PC discoverable on the network
You can perform Windows 11 network drive mapping if your computer is discoverable on the network. Here is how to make the device discoverable.
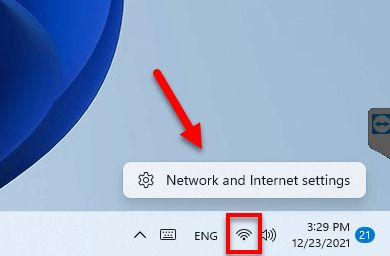
- Right-click on the internet icon present on your taskbar’s right side and choose Network & Internet settings.
- Now, click the Properties option at the top if it does not say Private Network.
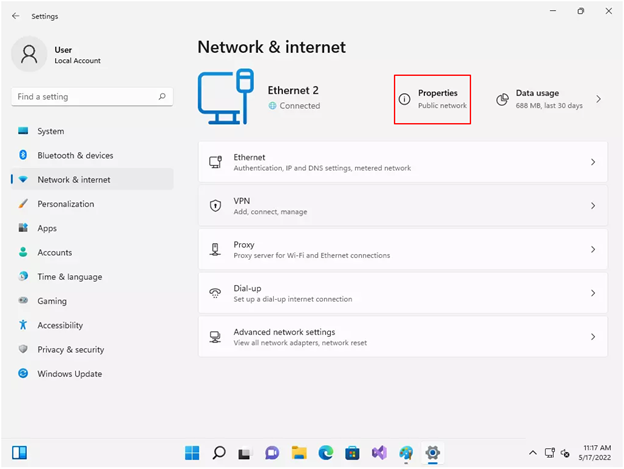
- Choose Private Network as your Network profile type.
- Now, go to the Advanced network settings.
- Select Advanced sharing settings and enable Network discovery if it is not enabled. Also, ensure that File and printer sharing is enabled.
Also Read: How to Fix or Bypass This PC Can’t Run Windows 11 Issue
Step 2: Link the network drive to the shared folder
After making your computer discoverable on the network, now is the time to perform the actual task of Windows 11 network drive mapping. Below is the detailed process to do it.
- Firstly, use your keyboard’s Windows+E shortcut to open File Explorer.
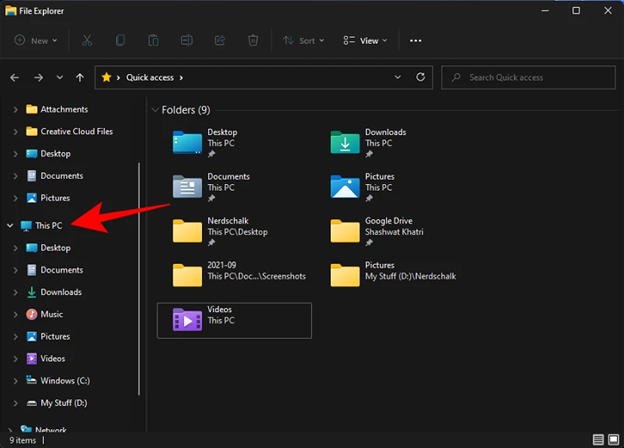
- Now, select This PC from the left panel of your File Explorer window.
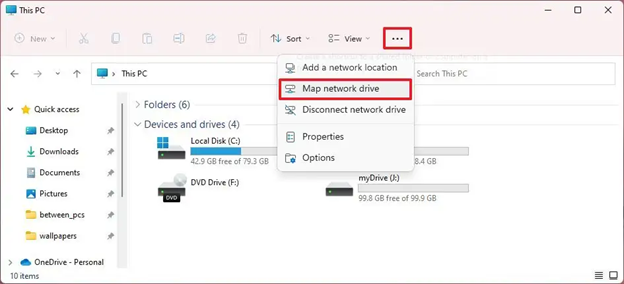
- Choose the ellipsis icon (…) from the top and select the Map network drive option from the dropdown menu.
- Now, assign a letter to your drive (you can assign any letter that is not already assigned to any other drive on your computer).
- Click on the Browse button after assigning the drive letter.
Note: Ensure Reconnect at sign-in option is selected if you wish to connect to the mapped folder every time you sign in to your computer.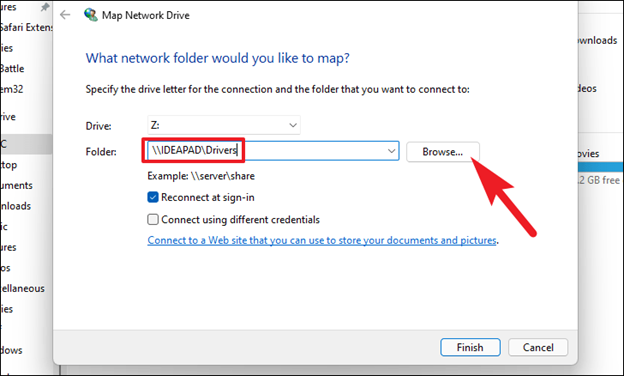
- Now, select the folder you wish to link to the network drive and click on the OK button.
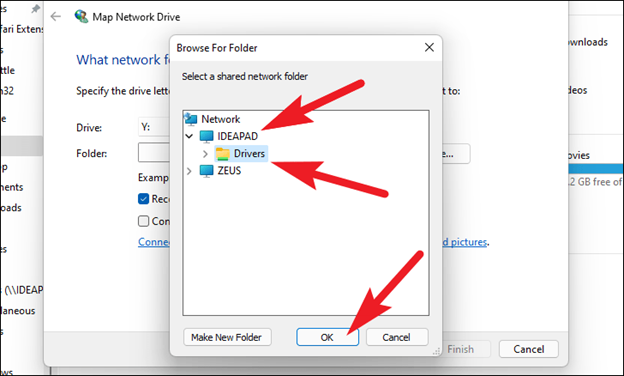
- Lastly, click on the Finish button to complete the Windows 11 network drive mapping.
Also Read: How to Fix Windows 10, 11 Memory Leak Issue
Method 2: Map your network drive using PowerShell
Though it is a bit of an advanced process (more suitable for techies), below is how you can map Windows 11 network drive via PowerShell.
- Firstly, right-click the Start icon on your taskbar, and choose Windows PowerShell from the on-screen menu.
- Now, input the New-PSDrive -Name “DRIVER-LETTER” -PSProvider “FileSystem” -Root “\\DEVICE-NAME-OR-IP\SHARED-FOLDER” -Persist command in the on-screen window and press Enter.
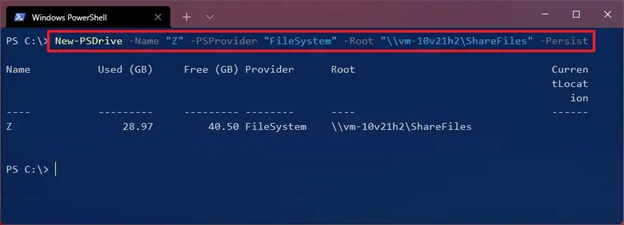
Note: In the command, use a drive letter (other than the ones already in use on your computer) in place of the DRIVER-LETTER. Also, replace the DEVICE-NAME-OR-IP and SHARED-FOLDER with the computer name or IP address of the PC hosting the shared folder and the share’s name. As an example, you can refer to the below screenshot.
- Lastly, wait for the command’s execution to complete.
Note: You can also perform Windows 11 network mapping with a password using PowerShell. Open PowerShell, execute the command $cred = Get-Credential -Credential USERNAME, confirm your account password, click on OK, execute the command New-PSDrive -Name “E” -Root “\\DEVICE-NAME-OR-IP\SHARED-FOLDER” -Persist -PSProvider “FileSystem” -Credential $cred (assigning the drive letter manually) to map the drive with a password.
Method 3: Use Command Prompt to map a network drive on Windows 11
You can also use Command Prompt or CMD for Windows 11 network drive mapping. Below is how to do it.
- Firstly, use your computer’s search function to find and open Command Prompt.
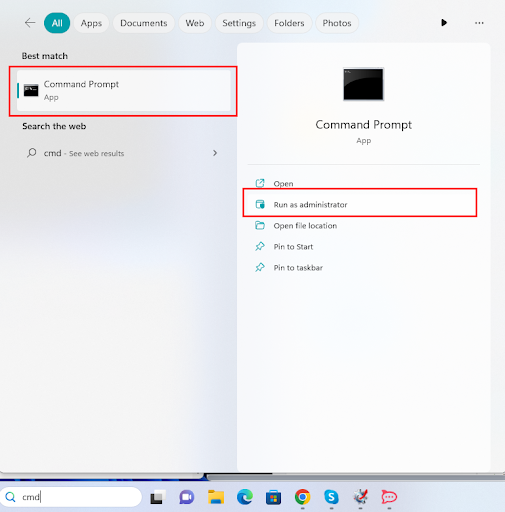
- After opening the Command Prompt, input the following command.
net use Z: \\DEVICE-NAME-OR-IP\SHARED-FOLDER
Note: Replace Z with a drive letter you haven’t used yet. Also, use your computer’s name or IP address of the hosting device and share’s name instead of DEVICE-NAME-OR-IP and SHARED-FOLDER. As an example, you can see the command in the following screenshot.
- Input the command net use * \\DEVICE-NAME-OR-IP\SHARED-FOLDER and press Enter to perform network drive mapping while assigning the drive letter automatically.
Note: Ensure to replace DEVICE-NAME-OR-IP and SHARED-FOLDER with your computer’s name or host device’s IP address and share’s name. As an example, you can see the command in the following screenshot.
- Now, input the command net use Z: \\DEVICE-NAME-OR-IP\SHARED-FOLDER PASSWORD /user:USERNAME /persistent:yes to map a drive with authentication details and press the Enter key.

Note: Do not forget to write a drive letter (which you haven’t already used) in place of Z. Also, replace DEVICE-NAME-OR-IP and SHARED-FOLDER with the computer name or IP address of the PC hosting the shared folder and the share’s name. You can check the following screenshot for reference.
Above, we shared various methods to add Windows 11 network drive to make it usable by other computers on the network. You can find the mapped drive in the File Explorer. However, if it shows a missing Windows 11 network drive, you can restart your computer and update PC drivers to fix the issue.
Also Read: How to Fix Driver Can’t Load on this Device on Windows 11,10
Windows 11 Network Drive Mapped Successfully
This article answered the question, “How do I map a network drive in Windows 11?” You can apply any of the above methods to map a Windows 11 network drive. However, if you have any questions/concerns about the same or wish to suggest something regarding this article, do not hesitate to write us a comment.


