How to Fix Winget is Not Recognized (Quickly & Easily)
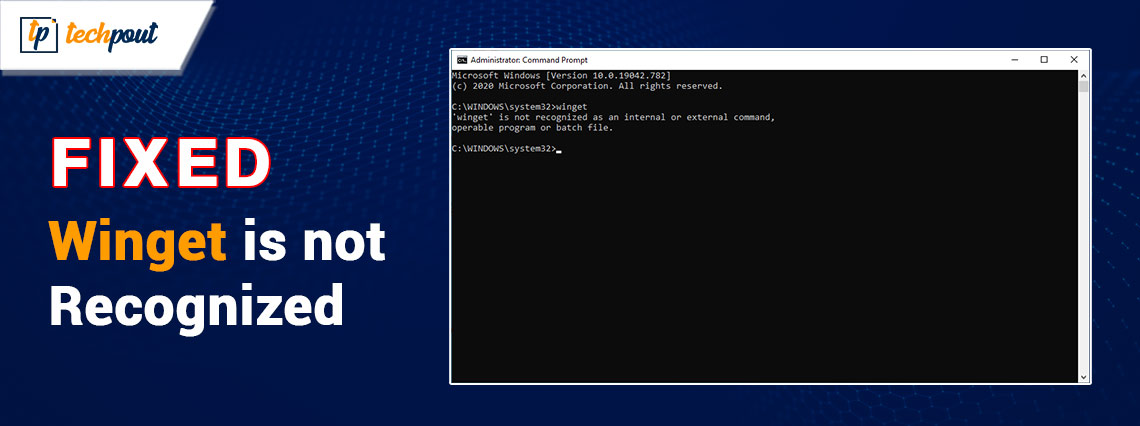
Running into Winget is not recognized on Windows 10/11? Don’t worry, after reading this article, you will be able to resolve the problem quickly.
Winget, a robust command line utility tool that allows users to download & install application packages from the Microsoft Store as well as the applications that are part of its repository. In addition, the tool saves a significant amount of time & manual effort that would otherwise be necessary to search for a certain application on the internet or in Microsoft Store, download it, then manually install it.
On the other hand, some users have reported that, Winget isn’t functioning properly on their computers. They are experiencing an error that states “Winget Not Recognized” and are unable to perform any commands. This article will explore numerous techniques to fix the problem and return Winget to functioning properly. Generally, in such situations, it’s best to use PC optimizer Software, however, for enhanced solutions try the ones provided below.
What Causes, “Winget Not Recognized” Error on Windows PC
If you are using a Windows computer, the following are the reasons why the Winget tool is not functioning properly:
- Possibly, you are using an App Installer’s outdated version.
- During the installation process, the App Installer was unable to automatically add the PATH environment variable.
- Either the servers of Winget are unavailable or you do not have an active or stable internet connection.
- In the case of Winget, the application execution alias is either not set or inactive.
You are now aware of the factors that led to the Winget not working properly. To fix the problem and get back to using your preferred package manager, you should give these approaches a shot. One of those helps you resolve the problem.
How to Fix Winget Is Not Recognized on Windows PC
Following are a few tried and tested solutions that you can use in order to fix Winget not recognized on Windows 11, 10. Without further ado, let’s get started:
Solution 1: Closing & Re-opening Winget in Terminal
Before continuing to more sophisticated solutions, make sure that the instance of PowerShell or Command Prompt that you are now executing on the computer is closed. In order to terminate a case of either of the command line tools that are malfunctioning, you can make use of the Task Manager.
Thereafter, make sure you open PowerShell or Command Prompt under Administrator’s rights. Then, input Winget and hit Enter key in order to test if the Winget not recognized is solved. If not, then move on to another solution.
Also Read: How to Fix USB Device Not Recognized Windows 11,10
Solution 2: Run A Complete Shutdown of PC
Windows takes advantage of Fast Startup in order to put kernel-level programs into hibernation. In case, any of the corresponding processes experience any kind of problem, they will continue to stay in that particular state even after you turn up the machine. So, execute a full shutdown to stop and restart all the essential services, then attempt to open Winget. For this task, follow the steps below:
Step 1: To launch the Run box, press the Win + R key simultaneously. Next, type cmd, then press the Ctrl, Shift, + Enter keys together in order to invoke Command Prompt under administrator rights.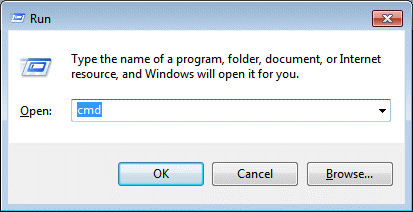
Step 2: On Command Prompt (Admin), type ‘shutdown /s /f /t 0’ and hit the Enter key.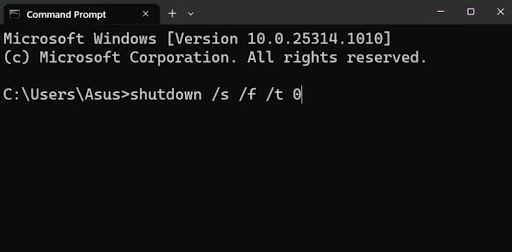
Step 3: This will shutdown your system completely. Because the Windows OS will terminate everything, the shutdown process will take a bit longer than normal.
Step 4: Turn on your computer and use the Terminal application to put Winget through its paces to see whether it is now functioning properly.
If the ‘Winget not recognized’ issue persists, then try the next method to fix it.
Solution 3: Setting Up the Right Path
If your path is wrong or you altered it earlier in order to test something, then you are required to set the accurate path in the Environment Variables section to fix the Winget not recognized issue. To set up the correct path for winget.exe, simply follow the steps shared below:
Step 1: Look for the Environment Variables and then launch individual search outcomes.
Step 2: Next, click the Environment Variables option.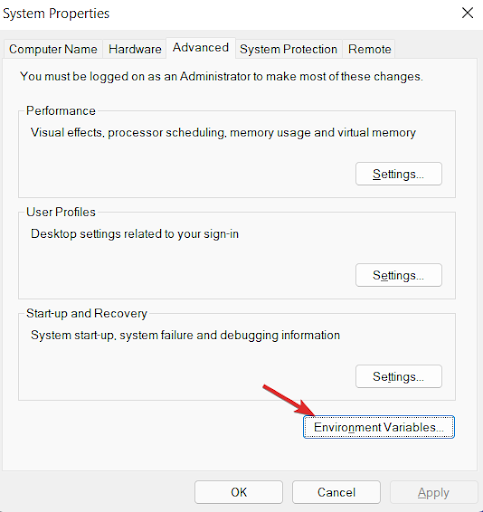
Step 3: Choose the Path, then click the Edit button.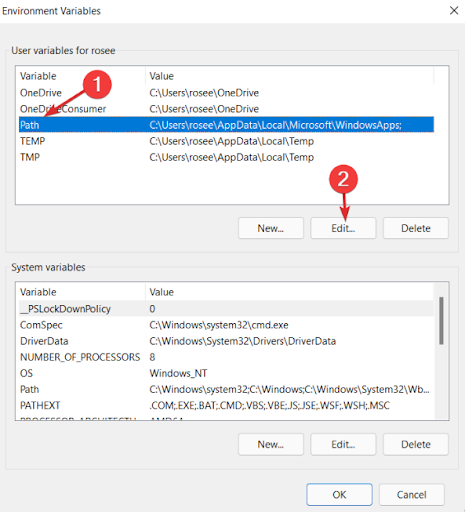
Step 4: After that, choose the currently existing path, and click Edit button.
Step 5: Now, input the following path:
%userprofile%\AppData\Local\Microsoft\WindowsApps
Step 6: Lastly, use the OK button to proceed.
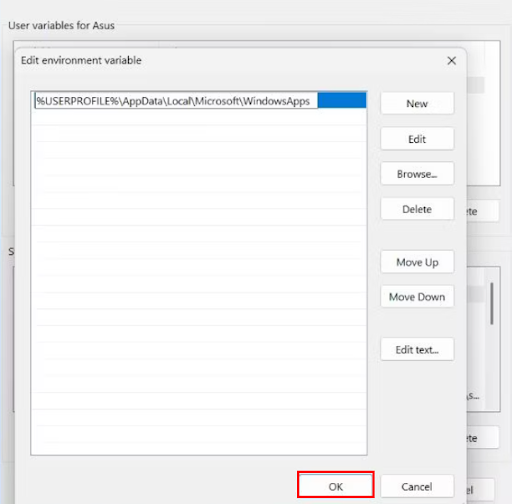
Next, reboot your device and check to see if it fixes your problem. If not, then proceed with other solutions mentioned below.
Also Read: How to Fix BIOS Not Detecting SSD in Computer PC
Solution 4: Updating App Installer
Windows 10 and Windows 11 now include Winget, which is shipped to computers through the application called App Installer. If you have not updated App Installer in a considerable amount of time, you may experience difficulties when attempting to run Winget and manage packages. Winget is compatible with the 1.11.11451 or higher versions of App Installer. In order to determine whether or not there are any outstanding updates for the App Installer, launch the Microsoft Store and check the library area. Find and install the available update manually, and then check to see if Winget is functioning properly. If you still face Winget not recognized on PC, then try another tactic.
Solution 5: Use PowerShell to Re-register Winget
Using PowerShell, you may re-register Winget on your computer if it is not functioning properly. It is feasible to re-register Winget since it’s a component of the App Installer, which is an application that is part of the system. For this task, follow the steps below:
Step 1: To invoke the Run terminal, press the Win + R keyboard keys simultaneously. And, input PowerShell in the text box then altogether press CTRL + SHIFT + ENTER keyboard keys to proceed.
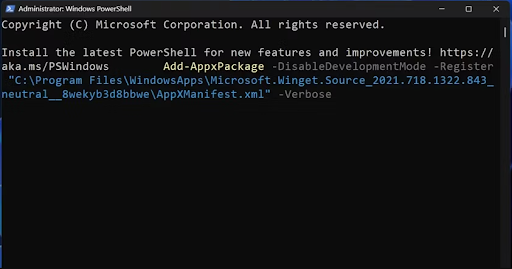
Step 2: The above action will open PowerShell window with administrative privileges. Paste the below-provided command and hit Enter key from your keyboard to run it:
Add-AppxPackage -DisableDevelopmentMode -Register “C:\Program Files\WindowsApps\Microsoft.Winget.Source_2021.718.1322.843_neutral__8wekyb3d8bbwe\AppXManifest.xml” -Verbose
Step 3: Following the successful execution of the command, you won’t get any confirmation prompt. Restart your computer once you have closed the PowerShell.
Solution 6: Enable the App Execution Alias
In the event that the App Execution Alias for Winget is deactivated, attempting to access Winget via the terminal will not cause it to function properly. Therefore, activate it inside the settings of the application. To do so, follow the procedure given below:
Step 1: Access the Power User menu by right-clicking the Start button. To access the Settings app, click on it.
Step 2: Go to the menu on the left side of the screen and then click the Apps option.
Step 3: To proceed, select the Advanced App Settings option from the menu. After that, click the option that says “App execution aliases“.
Step 4: Find the Windows Package Manager Client option. Next, check the toggle that is located next to it. To enable the app execution alias for the application, click on it if it is currently on the disabled list.
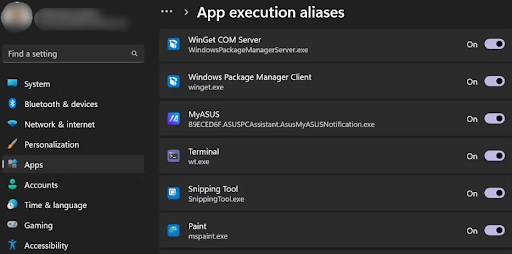
Step 5: Close Settings.
Also Read: IRQL Not Less Or Equal Error in Windows 10, 11 [Fixed]
Solution 6: Try Generic Fixes
In the event that none of the above-shared methods are successful for you, you can try some easy & effective generic fixes, such as SFC & DISM scans, which locate and repair the corruption in the system files and service the Windows Image Components. In addition, you need to begin by running SFC scan and allowing it to locate and replace any faulty system files that may be present. Thereafter, you can continue with DISM scan in online mode.
Following the completion of these complete system scans, you will be able to utilize System Restore in order to restore the computer to that state when everything was functioning normally. In conclusion, you have the option of doing a full system reset. Also, you can select ‘Keep My Files’ option to save all your desired files/ folders or other data while factory resetting the Windows. This will definitely help you fix the Winget is not recognized error on Windows 10/11 PC.
Winget Not Recognized on Windows 10/11: Fixed
It is possible to handle and manage application packages from terminal with the assistance of Winget, which is an excellent package manager. But, sometimes, you may run into problems related to Winget not detecting. This could be really frustrating. To fix the issue, you should make sure that you have a strong internet connection and check to see if the ‘App Execution Alias’ for Winget is active.
Additionally, you can manually change PATH for Winget, and update App Installer. So, that was all about how to fix Winget not recognized in Windows 10, 11. We hope you found the information shared in this troubleshooting guide helpful. If you have any queries or further tips regarding the same problem, please feel free to drop us a comment in the box below.
Last but not least, you can subscribe to our Newsletter and follow us on Social Media (Facebook, Pinterest, Twitter & Instagram) so you never miss an update.


