How to Blur Photos on iPhone [2022]
Want to know how to blur photos on an iPhone? If yes, then you have come up to the right place. The post highlights the best ways that you can consider for the same.
If you are on social media platforms, you have probably seen the pictures with impressively blurred backgrounds on WhatsApp profiles, Instagram, and other social media channels. In light of the same, learning how to blur pictures on an iPhone usually implies blurring the backdrop so that the main subject (an item or a person) gets the most attention. For that, you don’t have to rely on those big DSLRs to add wonderful or attractive background blur effects to your pictures.
There are different methods to achieve this. Doesn’t matter if you don’t have modern iPhone models, you can even apply the blur effect on older iPhone models. This write-up will walk you through the five best ways that you can use to blur a backdrop of a picture on an iPhone.
5 Different Ways to Blur Photos on iPhone
There are several ways to blur pictures on an iPhone. Without further ado, let’s read them below.
Ways 1: Use Portrait Mode to Blur Photos on iPhone
In order to blur pictures on your iPhone, you do not need to go anywhere else, but through the in-built Portrait Mode on iPhone. This mode allows the camera to create an in-depth field effect, letting you capture pictures with a sharp focus on a blurred background and subject.
Listed below are the following iPhone models that support Portrait Mode:
- iPhone 13, iPhone 12, and iPhone 11 family.
- iPhone SE and iPhone SE3.
- iPhone XR, iPhone XS, and iPhone XS Max.
- iPhone X and iPhone 8 Plus.
- iPhone 7 Plus.
Steps to use Portrait Mode to Blur Picture on iPhone:
Step 1: Open the Camera App on your iPhone. Then, swipe right to left in order to select Portrait mode at the bottom.
Step 2: Next, align your photo, and make sure that the subject is between 2 and 8 feet away from the camera. When the subject is correctly aligned, the portrait lighting effect will turn yellow. After that, tap the Shutter button, and there you have clicked a photo with a blurred background on your iPhone.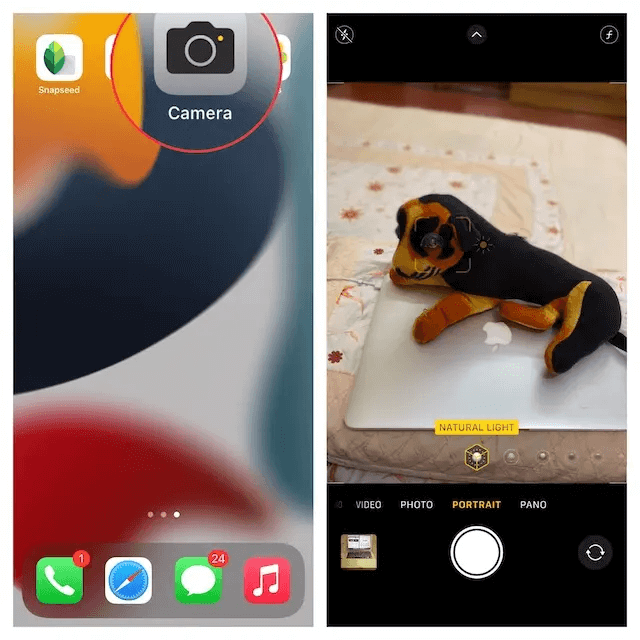
A few things you should consider when capturing a portrait picture on your iOS devices.
- To provide you additional assistance while capturing portrait shots, the camera app notifies you when you’re too close, too far or if the area is excessively dark.
- The iPhone 11, 12, or 13 Pro models come with multiple zoom options for portrait mode like 1X or 2X. You can make a switch between the options just by tapping the respective icon.
- The iPhone SE2 and iPhone XR must recognize an individual’s face to click a picture in portrait mode. Although, they don’t work on inanimate objects.
Also Read: How To Transfer Photos From iPhone To Mac
Way 2: Change Background Blur in Photos on iPhone
On iPhones, one can change the background blur even after capturing a portrait picture. Do you know that? To be more specific, whether you wish your portrait picture to be more appealing or use a different lighting effect, the Photos app can allow you to edit your images with more ease. To do so, simply follow the steps shared below:
Step 1: First of all, launch the Photos app on your iPhone and go to the Portrait Photo you want to edit. Thereafter, tap on Edit at the top right side of the screen.
Step 2: Next, tap the f/number icon on the upper left and use the Depth Control slider that emerges below your picture to alter the blur strength. Do note that a high number reduces the background blur effect, whereas, a low number strengthens the blur effect on iOS devices. Portrait Lighting, Natural Light, Studio Light, Contour Light, Stage Light, Stage Light Mono, High-Key Mono.
Step 3: Once everything is done, tap on the Done button shown on the lower right corner of the screen to save all the recently made changes. Afterward, if you ever wish to revert the modifications, then simply navigate to the picture, Edit > Revert > Revert to Original.
Way 3: Move Closer to your Subject to Get A Blur Effect
What will you do if you do not have the latest iPhone but still wish to blur an image on your iPhone? Don’t panic, there’s an outdated but still helpful tactic that will let you blur the background of a picture on an iPhone. All you need to do is- just go closer to the subject in order to make the background less visible. Yes, you have heard right, it’s that simple and go-to way. The in-built camera generates a short depth of focus when capturing the subject closer. The Depth-Of-Field gets shallower the closer you get to your main subject with your iPhone’s camera. Isn’t it so easy to set your iPhone camera focus?
Also Read: How to Backup iPhone Photos to Google Photos
Way 4: Using a Third-Party Tool to Blur Photo Background on iPhone
Numerous third-party applications can allow you to blur the backdrop of a picture on an iPhone. The blur photo editors let you edit your picture and apply different filters or effects, quite easily & quickly. Some of the best apps to blur the background on the iPhone are:
- Blur Photo Background.
- Blur Photo Plus.
- Focus App.
- QuickBlur.
- Background Eraser.
- Mosaic and Blur Photo Editor.
- DSLR Camera Effect – Blur Photo Background.
Way 5: Bring your Subject in Focus via Blurred Vignette Effect
Last but not least, you can also use the blurred vignette effect in order to blur pictures on your iPhone. Although this effect can’t provide you with the same result as the aforementioned methods, it is something you should give a try at least. Now, you must be wondering, how does this effect work? Isn’t it? Well, it makes a blurred vignette across the edges of the screen rather than blurring the entire background of a picture. As a result, those blurred edges draw your focus towards the subject.
For this purpose, you can use any reliable tool like Snapseed. Developed by Google, Snapseed is a dedicated photo editing application for Android and iOS that allows users to apply digital filters and enhance picture quality. No wonder why it is regarded as one of the best photo editing applications for iOS. Now, let’s have a look at the steps below to know how to use it:
Step 1: Download and install the Snapseed app on your iOS device from the App Store.
Step 2: Open the app on your device and tap on the PLUS icon to launch your photo library. Now, you have two options; either open a picture from your device or just open the last picture. Instead of this, you can also scroll through your gallery to select the picture you wish to edit.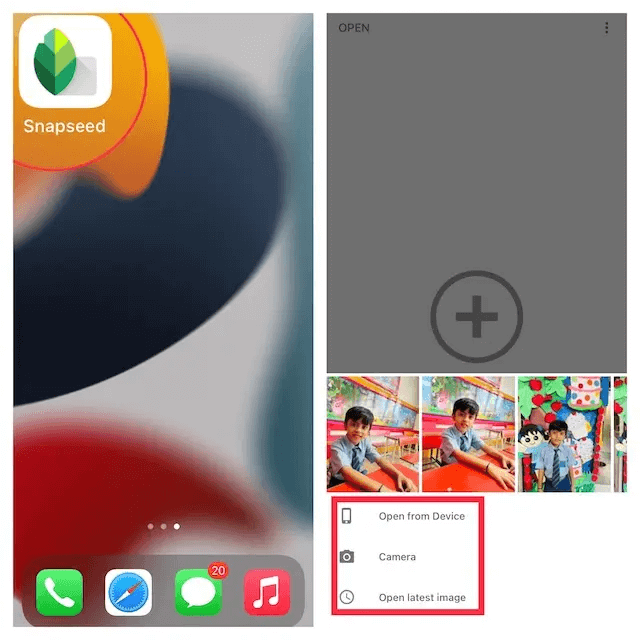
Step 3: After that, head to the Tools tab on the lower side of the screen and choose the Lens Blur option.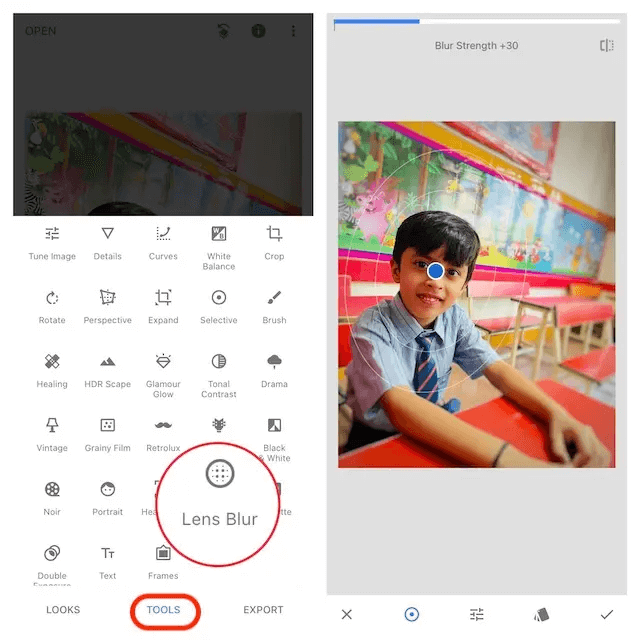
Step 4: Now, you will see a couple of white circles in your selected picture. While the part within the inner circle will be the main focus, and the part outside the circle will be blurred out. Your picture will start getting transitioned from sharp to blur in areas between the 2-circles. Based on your requirements, you can also resize the picture by pinching it with your fingers.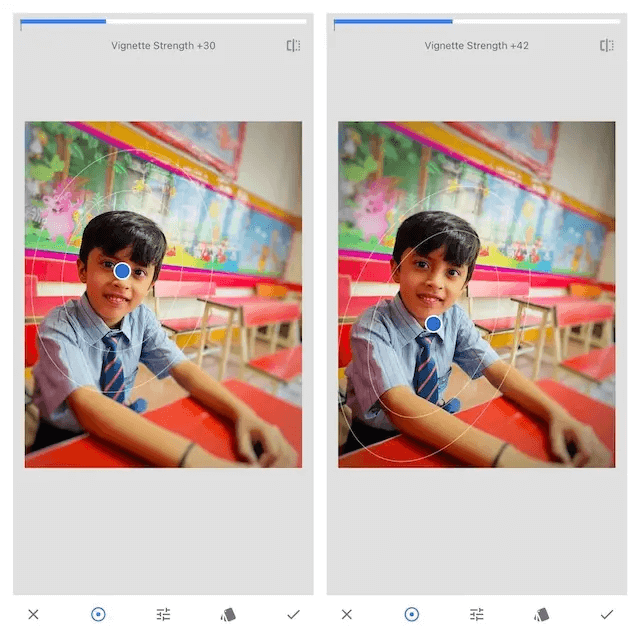
Step 5: Once you’ve completed the process of editing your picture, tap on the checkmark shown in the lower right corner of your screen.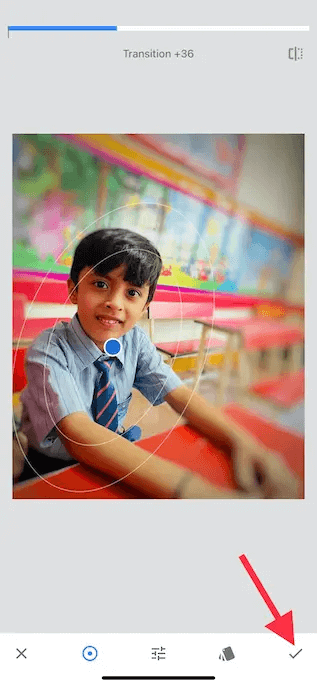
Step 6: Next, tap on Export and select Save a Copy, Save, or Export option depending on your need. And, you are done!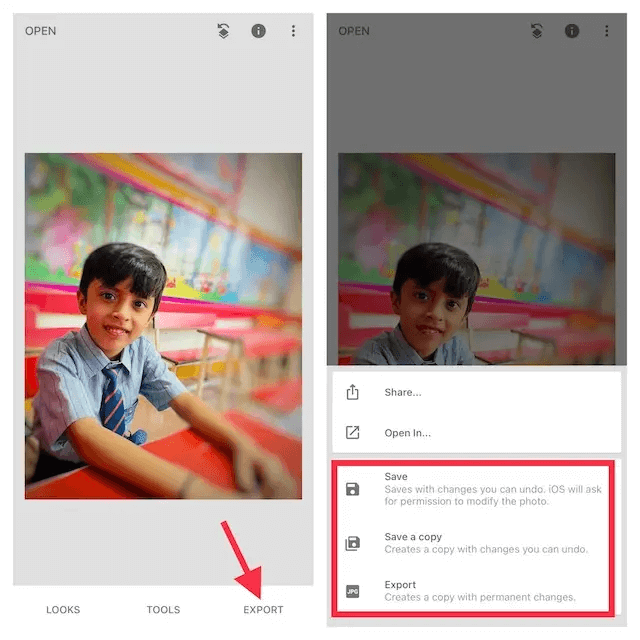
Also Read: How To Compress Photos On iPhone and iPad
Closing Words on How to Blur A Photo On iPhone
So, these were some of the best and easiest methods that you can use to blur photos on your iPhone. However, you can use any of the above approaches to blur Photos on iPhone. In our opinion, the most convenient way to make a realistic blur background in pictures is to use the Portrait mode, which is easily accessible on all iPhones.
Was this guide helpful? Do tell us in the comments box below. Furthermore, you can also drop your suggestions in the comments. Moreover, do subscribe to our Newsletter for regular tech updates and informative articles. Along with this, you can also follow us on Facebook, Twitter, Pinterest, and Instagram.


