How To Fix Internal Microphone is Missing Error on Windows 11 & Older Versions
If your internal microphone is missing or not showing in Windows 11/10, then it is certainly a cause for worry. Take the help of the solutions explained in the article below to make the internal mic discoverable again.
Needless to say, a microphone is one of the common and most useful input devices found in laptops, tablets, and desktop PCs. Starting from recording audio to speaking with people over the internet (e.g., through a voice chat), you always need a built-in microphone. However, recently plenty of users reported that they have received an internal microphone is missing error on Windows 10/11 soon after updating their system through the Windows update module.
After investigating the numerous user reports, we found out a variety of reasons which can be causing the internal microphone not working or missing from the Device Manager problem.
Outdated sound card drivers, incorrect microphone settings, hardware/software issues, and internal audio errors are some of the most common reasons rendering the Windows built-in mic dysfunctional.
In the following segment of this troubleshooting guide, we have elucidated several feasible solutions to help you fix the internal microphone missing or not showing up issue in Windows 10/11.
Solutions to Fix Internal Microphone is Missing Error on Windows 10/11
Is the internal microphone not showing up in Recording devices and Device Manager? Don’t panic. You can try the below-mentioned solutions one by one until the problem is solved.
Solution 1: Update the Audio Driver
If your internal microphone isn’t working properly or missing from the list of devices in Device Manager, then worry not as this is a very common problem that can be resolved easily. The reason behind this issue is driver failure. The audio driver installed in your system can either be corrupted or incompatible which is why you are facing these issues. To resolve all the driver-related issues you can simply update them to the latest compatible version either manually or by using the automatic method.
You can use any method which suits you. Though, we personally recommend our readers to use Bit Driver Updater software instead of the manual method. The reason behind insisting on this software is that it saves a lot of time and effort. Above that user can easily update all the drivers with just a click.
Now if you are worried about the process, then don’t as the process is really simple. Below we have shared the steps for your reference. You can take a look at the steps and then update the audio and all the other drivers of your PC in minutes.
- Download and install ‘Bit Driver Updater’ from the button provided below.
- Run the software and click on the ‘Scan’ button from the home screen
- The software will take few moments in analyzing and checking the drivers of your system
- Once the scan is complete, you will witness a list of drivers which need to be either replaced or repaired. By just simply clicking on the ‘Update Now’ button you can install the latest compatible version of the audio driver.

Also Read: Blue Snowball Microphone Drivers Download for Windows 10, 8, 7
Solution 2: Run the Recording Audio Troubleshooter
Windows operating systems come with a variety of troubleshooting tools to help users diagnose and repair common problems related to the internet connection, sound, keyboard, printer, bluetooth, power, and more.
To resolve the internal microphone is missing error in Windows 11/10, you can try to run the ‘Recording Audio’ troubleshooter. Execute the steps shared below for doing the same.
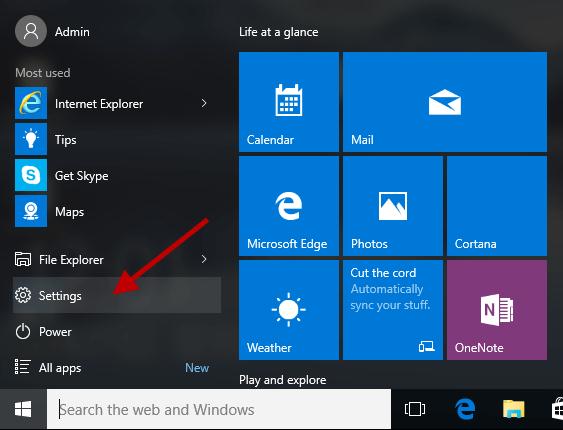
- On your keyboard, press the Windows logo button and then click the gear icon to open the Settings app.
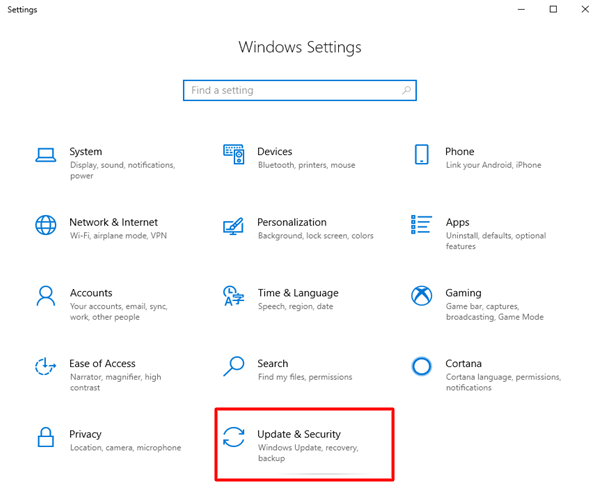
- In the Windows Settings application, look for and select the Update & Security sub-category.
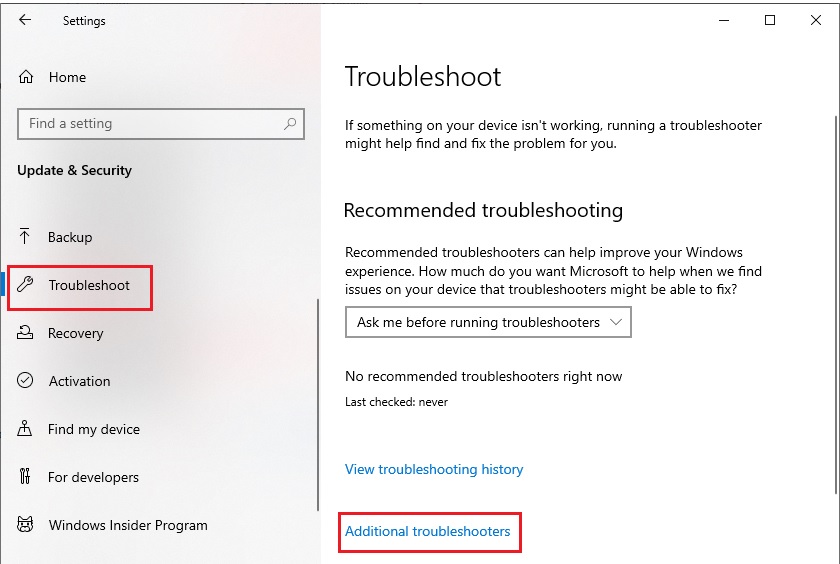
- Now, go to the Troubleshoot tab and select the Additional troubleshooters option from the right side pane.
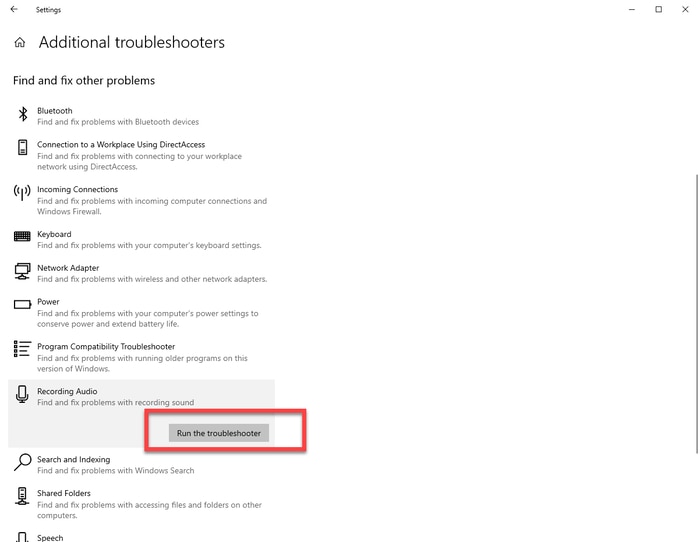
- Next, go to the Find and fix other problems section, click on Recording Audio, and then select the Run the troubleshooter option.
- Wait for the troubleshooting process to complete.
Now check to see if your internet mic not working or showing up issue has been resolved. If not, please move on to the next solution.
Also Read: Download and Update Microphone Driver for Windows 10
Solution 3: Set Your Microphone as the Default Device
You may encounter an internal microphone is missing error on Windows 11/10 if it’s disabled or not set as the default audio device. To re-enable your mic and set it as the default device on your computer, perform the following procedure:
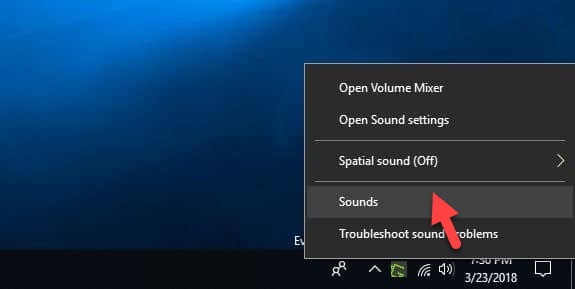
- On the taskbar, go to the lower-right corner of the screen, right-click on the Speakers icon, and then choose the “Sounds” option.
- Next, you have to navigate to the Recording tab, right-click on a blank area, and then tick the “Show Disabled Devices” option.
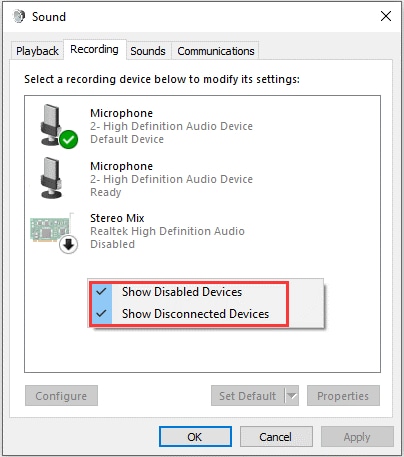
- Right-click on your Microphone device and select the “Enable” option.
- Now right-click your Microphone again and this time choose “Set as Default Device”.
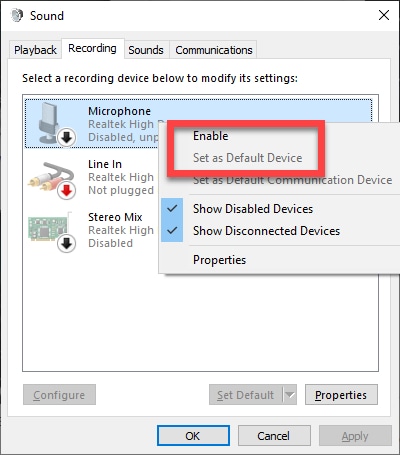
- Click Apply and OK buttons to save the changes.
- If setting your microphone as the default device doesn’t resolve the issue, you can try the next solution.
Also Read: 5 Best Ways to Fix Skype Microphone Not Working Problem On Windows 10
Solution 4: Allow Apps to Access Your Microphone
If you have not allowed your microphone to transmit its sound to applications, you may encounter numerous audio issues in your computer, including the internal mic is missing or not working. To fix this potential problem, you can try to turn on app permissions in Microphone settings. Here’s how to do it:
- Select the Privacy sub-category from the Windows Settings (Win+I) app.
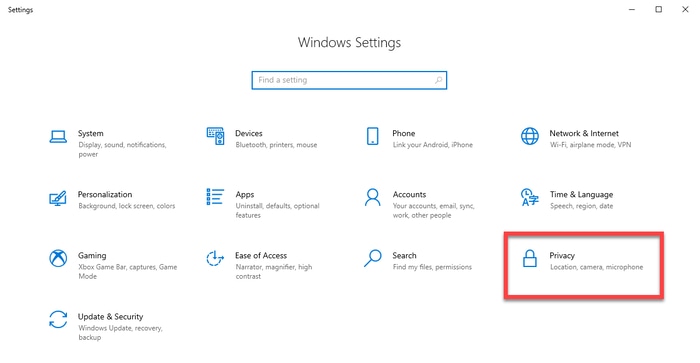
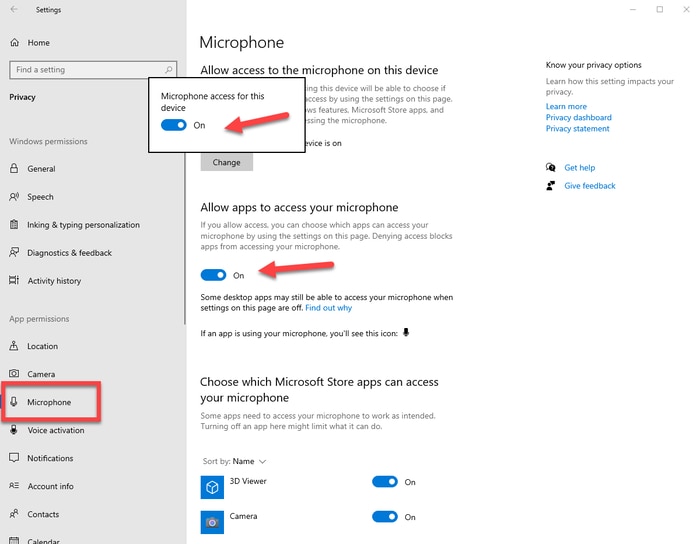
- Go to the App permissions section at the right-hand side panel and select the Microphone option.
- Now first you have to ensure that the Microphone access for this device option is turned on. To do so, click the “Change” button under the Allow access to the microphone on this device section and see if the toggle switch is turned on or off.
- Next, you have to make sure the toggle switch available under the Allow apps to access your microphone option is turned on.
Also Read: Zoom Microphone Not Working on Windows 10 PC {SOLVED}
Concluding Words: Internal Mic Not Working/Not Showing/Missing Problem
We hope you all have fixed the “Internal microphone is missing or not showing” error on Windows 10/11 using the methods listed in this guide. In case you have any questions or require further assistance to solve the problem, then let us know via the comments section below.
Also, if you found the information shared above helpful, then subscribe to our newsletter for more such tech guides.


